
-This post may contain affiliate links-

Another week of Summer Camp Craft Saturdays. We are on to week 5 out of 9, so we are over halfway through. This week we are making boondoggle keychains, which if you are like Napoleon Dynamite you may have made an infinity of them at scout camp.

When I asked on Instagram what crafts you think of when you think of summer camp crafts boondoggle was one of the answers I got the most.

I definitely think that boondoggle is one of the most quintessential summer camp crafts. There are tons of different variation that you can make. For this post I chose to stick with the most basic and common type, the square or box boondoggle. I feel like learning this type gives you a good base to learn others.
These are fun to make right now with kids heading back to school because they are perfect for adding to zippers on backpacks and lunchbags. I know my kids love adding things to their zipper pulls, and these can be made in any color they want.

How to Make Boondoggle Keychains
You will need:
- plastic lacing (I bought mine at Michaels but I can't find it online to link to that exact one)
- keyrings or lanyard clips
- scissors
Instructions:
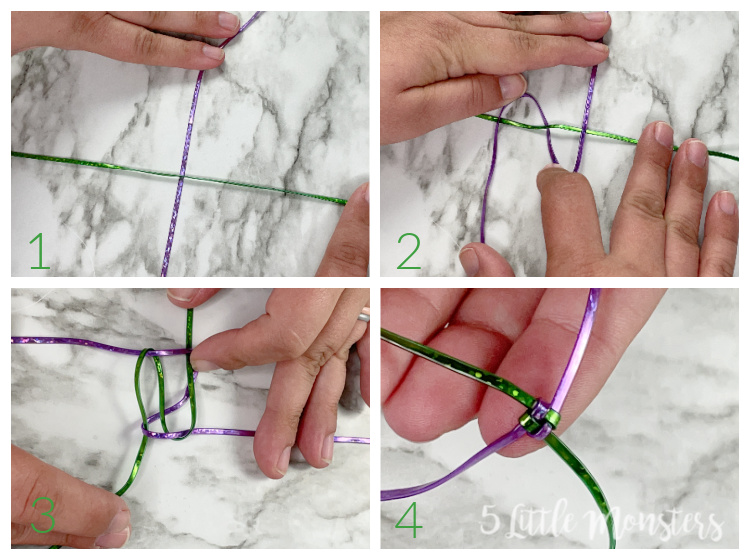
How to begin
Begin with 2 strands or lacing, each about 3 feet long.
Place the two strands down with one on top of the other making a plus sign, crossing at the centers.
Take the strand on the bottom and fold one end over the top of the plus sign, above the center, then do the same with the other but below the center.
Next, take the other strand and place it over and then under the first strand, repeat with the other end, over than under the other side.
Pull all 4 laces tight to secure.
Your first "weave" is finished, this is the hardest part because it is hard to hold onto all of the ends when they are loose. If you find this too difficult there is another way to begin that you may find easier-
*Alternate way to begin*
Find the center of your first lace and wrap twice around your finger.
Thread the other strand under the two loops on your finger so that it is centered under the loops.
Weave one end of the 2nd strand over then under one side, then repeat with the other side.
Gently slide off of your finger and pull to tighten.

Continue Weaving
Flip the each end of one lace over the center square.
Then weave the other lace over and under the first lace with each end.
Pull tight to secure.
Continue repeating this method of weaving until you have the length that you want.

Finish off
To finish off begin by weaving just like each other time, but don't tighten.
Wrap each end around the same color lace next to it, then poke up into the center.
Once you have done this with each end pull the ends to tighten the knot.
Trim the ends to the length that you want.
Add a keyring or lanyard clip to the beginning lace.


No comments :
Post a Comment