
-This post may contain affiliate links-
I grew up in a very crafty house, my mom taught me to make lots of different kinds of crafts, to sew, and crochet, but I still feel like I also have great memories of making crafts at my church girl's camp in the summer, or other activities where we would make simple crafts. There is a certain nostalgia that comes with those summer camp type crafts. I think it is because they are something that most of us probably experienced in some way as a kid and it brings back those memories of childhood, and some of those earliest creative, crafty experiences.

Thinking about that gave me the idea that during the summer it might be fun to revisit some of those nostalgic summer camp crafts and the idea of Summer Camp Craft Saturdays was born. Starting today, and going through the end of August I will share a new summer camp craft tutorial. There will be a total of 9 crafts over the course of 2 months.
To me summer camp crafts are crafts that I remember making as a kid, that are pretty easy for a large range of skill levels, are fairly inexpensive to make, and don't require a ton of supplies or any kind of machine. Other people may think of something else but those are kind of the requirements I gave myself as I was thinking of projects for this series.
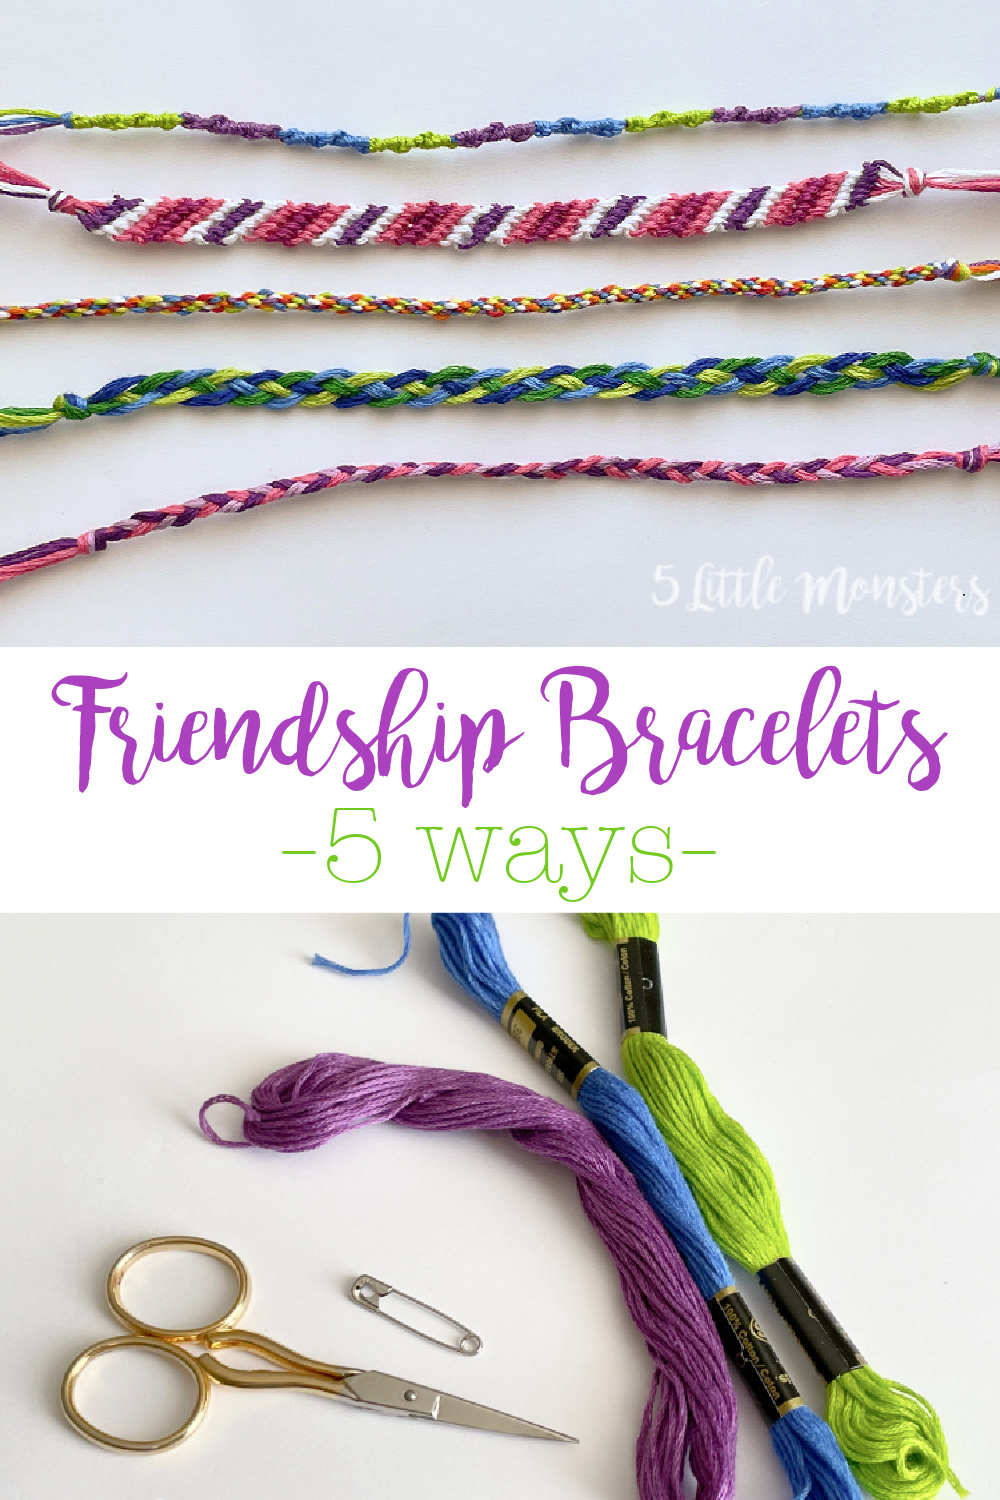
For the first project I decided to do friendship bracelets. To me that is kind of the quintessential summer camp craft. I remember spending plenty of summer days with a bundle of embroidery floss pinned to my pants as I made friendship bracelets in every color of the rainbow.

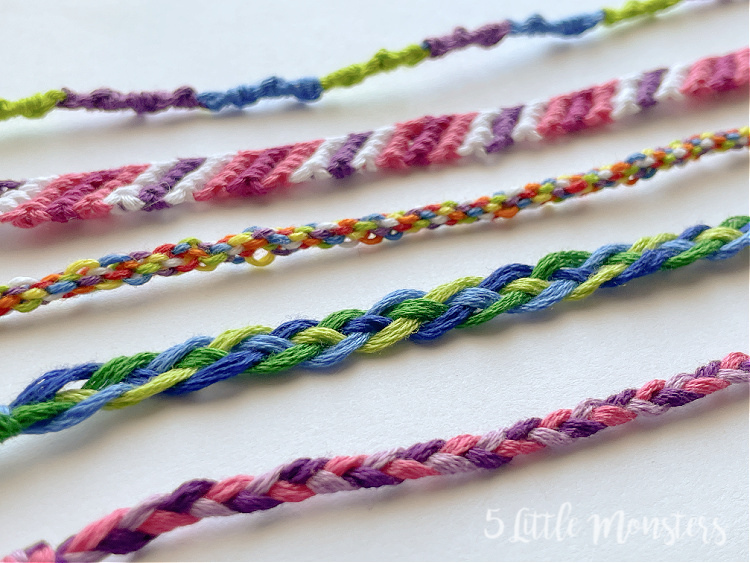
I chose 5 styles to share in this post, and there is a video tutorial showing how to make each one on my YouTube channel (and I will share it here as well). The five styles are:
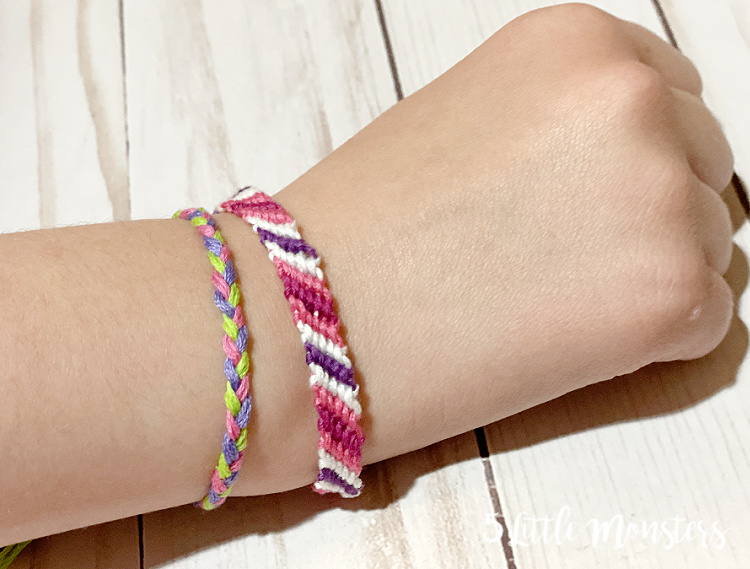
- The Spiral Twist Friendship Bracelet: I think this is one of the most common styles of bracelet, I remember making tones of these as a kid. Colorblocked sections of knots are tied and naturally create a spiral pattern as you make the knots.
- The Flat Friendship Bracelet: This is another one that I remember making as a kid. Knots are tied across the strands to create a flat bracelet. There are different patterns that can be made with this style of bracelet, most common are a diagonal stripe or a chevron pattern. In this tutorial I show how to make the stripe pattern.
- The Jellyfish Bracelet: This bracelet is woven using a simple cardboard loom. I feel like this is one is so simple that even little kids can do it, but it does take a little bit of time for the bracelet to grow long enough.
- 3 Strand Braided Bracelet: I think this is the easiest of all of the bracelets, and by far the quickest to make. It is just a simple 3 strand braid, but it makes a cute bracelet.
- 4 Strand Braided Bracelet: Last we have a twist on the braided bracelet, a 4 strand braid instead of just the traditional 3. You could make a braided bracelet with more strands, but I chose to stick with 3 and 4.
So lets get started-

How to Make Friendship Bracelets 5 Ways
You will need:
- embroidery floss in a variety of colors
- scissors
- safety pin, tape, or clipboard (something to attach your threads to your work surface)
- scrap of cardboard (for the jellyfish bracelet)
Instructions:
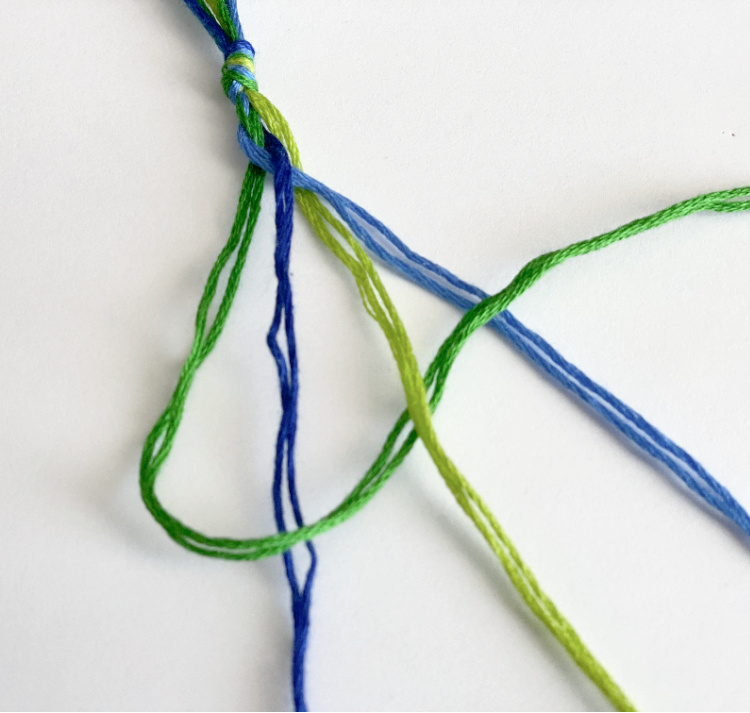
Bracelet #1: The Spiral Twist
For this bracelet there is not a specific number of threads you need, the more threads you use the thicker your bracelet will be. I used 3-4 strands in the bracelets I made, which is probably the minimum number of threads you want. I would recommend between 3-6. Cut your threads longer than you will need, you can always trim at the end. I usually start with a minimum of 18" lengths of thread, sometimes longer, I don't usually measure, just eyeball it but make it a longer than you thing you will need.
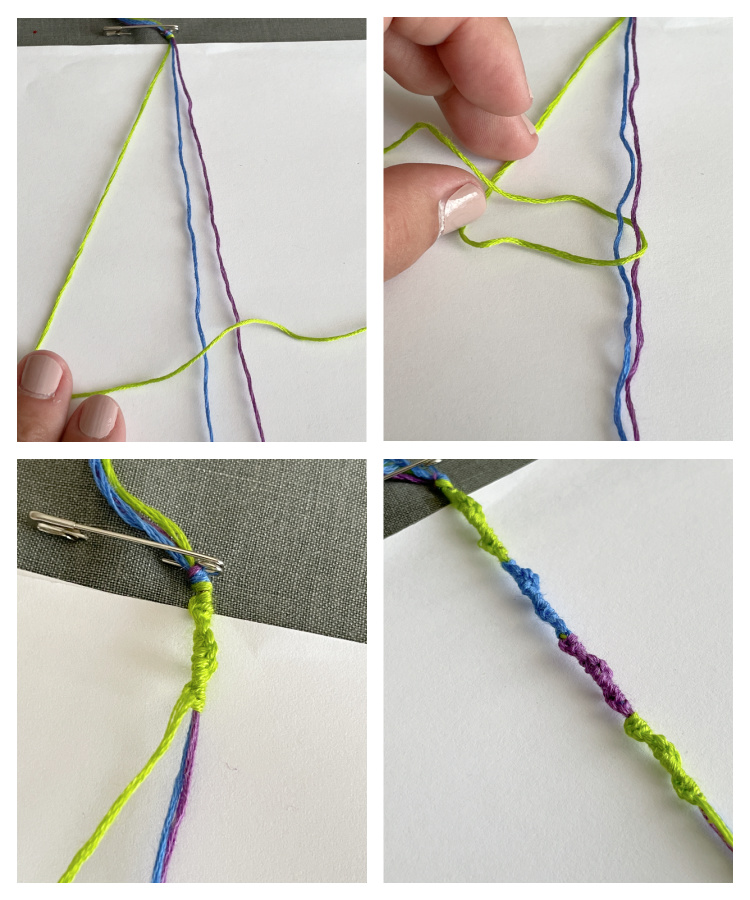
Step 1: Tie your strands together with a knot a couple of inches from the end. Pin, tape, or clip the knotted end onto your work surface.
Step 2: Start with your first strand and make a 4 shape crossing over all of the other strands.
Step 3: Pull the end of your working strand under the other strand and up through the hole in the 4 shape, pull to tighten.
Step 4: Repeat steps 2-3 until you have the number of knots you want in that section. I did 12 knots of each color before switching to the next color. As you work the knits you will see them begin to twist. Make sure you always tie your knot in the same direction in order to keep the twist going in the same way.
Step 5: Switch to a new strand, adding the first strand into the bundle you are working around. Repeat steps 2-4 with the next color. Continue the same pattern switching to a new color every time you complete a section.
Step 6: When you reach the length you want tie a knot at the end of your bracelet, try to get it as close to the end of your knot as possible so everything is nice and secure. Trim the ends leaving a couple of inches after the knot to allow room to tie the bracelet onto the wrist.
Bracelet #2: The Flat Stripe
This bracelet also does not require a specific number of strands but I would recommend 6-8. I used 6 strands in the samples I made. The more strands you use the wider your bracelet will be. Each strand will create a stripe, for wider stripes place two or more strands of the same color next to each other.
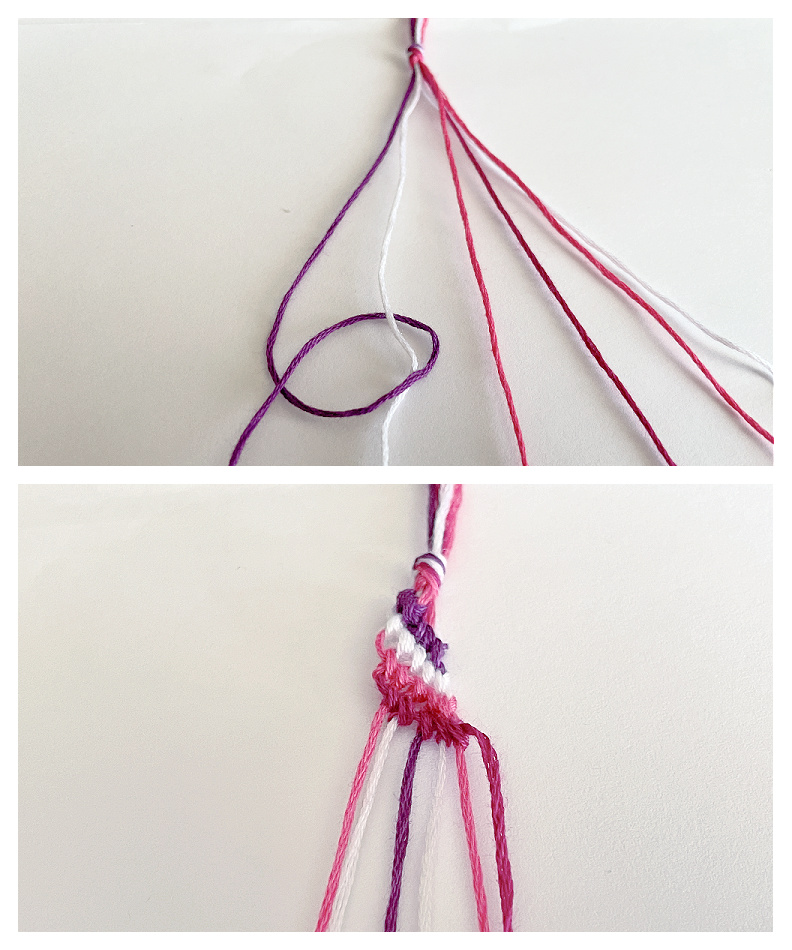
Step 1: Tie your strands together with a knot a couple of inches from the end. Pin, tape, or clip the knotted end onto your work surface.
Step 2: Separate your strands to determine the pattern, you will be working across the strands from left to right.
Step 3: Start with your first strand and make a 4 shape crossing over only the second strand. Pull the end of strand 1 under the strand 2 and up through the hole in the 4 shape, pull to tighten.
Step 4: Repeat step 2, tying a second knot on the same strand (strand 2).
Step 5: Using the same working strand (strand 1) repeat steps 3-4 on the next strand (strand 3) tying 2 knots on that strand.
Step 6: Continue repeating the same steps until you have tied 2 knot on each strand across and your first strand is now in the last position. In the sample I had 6 strands so I continued repeating the 2 knots on strand 4, 5, and 6, ending with strand 1 in the 6th position and strand 2 in the first position.
Step 7: Repeat the above steps using the second strand that is now in the first position, tying 2 knots on each strand until that strand is now at the end.
Step 8: Continue this pattern until you have the length that you want.
Step 9: When you reach the length you want tie a knot at the end of your bracelet, try to get it as close to the end of your knot as possible so everything is nice and secure. Trim the ends leaving a couple of inches after the knot to allow room to tie the bracelet onto the wrist.
Bracelet #3: The Jellyfish
This bracelet is made in a different way then all of the others. Rather then being secured to a work surface and then knotted you will use a cardboard loom to weave the bracelet. You will need 7 strands, each 18"-20" in length.

Step 1: Cut a circle out of cardboard, about 5" in diameter. It doesn't need to be exact or perfect. Then cut 8 slits around the edge of the circle, to do this I usually start by cutting across from each other dividing the circle in half, then into quarters, then cut a slit in between each of those to make 8. Then last, you will need a small hole right in the center of the cardboard circle.
Step 2: Tie your strands together with a knot a couple of inches from the end. Then poke the end down into the circle with the knot sitting in the hole.
Step 3: Put one strand in each slit, you will have one slit left empty.
Step 4: Turn so that the empty slit is in front of you and count 3 strand to the left of the empty slit. Take that strand out of its slit and move it to the empty slit.
Step 5: Count 3 strand to the left of the new empty slit and move that strand into the empty slit.
Step 6: Continue repeating the pattern, moving the strand 3 spots to the left of the empty slit into the empty slit until you reach your desired length.
Step 7: When you reach the length you want tie a knot at the end of your bracelet, try to get it as close to the end of your knot as possible so everything is nice and secure. Trim the ends leaving a couple of inches after the knot to allow room to tie the bracelet onto the wrist.
Bracelet #4: The 3 Strand Braid
This is probably the easiest bracelet of all because most people know how to do a three strand braid. You will want to start with 3 colors but you want 2 strands of each color, to do this you can either cut 2 strands of each or just cut your strands extra long and fold them in half to double each strand.
Step 1: Tie your strands together with a knot a couple of inches from the end. Pin, tape, or clip the knotted end onto your work surface.
Step 2: Pull the left strand over the center strand.
Step 3: Pull the right strand over the center strand.
Step 4: Repeat steps 2-3 until you have the length you want. Make sure that as you work you keep the braid snug but do not pull it tight. You want the braid to lay sort of flat and not be pulled super tight.
Step 5: When you reach the length you want tie a knot at the end of your bracelet, try to get it as close to the end of your braid as possible so everything is nice and secure. Trim the ends leaving a couple of inches after the knot to allow room to tie the bracelet onto the wrist.
Bracelet #5: The 4 Strand Braid
This is a fun twist on a the traditional 3 strand braid. Just like the 3 strand braid you will want to start with 4 colors but you want 2 strands of each color, to do this you can either cut 2 strands of each or just cut your strands extra long and fold them in half to double each strand.
Step 1: Tie your strands together with a knot a couple of inches from the end. Pin, tape, or clip the knotted end onto your work surface.
Step 2: Take the strand on the left and place it over strand 2, under strand 3, over strand 4, and now it will be in the 4th position to begin the next row
Step 3: Using the strand that is now in first position on the left repeat step 2, over, under, over.
Step 4: Continue the pattern repeating step 2 until you have the length that you want. Make sure that as you work you keep the braid snug but do not pull it tight. You want the braid to lay sort of flat and not be pulled super tight.
Step 5: When you reach the length you want tie a knot at the end of your bracelet, try to get it as close to the end of your braid as possible so everything is nice and secure. Trim the ends leaving a couple of inches after the knot to allow room to tie the bracelet onto the wrist.
No comments :
Post a Comment