
-This post may contain affiliate links. As an Amazon affiliate, I earn from qualifying purchases. I receive a small commission at no cost to you when you make a purchase using my link.-
*Ebook with all 12 patterns included available for purchase on Etsy and Ravelry
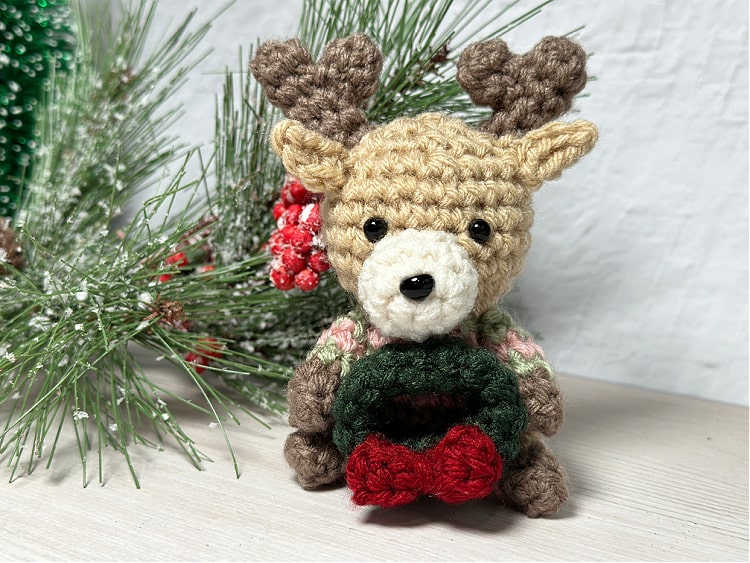
Today we start the second and final week of the Woodland Christmas Mini Amigurumi Crochet Along with Day 7. Today adds another little animal to the set, a cute little deer.

The Delightful Deer is really just a variation of the reindeer from last years set, but I felt like I had to include a little deer in a Christmas set that included forest animals. The biggest changes are that this little deer is wearing a striped sweater instead of a collar with a bell.

I also wanted to add a little extra touch of Christmas so I made a tiny little wreath with a little red bow for the deer to hold in its arms.

I also stitched the legs of this deer on in a sitting position like the other animals, as opposed to standing like the previous reindeer. You can sew them on whichever way you prefer but since the other animals were sitting I just decided to continue with that style.

Similar to the fox the deer has several small pieces to it, thanks to the antlers and the wreath, but the small size still works up pretty fast.

*Ebook with all 12 patterns included available for purchase on Etsy and Ravelry
How to Crochet a Delightful Deer
Finished Size about 4" tall sitting, plus antlers
You will need:
- Worsted weight yarn in tan, cream, brown, green, red, and sweater colors (Sample made with Red Heart Super Saver in Buff, Aran, Hunter Green, and Frosty Green, Loops & Threads Impeccable in Soft Rose and Claret, and Big Twist Value Worsted in Taupe)
- G crochet hook (4/4.25 mm)
- 2- 6mm safety eyes
- 8 or 9 mm safety nose
- stuffing
- yarn needle
- stitch markers
- scissors
Instructions:
All of the pieces, except the ears and the bow, are made in the round beginning with a magic ring, the head and body made in one piece, the arms, legs, antlers, and ears made separately and sewn on. Safety eyes and nose attached where directed, if you choose two embroider the eyes and nose (better for small children) just embroider in the same spot. The sweater is made in stripes, changing color every round. Carry the yarn inside rather than cutting after each round. You can also use just one color for the sweater, just don't change color and work the whole sweater section in the same color.
Body/Head
Make 1 with tan yarn, beginning with magic ring, changing to sweater colors where directed (sample made with Red Heart Super Saver Buff (body), Red Heart Super Saver Frosty Green (color A) and Loops & Threads Impeccable Soft Rose (color B))
Round 1: in mr, ch 1, 6 sc (6 sc)
Round 2: 2 sc in each st (12 sc)
Round 3: [2 sc in first st, 1 sc in next st] repeat around (18 sc)
Round 4: 1 sc in each st (18 sc)
Change to color A
Round 5: 1 sc in each st (18 sc)
Change to color B
Round 6: 1 sc in each st (18 sc)
Change to color A
Round 7: 1 sc in each st (18 sc)
Change to color B
Round 8: 1 sc in each st (18 sc)
Change to color A
Begin stuffing and continue stuffing as you work
Round 9: sc2tog around (9 sc)
Change to tan
Round 10: 2 sc in each st (18 sc)
Round 11: [2 sc in first st, 1 sc in next 2 sts] repeat around (24 sc)
Round 12-15: 1 sc in each st (24 sc)
Round 16: [sc2tog, sc in next 2 sts] repeat around (18 sc)
Insert safety eyes between rounds 13 and 14 about 3-4 stitches apart
Round 17: [sc2tog, sc in next st] repeat around (12 sc)
Round 18: sc2tog around (6 sc)
Finish off, weave in ends
Muzzle
Make 1 with cream yarn, beginning with magic ring
Round 1: in mr, ch 1, 6 sc (6 sc)
Round 2: 2 sc in each st (12 sc)
Round 3: 1 sc in each st (12 sc)
Finish off and cut yarn leaving long tail for sewing
Attach safety nose to muzzle
Add a tiny bit of stuffing and sew to head below eyes
Ears
Make 2 with tan yarn
ch 3
sl st in first ch from hook, sc in next st, hdc in last st
Finish off leaving long tail for sewing
Antlers
Make 2 of each piece (2 pieces for each antler) with brown yarn, beginning with magic ring
Piece 1 (main part of antler)
Round 1: in mr, ch 1, 6 sc (6 sc)
Round 2-5: 1 sc in each st (6 sc)
Finish off and cut yarn leaving long tail for sewing
Piece 2 (antler branch)
Round 1: in mr, ch 1, 6 sc (6 sc)
Round 2: 1 sc in each st (6 sc)
Finish off and cut yarn leaving long tail for sewing
Sew piece 2 onto the side of piece 1 (this will make a y shaped antler)
Sew the antlers to the top of the head
Sew the ears to the head, slightly in front of and to the outside of the antlers
Arms
Make 2 starting with brown yarn, begin with magic ring, changing to sweater colors where directed
Round 1: in mr, ch 1, 6 sc, sl st to first sc (6 sc)
Round 2: 1 sc in blo of each st (6 sc)
Switch to color A
Round 3: 1 sc in each st (6 sc)
Switch to color B
Round 4: 1 sc in each st (6 sc)
Switch to color A
Round 5: 1 sc in each st (6 sc)
Finish off and cut yarn leaving a long tail for sewing
Sew the arms to the side of the body angled slightly out to hold the wreath
Legs
Make 2 starting with brown yarn, begin with magic ring
Round 1: in mr, ch 1, 6 sc, sl st to first sc (6 sc)
Round 2: 1 sc in blo of each st (6 sc)
Switch to tan yarn
Round 3-5: 1 sc in each st (6 sc)
Finish off and cut yarn leaving a long tail for sewing
Sew the legs to the bottom of the body either in a standing or sitting position, whichever you prefer.
Wreath
Make 1 with green yarn, beginning with magic ring
Round 1: in mr, ch 1, 6 sc (6 sc)
Round 2-14: 1 sc in each st (6 sc)
Finish off and cut yarn, leaving long tail for sewing
Sew the ends of the wreath together to make a ring, leave extra tail for sewing to the deer
Bow
Make 1 with red yarn, beginning with a ch
ch 12
turn, skip first 2 ch from hook, hdc in each ch to the end (10 hdc)
Finish off leaving long tail for sewing
Fold the ends of the bow strip to the center, stitch in place, wrap end around the center a few times to make the center of the bow, stitch the bow to the front of the wreath
Using the wreath tail sew the wreath into the hands of the deer

These are absolutely adorable. I look forward to getting them made as soon as I catch up on some of my WIPs.
ReplyDelete