
-This post is sponsored by Fairfield World, all ideas and opinions are my own-

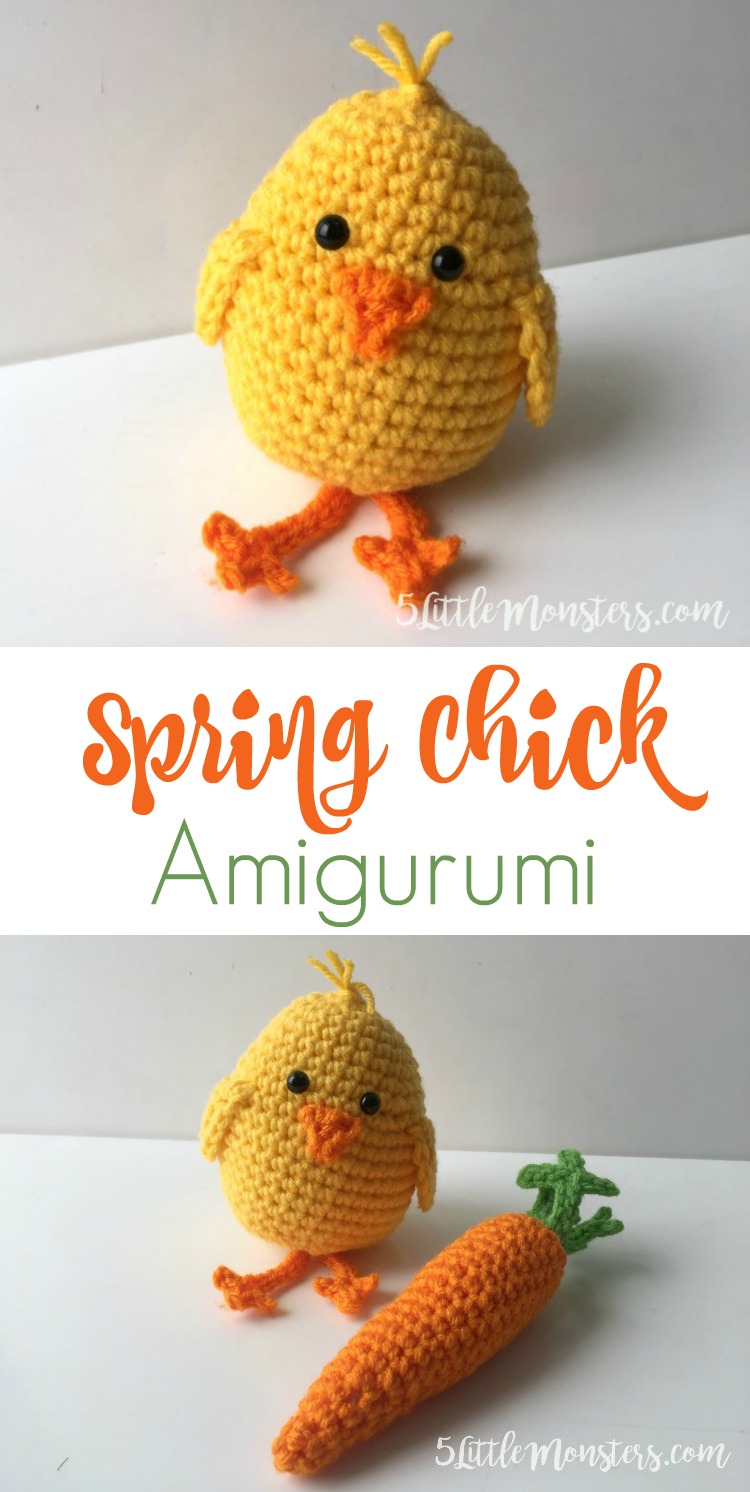
I can't believe that March is just a few days away and that means that spring is right around the corner. We have had some nice spring-ish days lately and that has made me really excited for spring. Of course this morning we got several inches of snow so obviously the spring weather is not yet here to stay. When I think of spring I think of Easter and everything that is associated with that, bunnies and chicks, carrots and Easter baskets, etc. I decided to make a couple little crochet projects for spring. I made a little baby chick and a carrot. Today I will be sharing the baby chick pattern and the carrot will be available on the Fairfield World site in a couple of days.

The idea for this little chick actually came from an Easter project I made a couple of years ago, Easter egg covers that fit over plastic eggs. I thought they were a really fun project to make and this chick is based off of the the little chick that I made as part of that set. I made the shape similar but made it bigger and stuffed it and closed off the bottom. I added a little face, wings and feet to finish.

How to Crochet a Spring Chick Amigurumi
You will need:
- worsted weight yarn in yellow and orange (I used Lion Brand DIYarn in yellow and Red Heart Super Saver in Pumpkin)
- G crochet hook
- 9 mm safety eyes
- yarn needle
Instructions:
Body
The chick is made starting with a magic ring and working in a continuous spiral
Round 1: in mr, ch 1, 6 sc (6 sc)
Round 2: 2 sc in each stitch (12 sc)
Round 3: [1 sc in first stitch, 2 sc in next stitch] repeat around (18 sc)
Round 4: [1 sc in next 5 stitches, 2 sc in next stitch] repeat around (21 sc)
Round 5: [1 sc in next 6 stitches, 2 sc in next stitch] repeat around (24 sc)
Round 6: [1 sc in next 7 stitches, 2 sc in next stitch] repeat around (27 sc)
Round 7: [1 sc in next 8 stitches, 2 sc in next stitch] repeat around (30 sc)
Round 8: [1 sc in next 9 stitches, 2 sc in next stitch] repeat around (33 sc)
Round 9: [1 sc in next 10 stitches, 2 sc in next stitch] repeat around (36 sc)
Round 10-17: 1 sc in each stitch around (36 sc)
Begin stuffing and add safety eyes about 8 rows down
Continue stuffing as you work
Round 18: [sc2tog, sc in next 4 stitches] repeat around (30 sc)
Round 19: [sc2tog, sc in next 3 stitches] repeat around (24 sc)
Round 20: [sc2tog, sc in next 2 stitches] repeat around (18 sc)
Round 21: [sc2tog, sc in next stitch] repeat around (12 sc)
Round 22: sc2tog around (6 sc)
Finish off, cut yarn and weave around last round to tighten up the stitches.

Wings
begin with magic ring but you will be turning after each row instead of working in the round
Row 1: in mr ch 1, 5 sc (5 sc)
Row 2: ch 1, turn, sc in first stitch, 2 hdc in next, 3 dc in next, 2 hdc in next, s in last stitch (9 stitches)
Row 3: ch 1, turn, 1 sc in first 3 stitches, 2 sc in each of the next 3 stitches. 1 sc in next 3 stitches (12 sc)
Finish off leaving long end for sewing.
Row 2: ch 1, turn, sc in first stitch, 2 hdc in next, 3 dc in next, 2 hdc in next, s in last stitch (9 stitches)
Row 3: ch 1, turn, 1 sc in first 3 stitches, 2 sc in each of the next 3 stitches. 1 sc in next 3 stitches (12 sc)
Finish off leaving long end for sewing.

Beak
with orange yarn
ch 3
slip stitch in first ch, sc in next, dc in last ch
cut yarn, leaving long end for sewing
Feet
with orange yarn
[ch 10, slip stitch in 2, ch, 2, slip stitch in those 2, ch 2, slip stitch in those 2, slip stitch in 8 remaining ch from original ch] repeat for second foot
cut yarn, leaving long end for sewing.

Assembly
Stitch the beak under the eyes, stitch the wings to the side, stitch the legs to the bottom of the body
Cut two pieces of yarn about 4-6" long and attach to the top of the head with a larksfoot knot, trim down to desired length
No comments :
Post a Comment