
-This post may contain affiliate links-
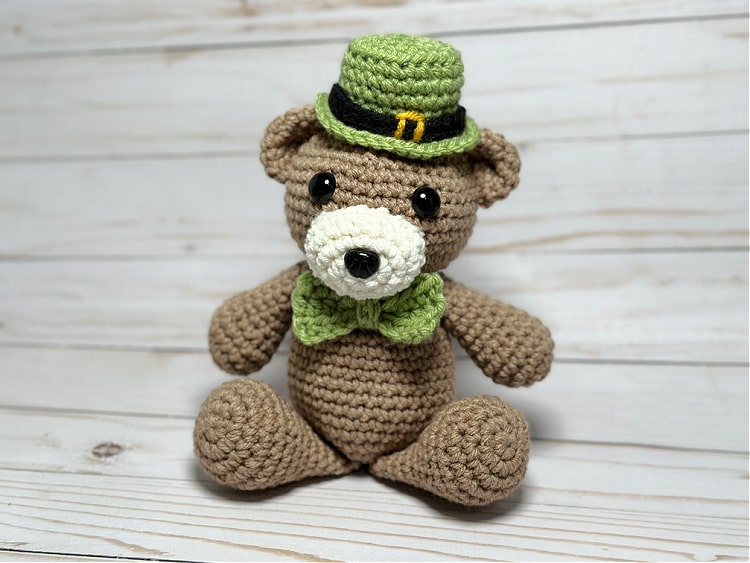
Over the last year and a half or so I started making some crocheted teddy bears dressed up for different holidays. I thought it would be really fun to make some for all of the holidays and seasons, but so far I have only gotten a few done. I decided maybe it was time to get around to making another, and with St. Patrick's Day coming up in a few weeks I thought a little leprechaun bear would be fun.

As I was coming up with the design to make this bear I went back and forth a little bit how complicated I wanted to make his little outfit to turn him into a leprechaun, but in the end I decided on keeping it super simple with just a little leprechaun hat and a green bow tie.

These holiday bears are all made in the same size, mostly following the same basic pattern. I do have 2 different options, one is my regular bear pattern, which is used for both this leprechaun bear and the grad bear. The pumpkin and Santa bears are made using an almost identical pattern, except they have rounder, fatter bodies. I chose the rounder bodies for those 2 because of the look I wanted for those 2 bears, a round pumpkin and a chubby Santa. But the heads, arms, legs, ears, etc. are the same on all of them so they work together as a set. I hope to continue to add to these holiday bears over time.

How to Crochet a Leprechaun Bear
Finished Size 7" tall to the top of head when sitting (8+" to the top of the hat)
You will need:
- worsted weight yarn in brown, cream, green, and black, and a tiny bit of yellow, Sample made with:
- Loops & Threads Impeccable, Soft Taupe
- Loops & Threads Impeccable, Aran
- Loops & Threads Impeccable, Fern
- Red Heart Super Saver, Black
- Red Heart Super Saver, Saffron
- G crochet hook
- Safety nose, 12 mm
- Safety eyes, 14 mm
- Polyfil fiberfill
- Poly Pellets, weighted stuffing beads
- nylon knee-high, or scrap of fabric
- yarn needle
- scissors
Instructions:
Weighted Base
First make your Poly Pellet insert by either taking a nylon and filling the toe with Poly Pellets, then tie a knot and cut off the excess (this is my favorite way) or cut a circle out of a scrap of fabric, stitch a running stitch around the outside, pull to cinch, fill, and stitch closed. (How to Make a Weighted Base)The body and head are made in one piece, from the bottom up, the other pieces are made separately and sewn on at the end. All parts except the hat band and bow tie are made starting with the magic ring.
Body and Head
Begin with magic ring, using brown yarn
Round 1: in mr, ch 1, 6 sc (6 sc)
Round 2: 2 sc in each st (12 sc)
Round 3: [2 sc in first st, 1 sc in next st] repeat around (18 sc)
Round 4: [2 sc in first st, 1 sc in next 2 sts] repeat around (24 sc)
Round 5: [2 sc in first st, 1 sc in next 3 sts] repeat around (30 sc)
Round 6: [2 sc in first st, 1 sc in next 4 sts] repeat around (36 sc)
Round 7: 1 sc in each st (36 sc)
Round 8: 1 sc in each st (36 sc)
Round 9: 1 sc in each st (36 sc)
Round 10: 1 sc in each st (36 sc)
Round 11: 1 sc in each st (36 sc)
Round 12: 1 sc in each st (36 sc)
Round 13: 1 sc in each st (36 sc)
Round 14: 1 sc in each st (36 sc)
Round 15: 1 sc in each st (36 sc)
Insert the weighted base into the bottom of the body
Round 16: [sc2tog, 1 sc in next 4 sts] repeat around (30 sc)
Round 16: [sc2tog, 1 sc in next 4 sts] repeat around (30 sc)
Round 17: 1 sc in each st (30 sc)
Round 18: 1 sc in each st (30 sc)
Round 19: [sc2tog, 1 sc in next 3 sts] repeat around (24 sc)
Round 20: [sc2tog, 1 sc in next 2 sts] repeat around (18 sc)
This is the end of the body portion, begin stuffing and continue to stuff as you work
Round 21: 2 sc in each st (36 sc)
Round 22: [2 sc in first st, 1 sc in next 5 st] repeat around (42 sc)
Round 23: 1 sc in each st (42 sc)
Round 24: 1 sc in each st (42 sc)
Round 25: 1 sc in each st (42 sc)
Round 26: 1 sc in each st (42 sc)
Round 27: 1 sc in each st (42 sc)
Round 28: 1 sc in each st (42 sc)
Round 29: 1 sc in each st (42 sc)
Round 30: [sc2tog, 1 sc in next 5 sts] repeat around (36 sc)
Insert Safety Eyes between rows 27 and 28, about 5 or 6 stitches apart
Round 31: [sc2tog, 1 sc in next 4 sts] repeat around (30 sc)
Round 32: [sc2tog, 1 sc in next 3 sts] repeat around (24 sc)
Round 33: [sc2tog, 1 sc in next 2 sts] repeat around (18 sc)
Round 34: [sc2tog, 1 sc in next st] repeat around (12 sc)
Round 35: sc2tog around (6 sc)
Finish off, weave around opening to close, weave in end
Arms (make 2)
Begin with magic ring, using brown yarn
Round 1: in mr, ch 1, 6 sc (6 sc)
Round 2: 2 sc in each st (12 sc)
Round 3: [2 sc in first st, 1 sc in next st] repeat around (18 sc)
Round 4: 1 sc in each st (18 sc)
Round 5: 1 sc in each st (18 sc)
Round 6: [sc2tog, 1 sc in next st] repeat around (12 sc)Round 7: 1 sc in each st (12 sc)
Round 8: 1 sc in each st (12 sc)
Round 9: 1 sc in each st (12 sc)
Round 10: 1 sc in each st (12 sc)
Round 11: 1 sc in each st (12 sc)
Round 12: 1 sc in each st (12 sc)
Finish off and cut yarn leaving a long tail for sewing
Legs (make 2)
Begin with magic ring, using brown yarn
Round 1: in mr, ch 1, 6 sc (6 sc)
Round 2: 2 sc in each st (12 sc)
Round 3: [2 sc in first st, 1 sc in next st] repeat around (18 sc)
Round 4: [2 sc in first st, 1 sc in next 2 sts] repeat around (24 sc)
Round 5: 1 sc in each st (24 sc)
Round 6: 1 sc in each st (24 sc)
Round 7: [sc2tog, 1 sc in next 2 sts] repeat around (18 sc)
Round 8: 1 sc in each st (18 sc)
Round 9: 1 sc in each st (18 sc)
Round 10: 1 sc in each st (18 sc)
Round 11: 1 sc in each st (18 sc)
Round 12: 1 sc in each st (18 sc)
Round 13: 1 sc in each st (18 sc)
Finish off and cut yarn leaving a long tail for sewing
Ears (make 2)
Begin with magic ring, using brown yarn
Round 1: in mr, ch 1, 6 sc (6 sc)
Round 2: 2 sc in each st (12 sc)
Round 3: [2 sc in first st, 1 sc in next 3] repeat around (15 sc)
Round 4: 1 sc in each st (15 sc)
Finish off and cut yarn leaving long tail for sewing
Muzzle
Begin with magic ring, using cream yarn
Round 1: in mr, ch 1, 6 sc (6 sc)
Round 2: [3 sc in first st, 1 sc in next 2 sts] repeat (10 sc)
Round 3: [2 sc in each of the next 3 sts, 1 sc in next 2 sts] repeat (16 sc)
Round 4: 1 sc in first 2 sts, 2 sc in each of next 2 sts, 1 sc in next 6 sts, 2 sc in each of next 2 sts, 1 sc in next 4 sts (20 sc)
Round 5: 1 sc in each st (20 sc)
Finish off and cut yarn leaving long tail for sewing, add safety nose just above the center of the muzzle
Begin with magic ring, using green yarn
Round 1: in mr, ch 1, 6 sc (6 sc)
Round 2: 2 sc in each st (12 sc)
Round 3: [2 sc in first st, 1 sc in next st] repeat around (18 sc)
Round 4: [2 sc in first st, 1 sc in next 2 sts] repeat around (24 sc)
Round 5: 1 sc in blo of each st (24 sc)
Round 4: 1 sc in first 2 sts, 2 sc in each of next 2 sts, 1 sc in next 6 sts, 2 sc in each of next 2 sts, 1 sc in next 4 sts (20 sc)
Round 5: 1 sc in each st (20 sc)
Finish off and cut yarn leaving long tail for sewing, add safety nose just above the center of the muzzle
Hat
Begin with magic ring, using green yarn
Round 1: in mr, ch 1, 6 sc (6 sc)
Round 2: 2 sc in each st (12 sc)
Round 3: [2 sc in first st, 1 sc in next st] repeat around (18 sc)
Round 4: [2 sc in first st, 1 sc in next 2 sts] repeat around (24 sc)
Round 5: 1 sc in blo of each st (24 sc)
Round 6: 1 sc in each st (24 sc)
Round 7: 1 sc in each st (24 sc)
Round 8: 1 sc in each st (24 sc)
Round 9: 1 sc in each st (24 sc)
Round 10: work in flo for this entire round [2 sc in first st, 1 sc in next 3 sts] repeat around
Round 11: [2 sc in first st, 1 sc in next 4 sts] repeat around
finish off, cut yarn leaving long tail for sewing
Hat Band
Make 1 with black yarn
ch 26
Row 1: turn, sc in second ch from hook and each ch to the end
Finish off, cut yarn leaving tail for sewing
Wrap the band around the hat and stitch in place to secure
Use yellow yarn to stitch a square around the hat band in the front of the hat (this will also help secure the band to the hat even more.
Bow Tie
Make 1 with green yarn
ch 11
Row 1: turn, hdc in 3rd ch from hook, hdc in each ch to the end (9 hdc)
Row 2: ch 2, turn, hdc in each st (9 hdc)
Row 3: ch 2, turn, hdc in each st (9 hdc)
Finish off, weave in ends
Make Bow Center with green yarn-
ch 7
Row 1: turn, sc in second ch from hook, sc in each st to the end (6 sc)
Finish off and cut yarn leaving long tail for sewing
Scrunch the middle of the bow and wrap the center piece around the middle, stitch center piece in place leaving the tail long for stitching onto the bear
Assembly
Add stuffing to the muzzle and stitch onto the head below the eyes
Flatten the ears and sew to the side of the head towards the top in a curved position
Add stuffing to the ends of the arms, then stitch the arms to the side of the body
Add stuffing to the ends of the legs and stitch in place on the bottom of the bear, I stitched mine in a sitting position because I wanted my bear to sit, but you can also sew them more to the side in a standing position
Stuff the top of the hat and sew to the top of the head in-between the ears
Stitch the bow tie in place on the body, just below the muzzle

No comments :
Post a Comment