
This shop has been compensated by Collective Bias, Inc. and its advertiser. All opinions are mine alone. #SKSHarvest #SeasonalSolutions #CollectiveBias

It is canning season so jars are everywhere right now. I don't can but I do enjoy crafting with jars. There are so many ways you can use jars besides canning; as storage and organization, as decor, centerpieces, and so many more. You can paint them, fill them, or make a crochet cover to put on them which is what I decided to do.

We have been moving our office downstairs and I wanted to put together a part of the office as a homework area for the kids. It seems like when it is time do to homework no one can ever find pencils, or crayons, or whatever else they may need. I thought it would be good to create a little area where the kids can sit and do their homework and have everything they need right there so that, hopefully, they will put it back when they are done and they will be right there the next day too. We will have to wait and see if it actually works but it is my attempt at getting more organized.
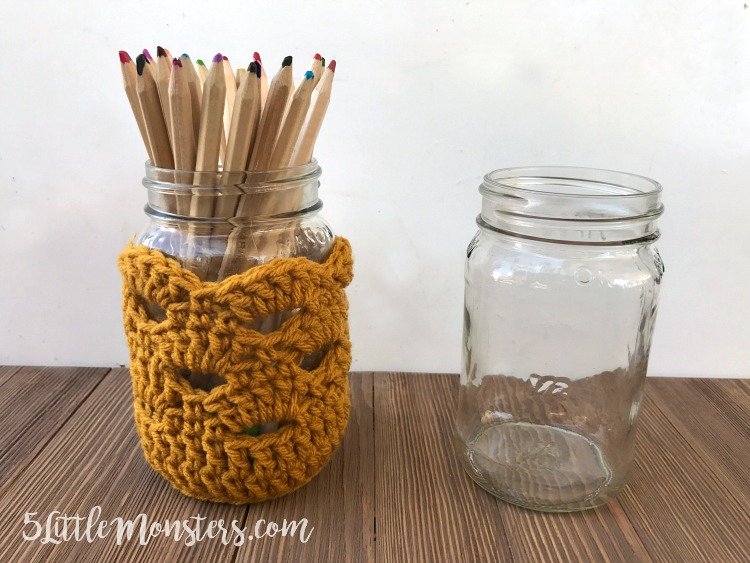
I ordered my jars online from SKS Bottle and Packaging, they have thousands of diffrent styles of clear and colored glass jars and glass and plastic containers, but I wanted plain glass mason jars so I ordered the SKS Clear Glass Mason Jars in the 16 oz (pint) size. You can hover over the image above to see the jars I ordered. They are also available in a 25 oz size but I felt like the smaller size would work best for what I needed. You can order the mason jars with or withour a 2 piece silver canning lid. For this project I could have ordered them without the lid but they came in a box of 12 and I thought that for future projects I may prefer to have the lid so I went ahead and ordered with the lids.

I crocheted a simple cover to put over the bottom of my jars to make them a little prettier, plus I thought it would protect them a little since I am planning on them being used by my kids. They were really quick and easy to make. I used the arcade stitch on the sides to make it a little bit prettier. I chose fall colors to make my cover partially because I had just finished another project and had those colors out, but I also really like fall colors and I am ready for fall to be here. There are lots of ways you could use these jars. I think they would be really great as a way to hold utensils at a fall dinner, or even Thanksgiving if you serve it buffet style.

How to Make Crocheted Jar Covers
Finished size: fits 16 oz Mason Jar
You will need:
- 16 oz SKS Clear Glass Mason Jars
- Worsted Weight Yarn in Desired Colors
- H Crochet Hook
- Scissors
- Yarn Needle
Instructions:
Begin with a magic ring
Round 1: in mr, ch 2 (does not count as stitch), 10 dc, sl st to first dc (10 dc)
Round 2: ch 2, 2 dc in each stitch, sl st to first dc (20 dc)
Round 3: ch 2, [2 sc in first stitch, 1 sc in next] repeat around, sl st to first sc (30 dc)
At this point your circle should be about the same size as the bottom of your jar or a tiny bit larger

Round 4: ch 2, dc in blo of each stitch around (30 dc)
Round 5: ch 2, 1 dc in each stitch around (30 dc)
Round 6: ch 1, sc in first 2 stitches, ch 3, skip 3 stitches, [sc in next 3 stitches, ch 3, skip 3 stitches] repeat around, 1 sc in last stitch, sl st to first sc to join (15 sc, 5 ch spaces)
Round 7: ch 1, sc in first stitch (center sc of previous row), work 5 dc in next ch space, [sc in center stitch of next 3 sc group, 5 dc in next ch sp] repeat around, sl st to first sc to join (5 shells)
Round 8: sl st in next 2 stitches so that you have skipped the next sc and first dc of the shell, ch 1, sc in next 3 stitches (center 3 of dc shell), ch 3, skip 3, [sc in next 3 stitches, ch 3, sk 3] repeat around, join with slip st to first sc (15 sc, 5 ch spaces)
Round 9: sl st in next stitch so that you can begin the row in the center sc, ch 1, sc in first stitch (center sc of previous row), work 5 dc in next ch space, [sc in center stitch of next 3 sc group, 5 dc in next ch sp] repeat around, sl st to first sc to join (5 shells)
Round 10: sl st in next 2 stitches so that you have skipped the next sc and first dc of the shell, ch 1, sc in next 3 stitches (center 3 of dc shell), ch 3, skip 3, [sc in next 3 stitches, ch 3, sk 3] repeat around, join with slip st to first sc (15 sc, 5 ch spaces)
Round 11: sl st in next stitch so that you can begin the row in the center sc, ch 1, sc in first stitch (center sc of previous row), work 5 dc in next ch space, [sc in center stitch of next 3 sc group, 5 dc in next ch sp] repeat around, sl st to first sc to join (5 shells)
Finish off and weave in ends

These are so pretty! And they'd make SUCH a great gift. Love this idea! [client]
ReplyDelete