
-This post may contain affiliate links-
How is it possible that it is already June? This year feels like it is absolutely flying by. Summer break is here, yesterday and today are my kids last days of school. It seems crazy that the year is almost half over. But with another year comes another Team Creative Crafts collaboration and this month the theme is pets/animals.
One of the things I enjoy about these collaborations is that they always challenge me a little bit to make something I may not have otherwise thought of, and this theme was definitely a bit challenging for me. The truth is I am not really a pet person. My kids have been begging us for years to get a pet, usually they ask for a dog, but I know cat and bunny have both been thrown out there as well, but I am just not a pet person. So when I saw the theme was pets I had no idea what I was going to do.

I immediately thought of crafts you could make for a pet, like pet beds, collars, dishes, stuff like that, and I had no idea where to even begin with something like that. Since I don't have a pet I don't really know what they need, how big to make stuff, or how to go about making something for them.

Then as I thought about the theme a little more I realized I could make a project about pets, not for them. I felt like that was something a little more in my wheelhouse. So I started coming up with ideas for that.

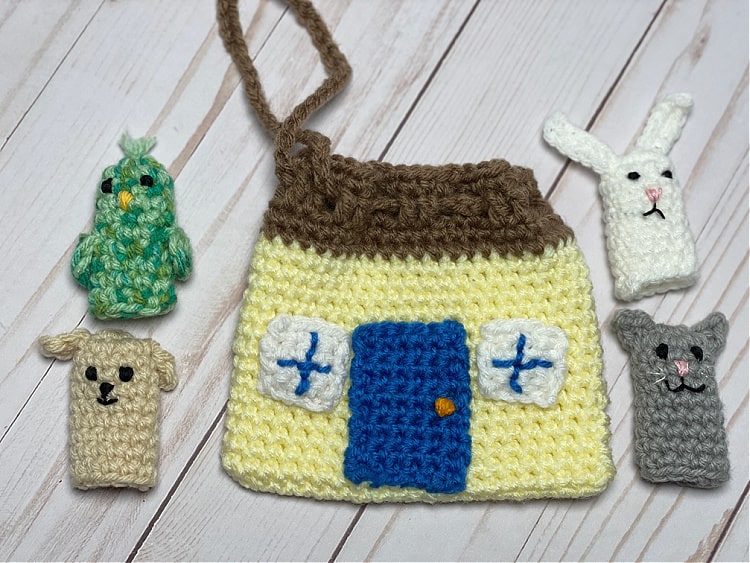
A couple of years ago I made a farm animal finger puppet set that included 4 farm animal finger puppets, and a little barn shaped drawstring bag to hold them. I decided to use that idea, but switch it up a little to fit with the pets theme.

Instead of a barn I turned the drawstring carrying bag into a little house, since that is where the pets live. Then I made 4 finger puppets in the shapes of animals that are common pets, a dog, a cat, a bunny, and a bird.

All of the finger puppets, in both sets, are made using the same base finger puppet pattern, with ears, faces, and other things added to turn them into animal. The bags are also made in the same way, just the details are a little bit different to turn it into a house.
Be sure to go check out all of the pets themed projects shared this week by Team Creative Crafts.
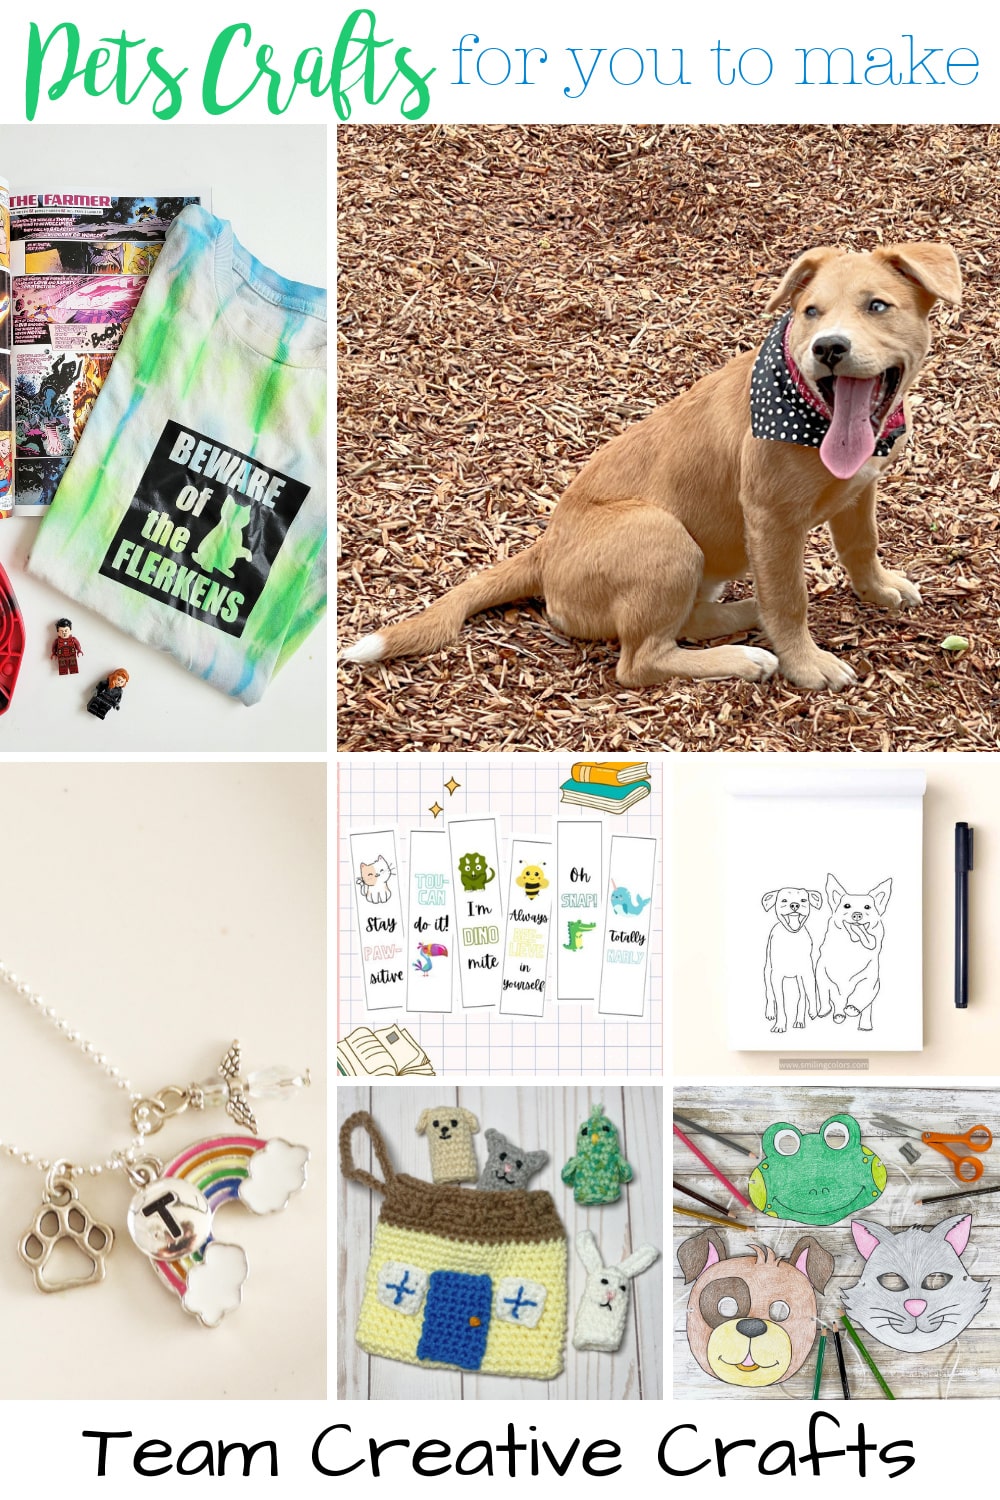
If you are looking for an easy sewing project, Laura of Me and My INKlings is sharing an Over the Collar Pet Bandana. Perfect for puppies because it won’t slide off their neck when they get rambunctious.
Laura of Laura’s Crafty Life is sharing an amazingly thoughtful Rainbow Bridge Necklace with charms representing your pet. Perfect to make for yourself or give as a gift.
Let the kiddo's imagination run wild with Free Animal Masks to Print and Color. Hand-drawn by Beth of Creatively Beth, this trio of a dog, cat, and frog are free to download, print, and color.
Smitha of Smiling Colors is so talented and has created a tutorial on How to Draw a Dog. This would be a great way to spend a summer afternoon with the kiddos, learning new skills!
Tackle that summer reading list early with Punny Animal Bookmarks from Shani of Sunshine and Munchkins. This funny set will inspire the kiddos to read and are FREE to download.
Get the kiddos involved in summer crafting with their favorite Disney Animals as SVG Files to add to t-shirts. Justin of Little Dove has created these as a FREE download.
How to Make a Pets Finger Puppet Playset with House Drawstring Bag
You will need:
- Small amount of worsted weight yarn in desired colors (this is a great pattern for using up small scraps in your stash, especially for the animals, I used mostly Red Heart Super Saver or Loops and Threads Impeccable)
- G crochet hook (4.25mm)
- H crochet hook (5mm)
- yarn needle
- scissors
- embroidery floss
- embroidery needle
Instructions:
The finger puppets are worked in a spiral, starting with a magic ring.
The bag is worked in the round, joining each round.
Finger Puppet Body
Round 1: in mr, ch 1, 6 sc (6 sc)
Round 2: 2 sc in each st (12 sc)
Round 3-10: 1 sc in each stitch (12 sc)
sl st to next stitch, finish off, weave in end
Cat
Make body in desired color (I used gray)Make 2 ears:
ch2, sl st in ch closest to hook, sc in nextfinish off, stitch onto head
Embroider face:
stitch eyes, small triangle nose, and mouthDog
Make body in desired color (I used a light tan)Make 2 ears:
ch 2, sc in each chfinish off, sew onto side of head
Embroider face:
stitch eyes, nose, and mouth onto the front of the puppetBird
Make body in desired color (I used a speckled green)Make 2 Wings:
Feather Tuft (optional):
Embroider face:
Bunny
Make body in desired color (I used white yarn)Make 2 ears:
ch 6, sc in second ch from hook, hdc in next 2 sts, sc in last 2 stsEmbroider face:
House Bag
The bag is made with an H hook, it is worked in the round by working along both sides of your starting chain, you will join at the end of each round
Bag:
Round 1: sc in second ch from hook, sc in each of next 18 ch, work 3 sc in last ch turning so you can work down the other side, sc in next 18 ch, 2 sc in last stitch, join to first sc with a sl st (42 sc)
Round 2-15: ch 1, sc in each stitch around, join to first sc with sl st (42 sc)
Round 18: ch 3 (counts as first dc), dc in next stitch, ch 1, skip next stitch, [dc in next 2 stitches, ch 1, skip next stitch] repeat around, join with sl st to first dc (28 dc, 14 ch spaces)
Round 19: ch 1, sc in each stitch, join with sl st to first sc (42 sc)
finish off, weave in ends
Drawstring:
with roof colorDoor:
Windows:
Assembly:

Aww, these are so cute! And I love the little house for the animals!
ReplyDeleteThis is the cutest, Erica! Such a fun playset. Thank you for sharing your talent and free patterns!
ReplyDeleteI love finger puppet projects, especially when they come with themed bags. They are great quiet easy to store and carry projects to bring for kids to play with at various activities when you need something small that you can pull out of a bag and then clean up quickly when its time to leave.
ReplyDelete