-This post may contain affiliate links-
A new month means it is time for another Team Creative Crafts collaboration. If you have been following me for any length of time you probably know that I am a Harry Potter fan, so I was pretty excited about the theme for this month which happens to be Harry Potter Crafts. This will be a little bit of a sneak peek for later this month when I have some more Harry Potter inspired projects planned. Scroll down to see the other fun projects shared this month and to enter to win a fun Harry Potter themed giveaway.
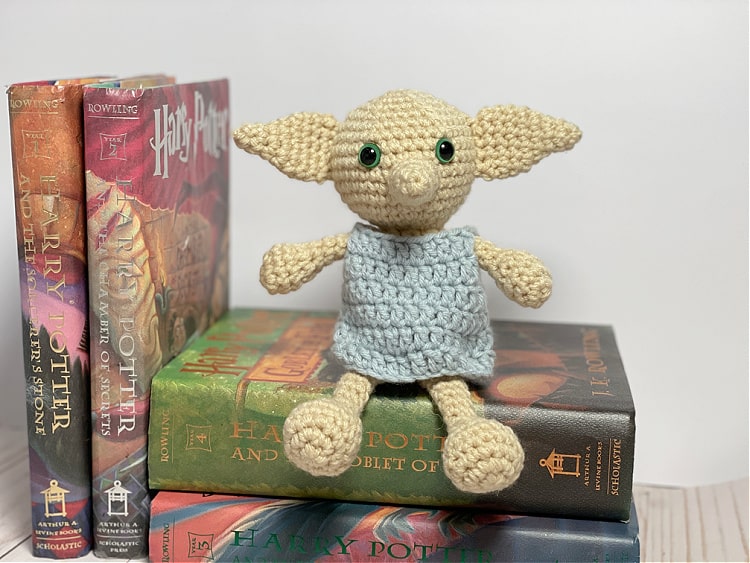
When I sat down to make this project I actually had something different in mind, but last minute decided to make a little house elf, and I am so glad I did because I absolutely love the way this little guy turned out.
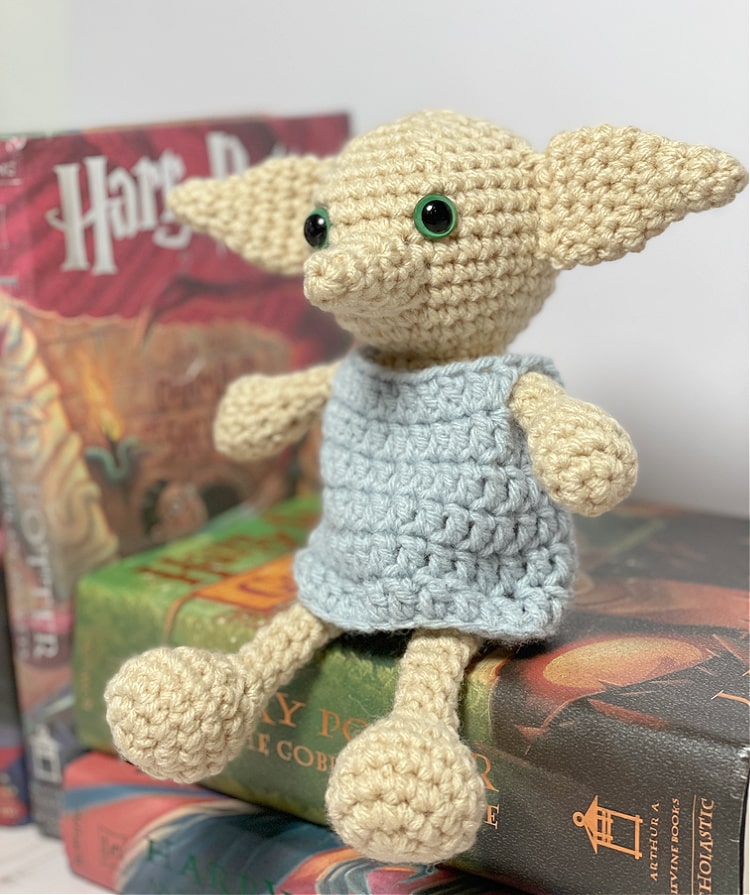
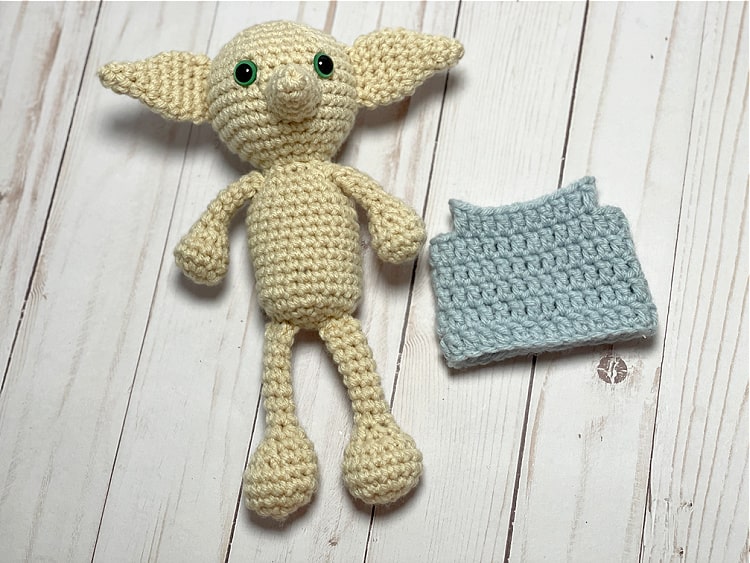
He isn't very big so he didn't take too long to make. I crocheted the head and body in one piece, and since I knew I wanted to be able to set him on a shelf I added a tiny little weighted base filled with Poly Pellets to the bottom of the body. Then I added his big ears, a long pointy nose, and skinny little arms and legs. Last I made a little shift out of gray yarn for him to wear.
I thought it would be cute to give him a little sock or something to hold, so he could be a free elf, but I didn't end up making one. But either way I think he turned out pretty cute and I have been excited to share him with you.
Be sure to check out all of the fun Harry Potter inspired projects being shared today and tomorrow, and enter to win an awesome giveaway filled with all sorts of fun Harry Potter goodies!
a Rafflecopter giveaway
Laura of Me and My INKlings is sharing a Room of Requirement Sign. Located in Hogwarts Castle, it’s a room that can only be discovered by someone who is in need. Free SVG File included in tutorial.
Let Harry, Ron, and Hermione hold your place with a Magnetic Set of Bookmarks created by Laura of Laura’s Crafty Life. Click through to discover how to make them.
Show your Hogwarts House Colors with a colorful set of Harry Potter DIY Scrunchies. The full step-by-step tutorial can be found over atSmitha’s site, Smiling Colors.
Shani of Sunshine and Munchkins has created a Free Printable Patronus Fortune Teller. Let this game help you discover what your charm is based upon your happiest memories.
Download, print, and color Harry Potter Movie Night Printables featuring Hogsmeade Tickets and Gringott’s Coins that the kiddos can earn, then redeem. Designed by the clever Justine of Little Dove.
Always remember that the Wand Chooses the Wizard with this cute Harry Potter Mug created by Chelly of We Can Make That. Get the Free SVG file on her website.
No Harry Potter birthday party is complete without a DIY Flying Broom photo booth prop. You will never guess what Debra from Debra Quartermain Designs has made this one out of!
Beth of Creatively Beth is always on the lookout for cute Dollar Tree crafts, including these magical Harry Potter Flying Keys. Easy to create with the free printable wing pattern sheet.
These yummy Chocolate Frog Earrings look good enough to eat, but don’t because they are made out of resin. Lindsay from Artsy Fartsy Mama has the complete tutorial over on her blog.
How to Crochet a House Elf
Finished Size approx 6" tall when sitting, 9" including legs
You will need:
Instructions:
All of the pieces except for the clothes are made beginning with a magic ring and worked in a continuous spiral, not joined at the end of rounds. The body and head are worked in one piece starting at the bottom, ears, nose, arms, and legs are made separately and sewn on at the end.
Body & Head
Make 1 with tan yarn
If you are going to make a weighted base you will want to make that first so it is ready to add to the base of the body. The body of the house elf is very small so you don't need a big base. I used a scrap of fabric and cut a circle about 4" in diameter. I then stitched a running stitch around the perimeter and filled with a small amount of weighted beads. Then pulled closed and stitched shut. Alternatively (and my preferred way) is to take the toe of a knee high nylon and add a small amount of beads, then knot the top closed and cut.
See this video for more information: HOW TO MAKE A WEIGHTED BASE
Round 1: in mr, ch 1, 6 sc (6 sc)
Round 2: 2 sc in each st (12 sc)
Round 3: [2 sc in first st, 1 sc in next st] repeat around (18 sc)
Round 4: [2 sc in first st, 1 sc in each of next 2 sts] repeat around (24 sc)
Round 5-14: 1 sc in each st (24 sc)
Add weighed base to the bottom of the body, begin stuffing and continue to stuff as you work
Round 15: [sc2tog, 1 sc in each of next 2 sts] repeat around (18 sc)
Round 16: sc2tog, repeat around (9 sc)
Round 17: 2 sc in each st (18 sc)
Round 18: [2 sc in first st, 1 sc in each of next 2 sts] repeat around (24 sc)
Round 19: [2 sc in first st, 1 sc in each of next 3 sts] repeat around (30 sc)
Round 20: [2 sc in first st, 1 sc in each of next 4 sts] repeat around (36 sc)
Round 21-26: 1 sc in each st (36 sc)
Add safety eyes between rounds 24 and 25, about 5 sts apart
Round 27: [sc2tog, 1 sc in each of next 4 sts] repeat around (30 sc)
Round 28: [sc2tog, 1 sc in each of next 3 sts] repeat around (24 sc)
Round 29: [sc2tog, 1 sc in each of next 2 sts] repeat around (18 sc)
Round 30: [sc2tog, 1 sc in next st] repeat around (12 sc)
Round 31: sc2tog, repeat around (6 sc)
Finish off and cut yarn, weave opening closed and weave in end
Nose
Make 1 with tan yarn
Round 1: in mr, ch 1, 4 sc (4 sc)
Round 2: [2 sc in first st, 1 sc in next] repeat around (6 sc)
Round 3: 1 sc in each st (6 sc)
Round 4: [2 sc in first st, 1 sc in next 2] repeat around (8 sc)
Round 5: [2 sc in first st, 1 sc in next 3] repeat around (10 sc)
Finish off and cut yarn leaving long tail for sewing
Ears
Make 2 with tan yarn
Round 1: in mr, ch 1, 4 sc (4 sc)
Round 2: [2 sc in first st, 1 sc in next] repeat around (6 sc)
Round 3: 1 sc in each st (6 sc)
Round 4: [2 sc in first st, 1 sc in next 2] repeat around (8 sc)
Round 5: [2 sc in first st, 1 sc in next 3] repeat around (10 sc)
Round 6: [2 sc in first st, 1 sc in next 4] repeat around (12 sc)
Round 7: 1 sc in each st (12 sc)
Round 8: 1 sc in each st (12 sc)
Round 9: [sc2tog, sc in next 4] repeat around (10 sc)
Finish off and cut yarn leaving long tail for sewing
Arms
Make 2 with tan yarn
Round 1: in mr, ch 1, 6 sc (6 sc)
Round 2: 2 sc in each st (12 sc)
Round 3: 1 sc in each st (12 sc)
Round 4: 1 sc in each st (12 sc)
Add a tiny bit of stuffing to the hands at this point
Round 5: sc2tog, repeat around (6 sc)
Round 6-10: 1 sc in each st (6 sc)
Finish off and cut yarn, leaving long tail for sewing
Legs
Make 2 with tan yarn
Round 1: in mr, ch 1, 6 sc (6 sc)
Round 2: 2 sc in each st (12 sc)
Round 3: [2 sc in first st, 1 sc in next st] repeat around (18 sc)
Round 4: 1 sc in each st (18 sc)
Round 5: 1 sc in each st (18 sc)
Round 6: sc2tog 6 times, 1 sc in next 6 sts (12 sc)
Add stuffing to the feet
Round 7: sc2tog, repeat around (6 sc)
Round 8-15: 1 sc in each st (6 sc)
Finish off and cut yarn, leaving long tail for sewing
Clothes
Make 1 with gray yarn
ch 28, join with a sl st to first ch to make a ring
Round 1:ch 2 (doesn't count as a stitch ), dc in each ch around, join with sl st to first dc (28 dc)
Round 2-5: ch 2, dc in each st around, join with sl st to first dc to join (28 dc)
Round 6: ch 2, dc in first 5 sts, ch 2, sk 4 sts, dc in next 10 sts, ch 2, sk 4 sts, dc in next 5 sts, sl st to first dc to join (20 dc)
Finish off and cut yarn, weave in ends
Assembly
Add a small amount of stuffing to the nose and sew on just below and between the eyes.
Flatten the ears and stitch to the side of the head.
Stitch arms to the side of the body
Stitch the legs to the bottom of the body, paying attention to the way the feet face.
Pull on the clothing from the bottom up, carefully pulling the arms through the armholes.


This pattern is so fun! Crochet is my current favorite craft (and shawls are my favorite thing to crochet), but I still sew and bead and paper craft and all the things!
ReplyDelete