
-This post may contain affiliate links-

The bins where I store my skeins of yarn have started to overflow lately and so I have kind of been on a mission to try to use up my yarn stash. A couple of weeks ago I shared a couple of Mermaid Water Bottle Holders that I made with some colorful self striping yarn. I still had a little bit of that yarn left, some in the colors I used for the water bottle holders plus a couple more, all left over from some hats that I made last year.

I have always wanted to try using a self striping type of yarn to make some kind of stuffed animals, but I wasn't sure exactly what I wanted to make, and was nervous about whether or not I would actually like the way it looked. Since I was trying to use up yarn I figured this was as good a time as any to give it a try. I decided on bears because I wanted something really simple and basic, that the colorful yarn wouldn't be a distraction from the design.

Since I was working with partially used skeins I wanted to keep the bears pretty small. I started with the pattern I used for my graduation bear and then I went down in size from there. I ended up with 4 different sizes of bears ranging from 8"- 5" tall.
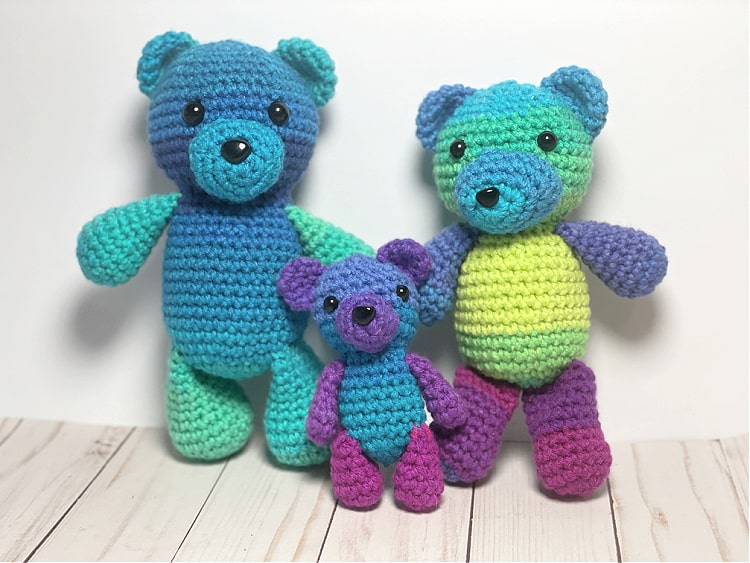
I used 4 shades of Red Heart Super Saver Stripes for the bears. It was fun to see the color changes and see what colors each part ended up. You could obviously make them out of solid colors too, but this was kind of a fun way to change things up a little.
When I use a solid color I like to make the muzzle piece a different color than the rest of the bear, just for a little contrast, but young the self striping yarn it just ended up a different color automatically. My favorite one ended up being the biggest one (Cool Stripe), because I like the blue and green tones and how smoothly they transition.
Depending on how you sew the legs on you can make a bear that sits, stands, or does both. You can also add an optional weighted base in the bottom to help it sit up better.

How to Crochet Colorful Bears in 4 Sizes
You will need:
- Red Heart Super Saver Stripes or other worsted weight yarn (samples made with Cool Stripe, Parrot Stripe, Fruity Stripe, and Polo Stripe)
- G Crochet Hook (4.25 mm)
- Fiberfill
- Safety Eyes (tiny-8mm, small- 8mm, medium-11mm, large-13mm)
- Safety Noses (tiny-13mm, small-13mm, medium-13mm, large-15mm)
- Yarn Needle
- Stitch Markers
- Scissors
Instructions:
All bears are made with the body and head made in one piece and the arms, legs, ears, and muzzle are made separately and sewn on.
All pieces begin with a magic ring and are crocheted in a continuous spiral, not join after each round.
If you do not want to use safety eyes and noses you can embroider them on instead.
*To make an optional weighted base for your bear- Either cut a circle out of fabric and stitch a running stitch around the edge to cinch up to make a bowl shape, or use the toe end of a pair of nylons. Fill with PolyPellets weighted stuffing beads and close securely (cinch and stitch if using fabric, know the end and trim if using nylons). Set the weighted base in the bottom of the body then stuff as usual.
Tiny Bear
Finished Size approx. 5" tall standing/4" tall sitting
Sample made with Red Heart Super Saver Polo Stripe
Body/Head
Make 1
Round 1: in mr, ch 1, 6 sc (6 sc)
Round 2: 2 sc in each st (12 sc)
Round 3: [2 sc in first st, 1 sc in next st] repeat around (18 sc)
Round 4: 1 sc in each st (18 sc)
Round 5: 1 sc in each st (18 sc)
Round 6: 1 sc in each st (18 sc)
Round 7: 1 sc in each st (18 sc)
Round 8: 1 sc in each st (18 sc)
Round 9: 1 sc in each st (18 sc)
Round 10: sc2tog, repeat around (9 sc)
Begin stuffing body, next round begins the head portion
Round 11: 2 sc in each st (18 sc)
Round 12: [2 sc in first st, 1 sc in next 2 sts] repeat around (24 sc)
Round 13: 1 sc in each st (24 sc)
Round 14: 1 sc in each st (24 sc)
Round 15: 1 sc in each st (24 sc)
Round 16: 1 sc in each st (24 sc)
Insert eyes between rounds 14 and 15, about 5 stitches apart, begin stuffing head and continue to stuff as needed as you finish closing up the head
Round 17: [sc2tog, 1 sc in next 2 sts] repeat around (18 sc)
Round 18: [sc2tog, 1 sc in next st] repeat around (12 sc)
Round 19: sc2tog, repeat around (6 sc)
Finish off and cut yarn, use tail to weave around opening to close, weave in end
Muzzle
Make 1
Round 1: in mr, ch 1, 6 sc (6 sc)
Round 2: [2 sc in first st, 1 sc in next 2] repeat (8 sc)
Round 3: [2 sc in first st, 2 sc in next st, 1 sc in next 2 sts] repeat (12 sc)
Finish off and cut yarn leaving long tail for sewing
Ears
Make 2
Round 1: in mr, ch 1, 6 sc (6 sc)
Round 2: [2 sc in first st, 1 sc in next] repeat around (9 sc)
Round 3: 1 sc in each st (9 sc)
Finish off and cut yarn leaving long tail for sewing
Finish off and cut yarn leaving long tail for sewing
Arms
Make 2
Round 1: in mr, ch 1, 6 sc (6 sc)
Round 2: [2 sc in first st, 1 sc in next 2] repeat around (9 sc)
Round 3: 1 sc in each st (9 sc)
Round 4: [sc2tog, 1 sc in next st] repeat around (6 sc)
Round 5: 1 sc in each st (6 sc)
Round 6: 1 sc in each st (6 sc)
Finish off and cut yarn leaving a long tail for sewing
Round 6: 1 sc in each st (6 sc)
Finish off and cut yarn leaving a long tail for sewing
Legs
Make 2
Round 1: in mr, ch 1, 6 sc (6 sc)
Round 2: 2 sc in each st (12 sc)
Round 3: 1 sc in each st (12 sc)
Round 4: [sc2tog, 1 sc in next 2 sts] repeat around (9 sc)
Round 5: 1 sc in each st (9 sc)
Round 6: 1 sc in each st (9 sc)
Finish off and cut yarn leaving a long tail for sewing
Round 4: [sc2tog, 1 sc in next 2 sts] repeat around (9 sc)
Round 5: 1 sc in each st (9 sc)
Round 6: 1 sc in each st (9 sc)
Finish off and cut yarn leaving a long tail for sewing
Assembly
To finish your bear add the nose to the muzzle, then stitch the muzzle to the front of the face just below and between the eyes adding stuffing as you stitch it on.
Flatten the ears and stitch them to the top of the head, curving them slightly as you stitch.
Stitch the arms to the side of the body.
Add a small amount of stuffing to the feet portion of the legs and stitch them to the bottom of the body. If you want your bear to be in a standing position flatten them and stitch them to the side of the body close to the bottom, if you want to be able to put it in a sitting or standing position flatten and stitch the top edge to the bottom with the flat side facing forward, so it moves kind of like a hinge. To make a permanent sitting position flatten the legs and stitch them to the bottom of the bear with the feet facing forward.
Small Bear
Finished Size approx. 6.5" tall standing/5" tall sitting
Sample made with Red Heart Super Saver Fruity Stripe
Body/Head
Make 1
Round 1: in mr, ch 1, 6 sc (6 sc)
Round 2: 2 sc in each st (12 sc)
Round 3: [2 sc in first st, 1 sc in next st] repeat around (18 sc)
Round 4: [2 sc in first st, 1 sc in next 2 sts] repeat around (24 sc)
Round 5: 1 sc in each st (24 sc)
Round 6: 1 sc in each st (24 sc)
Round 7: 1 sc in each st (24 sc)
Round 8: 1 sc in each st (24 sc)
Round 9: 1 sc in each st (24 sc)
Round 10: 1 sc in each st (24 sc)
Round 11: 1 sc in each st (24 sc)
Round 12: [sc2tog, 1 sc in next 2 sts] repeat around (18 sc)
Round 13: 1 sc in each st (18 sc)
Round 14: sc2tog, repeat around (9 sc)
Begin stuffing body, next round begins the head portion
Round 11: 2 sc in each st (18 sc)
Round 12: [2 sc in first st, 1 sc in next 2 sts] repeat around (24 sc)
Round 13: [2 sc in first st, 1 sc in next 3 sts] repeat around (30 sc)
Round 14: 1 sc in each st (30 sc)
Round 15: 1 sc in each st (30 sc)
Round 16: 1 sc in each st (30 sc)
Round 17: 1 sc in each st (30 sc)
Round 18: 1 sc in each st (30 sc)
Insert eyes between rounds 15 and 16, about 5 stitches apart, begin stuffing head and continue to stuff as needed as you finish closing up the head
Round 19: [sc2tog, 1 sc in next 3 sts] repeat around (24 sc)
Round 17: [sc2tog, 1 sc in next 2 sts] repeat around (18 sc)
Round 18: [sc2tog, 1 sc in next st] repeat around (12 sc)
Round 19: sc2tog, repeat around (6 sc)
Finish off and cut yarn, use tail to weave around opening to close, weave in end
Muzzle
Make 1
Round 1: in mr, ch 1, 6 sc (6 sc)
Round 2: [3 sc in first st, 1 sc in next 2] repeat (10 sc)
Round 3: [2 sc in each of the next 3 sts, 1 sc in next 2 sts] repeat (16 sc)
Round 4: 1 sc in each st (16 sc)
Finish off and cut yarn leaving long tail for sewing
Ears
Make 2
Round 1: in mr, ch 1, 6 sc (6 sc)
Round 2: 2 sc in each st (12 sc)
Round 3: 1 sc in each st (12 sc)
Finish off and cut yarn leaving long tail for sewing
Finish off and cut yarn leaving long tail for sewing
Arms
Make 2
Round 1: in mr, ch 1, 6 sc (6 sc)
Round 2: 2 sc in each st (12 sc)
Round 3: 1 sc in each st (12 sc)
Round 4: 1 sc in each st (12 sc)
Round 5: [sc2tog, 1 sc in next 2 sts] repeat around (9 sc)
Round 6: 1 sc in each st (9 sc)
Round 7: 1 sc in each st (9 sc)
Round 8: 1 sc in each st (9 sc)
Round 9: 1 sc in each st (9 sc)
Finish off and cut yarn leaving a long tail for sewing
Round 7: 1 sc in each st (9 sc)
Round 8: 1 sc in each st (9 sc)
Round 9: 1 sc in each st (9 sc)
Finish off and cut yarn leaving a long tail for sewing
Legs
Make 2
Round 1: in mr, ch 1, 6 sc (6 sc)
Round 2: 2 sc in each st (12 sc)
Round 3: [2 sc in first st, 3 sc in next sts] repeat around (15 sc)
Round 4: 1 sc in each st (15 sc)
Round 5: 1 sc in each st (15 sc)
Round 6: [sc2tog, 1 sc in next 3 sts] repeat around (12 sc)
Round 7: 1 sc in each st (12 sc)
Round 8: 1 sc in each st (12 sc)
Round 9: 1 sc in each st (12 sc)
Round 10: 1 sc in each st (12 sc)
Finish off and cut yarn leaving a long tail for sewing
Assembly
To finish your bear add the nose to the muzzle, then stitch the muzzle to the front of the face just below and between the eyes adding stuffing as you stitch it on.
Flatten the ears and stitch them to the top of the head, curving them slightly as you stitch.
Add a small amount of stuffing to the end of the arms and stitch the arms to the side of the body.
Add a small amount of stuffing to the feet portion of the legs and stitch them to the bottom of the body. If you want your bear to be in a standing position flatten them and stitch them to the side of the body close to the bottom, if you want to be able to put it in a sitting or standing position flatten and stitch the top edge to the bottom with the flat side facing forward, so it moves kind of like a hinge. To make a permanent sitting position flatten the legs and stitch them to the bottom of the bear with the feet facing forward.
Medium Bear
Finished Size approx. 7" tall standing/5.5" tall sitting
Sample made with Red Heart Super Saver Parrot Stripe
Body/Head
Make 1
Round 1: in mr, ch 1, 6 sc (6 sc)
Round 2: 2 sc in each st (12 sc)
Round 3: [2 sc in first st, 1 sc in next st] repeat around (18 sc)
Round 4: [2 sc in first st, 1 sc in next 2 sts] repeat around (24 sc)
Round 5: [2 sc in first st, 1 sc in next 3 sts] repeat around (30 sc)
Round 6: 1 sc in each st (30 sc)
Round 7: 1 sc in each st (30 sc)
Round 8: 1 sc in each st (30 sc)
Round 9: 1 sc in each st (30 sc)
Round 10: 1 sc in each st (30 sc)
Round 11: 1 sc in each st (30 sc)
Round 12: 1 sc in each st (30 sc)
Round 13: 1 sc in each st (30 sc)
Round 14: [2 sc in first st, 1 sc in next 2 sts] repeat around (24 sc)
Round 15: 1 sc in each st (24 sc)
Round 16: sc2tog, repeat around (12 sc)
Begin stuffing body, next round begins the head portion
Round 17: 2 sc in each st (24 sc)
Round 18: [2 sc in first st, 1 sc in next 3 sts] repeat around (30 sc)
Round 19: [2 sc in first st, 1 sc in next 4 sts] repeat around (36 sc)
Round 20: 1 sc in each st (36 sc)
Round 21: 1 sc in each st (36 sc)
Round 22: 1 sc in each st (36 sc)
Round 23: 1 sc in each st (36 sc)
Round 24: 1 sc in each st (36 sc)
Round 25: 1 sc in each st (36 sc)
Round 26: [sc2tog, 1 sc in next 4 sts] repeat around (30 sc)
Insert eyes between rounds 23 and 24, about 6 stitches apart, begin stuffing head and continue to stuff as needed as you finish closing up the head
Round 27: [sc2tog, 1 sc in next 3 sts] repeat around (24 sc)
Round 28: [sc2tog, 1 sc in next 2 sts] repeat around (18 sc)
Round 29: [sc2tog, 1 sc in next st] repeat around (12 sc)
Round 30: sc2tog, repeat around (6 sc)
Finish off and cut yarn, use tail to weave around opening to close, weave in end
Muzzle
Make 1
Round 1: in mr, ch 1, 6 sc (6 sc)
Round 2: [3 sc in first st, 1 sc in next 2] repeat (10 sc)
Round 3: [2 sc in each of the next 3 sts, 1 sc in next 2 sts] repeat (16 sc)
Round 4: 1 sc in first 2 sts, 2 sc in each of next 2 sts, 1 sc in next 6 sts, 2 sc in each of next 2 sts, 1 sc in next 4 sts (20 sc)
Round 5: 1 sc in each st (20 sc)
Finish off and cut yarn leaving long tail for sewing
Ears
Make 2
Round 1: in mr, ch 1, 6 sc (6 sc)
Round 2: 2 sc in each st (12 sc)
Round 3: [2 sc in first st, 1 sc in next 3] repeat around (15 sc)
Round 4: 1 sc in each st (15 sc)
Finish off and cut yarn leaving long tail for sewing
Round 4: 1 sc in each st (15 sc)
Finish off and cut yarn leaving long tail for sewing
Arms
Make 2
Round 1: in mr, ch 1, 6 sc (6 sc)
Round 2: 2 sc in each st (12 sc)
Round 3: [2 sc in first st, 1 sc in next 3 sts] repeat around (15 sc)
Round 4: 1 sc in each st (15 sc)
Round 5: 1 sc in each st (15 sc)
Round 6: [sc2tog, 1 sc in next 3] repeat around (12 sc)
Round 7: 1 sc in each st (12 sc)
Round 8: 1 sc in each st (12 sc)
Round 9: 1 sc in each st (12 sc)
Round 10: 1 sc in each st (12 sc)
Round 11: 1 sc in each st (12 sc)
Finish off and cut yarn leaving a long tail for sewing
Round 8: 1 sc in each st (12 sc)
Round 9: 1 sc in each st (12 sc)
Round 10: 1 sc in each st (12 sc)
Round 11: 1 sc in each st (12 sc)
Finish off and cut yarn leaving a long tail for sewing
Legs
Make 2
Round 1: in mr, ch 1, 6 sc (6 sc)
Round 2: 2 sc in each st (12 sc)
Round 3: [2 sc in first st, 1 sc in next st] repeat around (18 sc)
Round 4: 1 sc in each st (18 sc)
Round 5: 1 sc in each st (18 sc)
Round 6: [sc2tog, 1 sc in next 4 sts] repeat around (15 sc)
Round 7: 1 sc in each st (15 sc)
Round 8: 1 sc in each st (15 sc)
Round 9: 1 sc in each st (15 sc)
Round 10: 1 sc in each st (15 sc)
Round 11: 1 sc in each st (15 sc)
Finish off and cut yarn leaving a long tail for sewing
Assembly
To finish your bear add the nose to the muzzle, then stitch the muzzle to the front of the face just below and between the eyes adding stuffing as you stitch it on.
Flatten the ears and stitch them to the top of the head, curving them slightly as you stitch.
Add a small amount of stuffing to the end of the arms and stitch the arms to the side of the body.
Add a small amount of stuffing to the feet portion of the legs and stitch them to the bottom of the body. If you want your bear to be in a standing position flatten them and stitch them to the side of the body close to the bottom, if you want to be able to put it in a sitting or standing position flatten and stitch the top edge to the bottom with the flat side facing forward, so it moves kind of like a hinge. To make a permanent sitting position flatten the legs and stitch them to the bottom of the bear with the feet facing forward.
Large Bear
Finished Size approx. 8" tall standing/6" tall sitting
Sample made with Red Heart Super Saver Cool Stripe
Body/Head
Make 1
Round 1: in mr, ch 1, 6 sc (6 sc)
Round 2: 2 sc in each st (12 sc)
Round 3: [2 sc in first st, 1 sc in next st] repeat around (18 sc)
Round 4: [2 sc in first st, 1 sc in next 2 sts] repeat around (24 sc)
Round 5: [2 sc in first st, 1 sc in next 3 sts] repeat around (30 sc)
Round 6: [2 sc in first st, 1 sc in next 4 sts] repeat around (36 sc)
Round 7: 1 sc in each st (36 sc)
Round 8: 1 sc in each st (36 sc)
Round 9: 1 sc in each st (36 sc)
Round 10: 1 sc in each st (36 sc)
Round 11: 1 sc in each st (36 sc)
Round 12: 1 sc in each st (36 sc)
Round 13: 1 sc in each st (36 sc)
Round 14: 1 sc in each st (36 sc)
Round 15: 1 sc in each st (36 sc)
Round 16: [2 sc in first st, 1 sc in next 3 sts] repeat around (30 sc)
Round 17: 1 sc in each st (30 sc)
Round 18: 1 sc in each st (30 sc)
Round 19: [2 sc in first st, 1 sc in next 2 sts] repeat around (24 sc)
Round 20: [sc2tog, 1 sc in next 2 sts] repeat around (18 sc)
Begin stuffing body, next round begins the head portion
Round 21: 2 sc in each st (36 sc)
Round 22: [2 sc in first st, 1 sc in next 5 sts] repeat around (42 sc)
Round 23: 1 sc in each st (42 sc)
Round 24: 1 sc in each st (42 sc)
Round 25: 1 sc in each st (42 sc)
Round 26: 1 sc in each st (42 sc)
Round 27: 1 sc in each st (42 sc)
Round 28: 1 sc in each st (42 sc)
Round 29: 1 sc in each st (42 sc)
Round 31: [sc2tog, 1 sc in next 5 sts] repeat around (36 sc)
Insert eyes between rounds 26 and 27, about 6 stitches apart, begin stuffing head and continue to stuff as needed as you finish closing up the head
Round 32: [sc2tog, 1 sc in next 4 sts] repeat around (30 sc)
Round 33: [sc2tog, 1 sc in next 3 sts] repeat around (24 sc)
Round 34: [sc2tog, 1 sc in next 2 sts] repeat around (18 sc)
Round 35: [sc2tog, 1 sc in next st] repeat around (12 sc)
Round 36: sc2tog, repeat around (6 sc)
Finish off and cut yarn, use tail to weave around opening to close, weave in end
Muzzle
Make 1
Round 1: in mr, ch 1, 6 sc (6 sc)
Round 2: [3 sc in first st, 1 sc in next 2] repeat (10 sc)
Round 3: [2 sc in each of the next 3 sts, 1 sc in next 2 sts] repeat (16 sc)
Round 4: 1 sc in first 2 sts, 2 sc in each of next 2 sts, 1 sc in next 6 sts, 2 sc in each of next 2 sts, 1 sc in next 4 sts (20 sc)
Round 5: 1 sc in each st (20 sc)
Finish off and cut yarn leaving long tail for sewing
Ears
Make 2
Round 1: in mr, ch 1, 6 sc (6 sc)
Round 2: 2 sc in each st (12 sc)
Round 3: [2 sc in first st, 1 sc in next 3] repeat around (15 sc)
Round 4: 1 sc in each st (15 sc)
Finish off and cut yarn leaving long tail for sewing
Round 4: 1 sc in each st (15 sc)
Finish off and cut yarn leaving long tail for sewing
Arms
Make 2
Round 1: in mr, ch 1, 6 sc (6 sc)
Round 2: 2 sc in each st (12 sc)
Round 3: [2 sc in first st, 1 sc in next st] repeat around (18 sc)
Round 4: 1 sc in each st (18 sc)
Round 5: 1 sc in each st (18 sc)
Round 6: [sc2tog, 1 sc in next st] repeat around (12 sc)
Round 7: 1 sc in each st (12 sc)
Round 8: 1 sc in each st (12 sc)
Round 9: 1 sc in each st (12 sc)
Round 10: 1 sc in each st (12 sc)
Round 11: 1 sc in each st (12 sc)
Round 12: 1 sc in each st (12 sc)
Finish off and cut yarn leaving a long tail for sewing
Round 8: 1 sc in each st (12 sc)
Round 9: 1 sc in each st (12 sc)
Round 10: 1 sc in each st (12 sc)
Round 11: 1 sc in each st (12 sc)
Round 12: 1 sc in each st (12 sc)
Finish off and cut yarn leaving a long tail for sewing
Legs
Make 2
Round 1: in mr, ch 1, 6 sc (6 sc)
Round 2: 2 sc in each st (12 sc)
Round 3: [2 sc in first st, 1 sc in next st] repeat around (18 sc)
Round 4: [2 sc in first st, 1 sc in next 2 sts] repeat around (24 sc)
Round 5: 1 sc in each st (24 sc)
Round 6: 1 sc in each st (24 sc)
Round 7: [sc2tog, 1 sc in next 2 sts] repeat around (18 sc)
Round 8: 1 sc in each st (18 sc)
Round 9: 1 sc in each st (18 sc)
Round 10: 1 sc in each st (18 sc)
Round 11: 1 sc in each st (18 sc)
Round 12: 1 sc in each st (18 sc)
Round 13: 1 sc in each st (18 sc)
Finish off and cut yarn leaving a long tail for sewing
Assembly
To finish your bear add the nose to the muzzle, then stitch the muzzle to the front of the face just below and between the eyes adding stuffing as you stitch it on.
Flatten the ears and stitch them to the top of the head, curving them slightly as you stitch.
Add a small amount of stuffing to the end of the arms and stitch the arms to the side of the body.
Add a small amount of stuffing to the feet portion of the legs and stitch them to the bottom of the body. If you want your bear to be in a standing position flatten them and stitch them to the side of the body close to the bottom, if you want to be able to put it in a sitting or standing position flatten and stitch the top edge to the bottom with the flat side facing forward, so it moves kind of like a hinge. To make a permanent sitting position flatten the legs and stitch them to the bottom of the bear with the feet facing forward.

No comments :
Post a Comment