
-This post may contain affiliate links-
*Purchase an ad-free PDF version of this pattern in an ebook with all 12 patterns on Etsy or Ravelry*

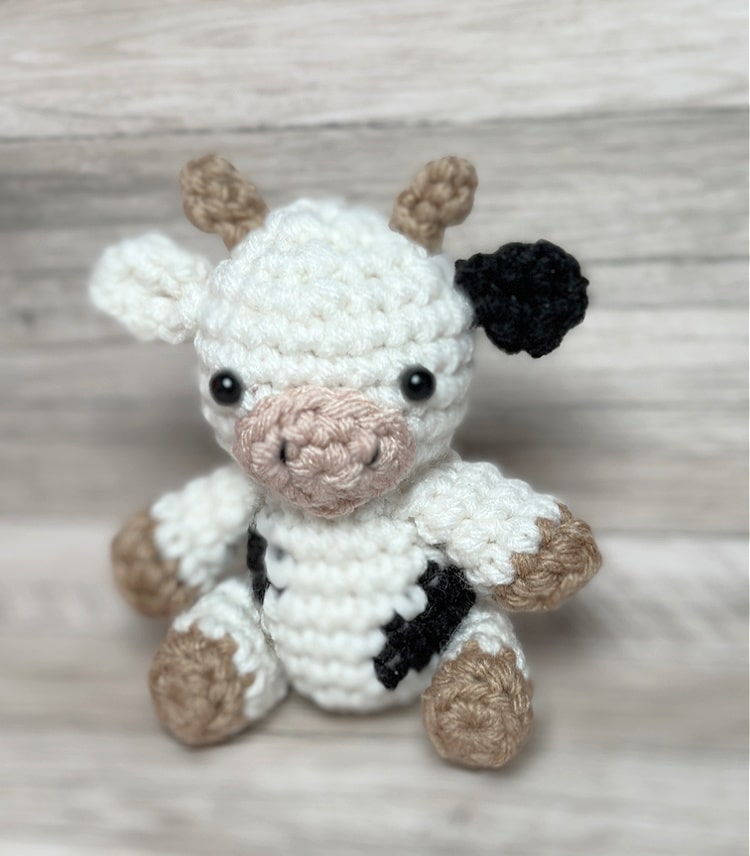
Day 3 of the Mini Amigurumi Spring Crochet Along. So far we have a little pig and a duck, and today we are adding a tiny little cow.

If I am honest I think the cow was one of the animals I was most nervous to make. It was obviously going to be part of the series, I feel like if you are doing something with farm animals a cow absolutely has to be included. And I really wanted a black and white spotted cow, but getting details like that on something so small can be a challenge.
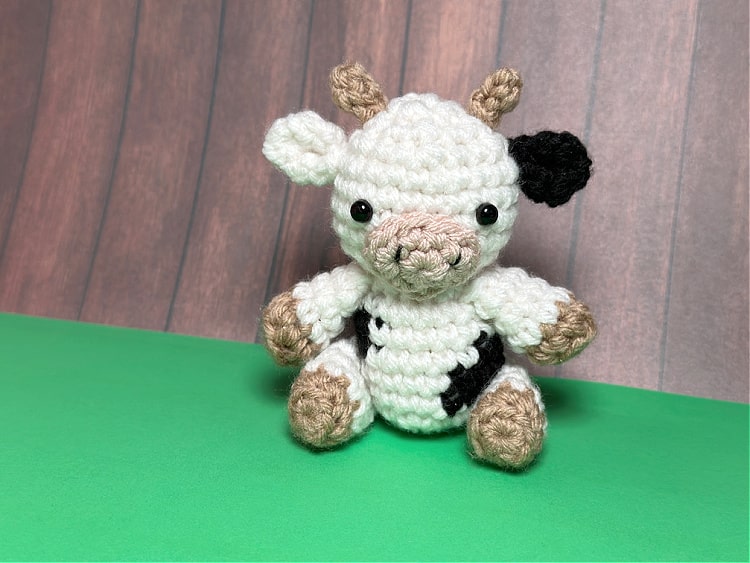
While I was designing it I was hopeful it would turn out how I was picturing, but I was a little nervous about it. Then I got it all sewn together and I was so happy with how it turned out.

I think it might be my favorite of all of the little animals. The cow was another of the animals shown in the announcement picture, but tomorrow will be a new animal, not shown in the sneak peek. With 3 animals done we are a quarter of the way through, and of the 9 animals left only one more was shown in the sneak peek, although knowing the theme you may be able to guess some of the others.
*Purchase an ad-free PDF version of this pattern in an ebook with all 12 patterns on Etsy or Ravelry*
How to Crochet a Mini Cow
Finished Size: about 3" tall sitting
You will need:
- medium weight yarn in black, white, tan, and pink or desired colors (sample made in Red Heart Super Saver in White and Black, Loops & Threads Impeccable in Soft Taupe, and Yarn Bee Soft & Sleek in Blush)
- G crochet hook (4 mm)
- 2- 6 mm safety eyes
- Polyfil fiberfill
- yarn needle
- stitch markers
- scissors
- black embroidery floss and needle
Instructions:
The cow's body is made in the same way as the previous animals, but there are color changes throughout to make the spots. When making color changes work the final stitch in the working color as normal until the last step, rather than yarning over and pulling through the yarn to finish the stitch as you normally would, grab your new color and yarn over and pull through the loops to finish the stitch with the new color. Don't cut the yarn with each color change, just carry it inside of the body. If you choose to make a solid color cow just ignore the color changes and work the total number of stitches for each round.

Body
Make 1 starting with white yarn, beginning with magic ring
Round 1: in mr, ch 1, 6 sc (6 sc)
Round 2: 2 sc in each st (12 sc)
Round 3: [2 sc in first st, 1 sc in next st] repeat around (18 sc)
Round 4: 1 sc in each st changing colors as follows- 6 white, 3 black, 9 white (18 sc)
Round 5: 1 sc in each st changing colors as follows- 5 white, 4 black, 5 white, 2 black, 2 white (18 sc)
Round 6: 1 sc in each st changing colors as follows- 6 white, 2 black, 5 white, 4 black, 1 white (18 sc)
Round 7: 1 sc in each st changing colors as follows- 13 white, 3 black, 2 white (18 sc)
Round 8: all white from this round on- 1 sc in each st (18 sc)
Begin stuffing and continue stuffing as you work
Round 9: sc2tog around (9 sc)
Round 10: 2 sc in each st (18 sc)
Round 11: [2 sc in first st, 1 sc in next 2 sts] repeat around (24 sc)
Round 12-15: 1 sc in each st (24 sc)
Round 16: [sc2tog, sc in next 2 sts] repeat around (18 sc)
Insert safety eyes between rounds 13 and 14 about 3 stitches apart, when you put in your eyes pay attention to where the spots are and what you want the front of the cow to look like
Round 17: [sc2tog, sc in next st] repeat around (12 sc)
Round 18: sc2tog around (6 sc)
Finish off, weave in ends
Nose
Make 1 with pink yarn, beginning with magic ring
Round 1: in mr, ch 1, 6 sc (6 sc)
Round 2: 1 sc in first st, 3 sc in next st, 1 sc in next 2 sts, 3 sc in net st, 1 sc in last st (10 sc)
Finish off and cut yarn leaving long tail for sewing
Embroider 2 small lines on the nose for nostrils
Sew the nose to the head just below the eyes
Ears
Make 2, one with white yarn, one with black yarn
Round 1: in mr, ch 1, 6 sc (6 sc)
Round 2: [2 sc in first st, 1 sc in next st] repeat around (9 sc)
Round 3: 1 sc in each st (9 sc)
Finish off and cut yarn, leaving long tail for sewing
Sew ears to the sides of the head
Horns
Make 2 with tan yarn
Round 1: in mr, ch 1, 4 sc (4 sc)
Round 2: 1 sc in each st (4 sc)
Finish off and cut yarn, leaving long tail for sewing
Sew horns to the top of the head
Legs
Make 4 with beginning with tan yarn and changing to white where directed, beginning with magic ring
Round 1: in mr, ch 1, 8 sc (8 sc)
Round 2: 1 sc in blo of each st (8 sc in blo)
change to white yarn
Round 3-5: 1 sc in each st (8 sc)
Finish off and cut yarn leaving a long tail for sewing
Sew the 2 of the legs/arms to the side of the body between the body and head, sew the other 2 to the bottom side of the body in a sitting position

asas
ReplyDeleteI came late to the CAL, but I’m catching up and loving these cute little amigurumi babies. Thank you for sharing. These are so inexpensive, quick and easy; perfect as a little extra tuck in gift, charity make, or to use instead of a bow as a gift topper.
ReplyDelete