
-This post may contain affiliate links-
*Purchase an ad-free PDF version of this pattern in an ebook with all 12 patterns on Etsy or Ravelry*
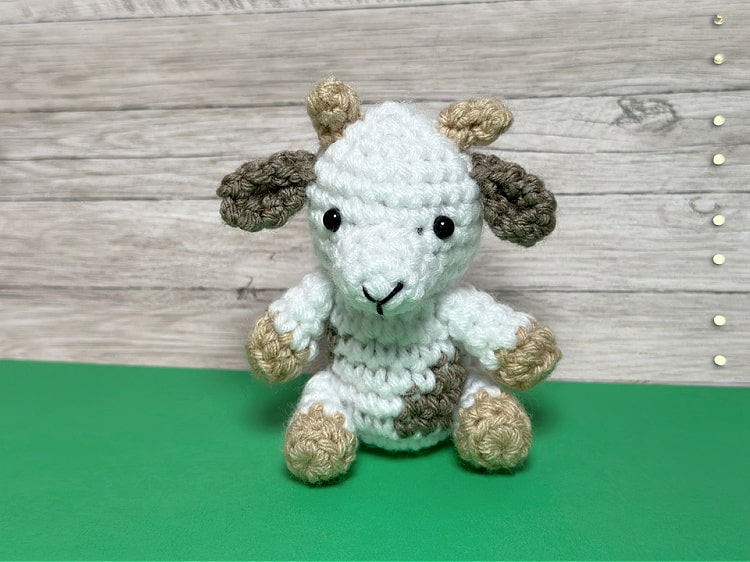
It is the last day of the Spring Mini Amigurumi Crochet Along, Day 12. The last animal in the set is a little goat.

I wanted to make my little goat spotted so I made it in the same way as the cow, but with brown spots instead of black. You could definitely make a solid color goat instead, gray, or brown, or white, or black would all work well for a little goat. If you choose to make a solid color goat just ignore the color changes in the pattern.


That is one of the things that I like about crochet. As you learn how to make different shapes you can use those techniques to make pretty much anything you want.

Making them in this mini size gives a little more of a challenge when it comes to getting details to come across, because you can only go so small, so it was fun to see each animal take shape and look like the animal is was supposed to be, even when they mix and match a lot of the same elements.

*Purchase an ad-free PDF version of this pattern in an ebook with all 12 patterns on Etsy or Ravelry*
How to Crochet a Little Goat
Finished Size: about 3" tall sitting
You will need:
- medium weight yarn in white, light brown, and tan or desired colors (sample made in Red Heart Super Saver in Buff, and Loops & Threads Impeccable in White and Barley)
- G crochet hook (4 mm)
- 2- 6 mm safety eyes
- Polyfil fiberfill
- yarn needle
- stitch markers
- scissors
- black embroidery floss and needle
Instructions:
The goat's body is made with color changes throughout to make the spots, in the same way as the cow. When making color changes work the final stitch in the working color as normal until the last step, rather than yarning over and pulling through the yarn to finish the stitch as you normally would, grab your new color and yarn over and pull through the loops to finish the stitch with the new color. Don't cut the yarn with each color change, just carry it inside of the body. If you choose to make a solid color goat just ignore the color changes and work the total number of stitches for each round.

Body
Make 1 starting with white yarn, changing colors as directed to make the spots, beginning with magic ring
Round 1: in mr, ch 1, 6 sc (6 sc)
Round 2: 2 sc in each st (12 sc)
Round 3: [2 sc in first st, 1 sc in next st] repeat around (18 sc)
Round 4: 1 sc in each st changing colors as follows- 6 white, 3 brown, 9 white (18 sc)
Round 5: 1 sc in each st changing colors as follows- 5 white, 4 brown, 5 white, 2 brown, 2 white (18 sc)
Round 6: 1 sc in each st changing colors as follows- 6 white, 2 brown, 5 white, 4 brown, 1 white (18 sc)
Round 7: 1 sc in each st changing colors as follows- 13 white, 3 brown, 2 white (18 sc)
Round 8: all white from this round on- 1 sc in each st (18 sc)
Begin stuffing and continue stuffing as you work
Round 9: sc2tog around (9 sc)
Round 10: 2 sc in each st (18 sc)
Round 11: [2 sc in first st, 1 sc in next 2 sts] repeat around (24 sc)
Round 12-15: 1 sc in each st (24 sc)
Round 16: [sc2tog, sc in next 2 sts] repeat around (18 sc)
Insert safety eyes between rounds 13 and 14 about 3 stitches apart, when you put in your eyes pay attention to where the spots are and what you want the front of the goat to look like
Round 17: [sc2tog, sc in next st] repeat around (12 sc)
Round 18: sc2tog around (6 sc)
Finish off, weave in ends
Nose
Make 1 with white yarn, beginning with magic ring
Round 1: in mr, ch 1, 6 sc (6 sc)
Round 2: [2 sc in first st, 1 sc in next st] repeat around (9 sc)
Round 3: [2 sc in first st, 1 sc in next 2 sts] repeat around (12 sc)
Finish off and cut yarn leaving long tail for sewing
Embroider a little Y shape to make the nose
Sew the nose to the head just below the eyes
Ears
Make 2 with brown yarn, beginning with magic ring
Round 1: in mr, ch 1, 6 sc (6 sc)
Round 2: [2 sc in first st, 1 sc in next st] repeat around (9 sc)
Round 3: 1 sc in each st (9 sc)
Round 4: 1 sc in each st (9 sc)
Finish off and cut yarn, leaving long tail for sewing
Flatten the ears, then pinch the top edge in half to create the folded ear shape, sew ears to the sides of the head
Horns
Make 2 with tan yarn
Round 1: in mr, ch 1, 4 sc (4 sc)
Round 2: 1 sc in each st (4 sc)
Finish off and cut yarn, leaving long tail for sewing
Sew horns to the top of the head
Legs
Make 4 with beginning with tan yarn and changing to white where directed, beginning with magic ring
Round 1: in mr, ch 1, 8 sc (8 sc)
Round 2: 1 sc in blo of each st (8 sc in blo)
change to white yarn
Round 3-5: 1 sc in each st (8 sc)
Finish off and cut yarn leaving a long tail for sewing
Sew the 2 of the legs/arms to the side of the body between the body and head, sew the other 2 to the bottom side of the body in a sitting position

I thank you so much for sharing these adorable little animal patterns I can’t wait to make them and I am starting immediately my grandchildren are going to love these I thank you so so much… they are the sweetest..!!
ReplyDeleteDebra..s.. thank you so much for sharing your beautiful animal patterns I can’t wait to start making them ..,!!!
ReplyDeleteThese are absolutely adorable. I already have plans for them.
ReplyDeleteThank You!!!!!