-This post may contain affiliate links. Yarn used for this project provided by WeCrochet.-
A month or so ago I posted on both Facebook and Instagram asking for votes on what my next Mini Amigurumi Crochet Along will be. I had 4 different options to choose from, and I'm not going to say what won yet (although if you really wanted to know early you could look at my posts and probably figure it out), but an announcement will be coming very soon. One of the options was Ocean Animals, which didn't win, but it did come in second place.
Then shortly after that I received
some yarn from WeCrochet that I had been wanting to try that was made for making amigurumi, and of the 3 color ways that they offer the one that they sent me was the Oceanscapes pack, which is a lot of blues and greens. I knew immediately that I wanted to do a smaller set of ocean animals with it, not the full set I would have made with the crochet along, but a smaller set with a few animals.
Then when I realized that this month's Team Creative Crafts theme was Ocean Crafts, I figured that was the perfect time to plan on sharing the set.
When I do the Crochet Alongs I plan on doing 12 animals each time, and for this set I chose just 3 to include. The Animation yarn that I used is a thinner DK weight mercerized cotton that is almost more like a crochet thread than a yarn. I made each of the animals small, but maybe slightly bigger than I would have for my mini amigurumi, especially if you were to make them with worsted weight yarn. I thought the smoothness of the mercerized cotton would be great for little babies since it is not fuzzy like other yarns can be and they often put toys in their mouths.

Since I made the set with babies or small children in mind I chose to embroider the eyes and faces, rather than using safety eyes like I normally do and I have to say, I really like using safety eyes. I know there are people who love embroidering their faces, but I have such a hard time getting them even and the same size. They never look quite as nice to me as when I use safety eyes. But they are most definitely a safer option for small children, especially since for animals like these I would have used very small safety eyes. So that is just something to keep in mind, depending on who you are making them for.
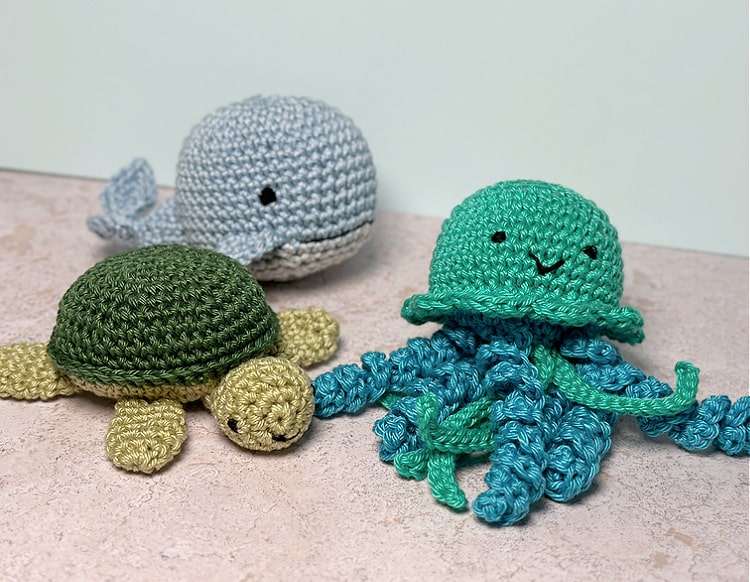
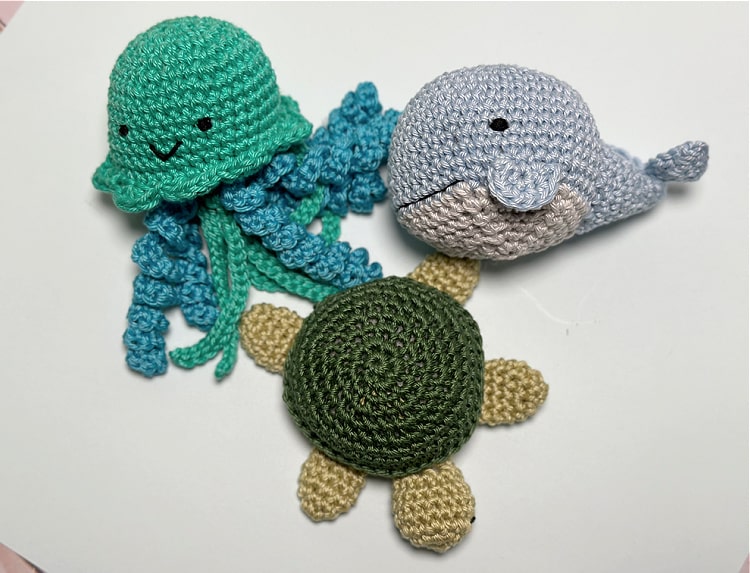
This little set includes a jellyfish, a tiny whale, and a little sea turtle.
Be sure to check out all of the other Ocean crafts being shared today
How to Crochet a Trio of Ocean Animals
You will need:
Instructions:
*Note- any of these animals can be made with worsted weight yarn (or other weights) just make sure that you also adjust your hook size accordingly. For worsted weight I typically use a G hook.
Jellyfish
Finished size: about 4" tall from top of head to end of legs
Sample made with Verdigris and Azure
Body Base
make one with Verdigris (green), beginning with magic ring
Round 1: in mr, ch 1, 6 sc (6 sc)
Round 2: 2 sc in each st (12 sc)
Round 3: [2 sc in first st, 1 sc in next st] repeat around (18 sc)
Round 4: [2 sc in first st, 1 sc in next 2 sts] repeat around (24 sc)
Round 5: [2 sc in first st, 1 sc in next 3 sts] repeat around (30 sc)
Round 6: [2 sc in first st, 1 sc in next 4 sts] repeat around (36 sc)
Finish off and set aside for the next step
Body
Begin with magic ring, using Verdigris (green)
Round 1: in mr, ch 1, 6 sc (6 sc)
Round 2: 2 sc in each st (12 sc)
Round 3: [2 sc in first st, 1 sc in next st] repeat around (18 sc)
Round 4: [2 sc in first st, 1 sc in next 2 sts] repeat around (24 sc)
Round 5: [2 sc in first st, 1 sc in next 3 sts] repeat around (30 sc)
Round 6: [2 sc in first st, 1 sc in next 4 sts] repeat around (36 sc)
Round 7: 1 sc in each st (36 sc)
Round 8: 1 sc in each st (36 sc)
Round 9: 1 sc in each st (36 sc)
Round 10: 1 sc in each st (36 sc)
Round 11: 1 sc in each st (36 sc)
Take the base piece and place it in the opening of your body, continue working the next round by working through both the body and the base, start stuffing as you work your way around the base so that the body is fully stuffed at the end of the round (since the body will be closed up at that point), if you are adding safety eyes you will want to do that at this point (I would place them between rows 9 and 10, with a few stitches in between)
Round 12: 1 sc in each st working through both the the body and the base (36 sc)
Round 13: sl st in first st [sk next st, 4 hdc in next st, sk 1 st, sl st in next st] repeat around (9 shells)
Finish off, weave in ends
Embroider eyes and mouth with embroidery floss
Curly Legs
Make 6 with Azure (blue)
Ch 30
turn, 2 sc in each st (60 sc)
Sew the curly legs evenly around the body base
Straight Legs
Make 6 with Verdigris (green)
ch 20
turn, sl st in each ch to the end (20 sl st)
Sew the legs evenly around the base, just inside of the curly legs
Whale
Finished Size: About 4" long
Sample made with Dewdrop and Clarity
Body
Begin with magic ring, using Dewdrop (light blue)
Round 1: in mr, ch 1, 6 sc (6 sc)
Round 2: 2 sc in each st (12 sc)
Round 3: [2 sc in first st, 1 sc in next st] repeat around (18 sc)
Round 4: [2 sc in first st, 1 sc in next 2 sts] repeat around (24 sc)
Round 5: [2 sc in first st, 1 sc in next 3 sts] repeat around (30 sc)
Round 6: [2 sc in first st, 1 sc in next 4 sts] repeat around (36 sc)
Round 7: [2 sc in first st, 1 sc in next 5 sts] repeat around (42 sc)
Round 8: 1 sc in each st (42 sc)
Round 9: 1 sc in each st (42 sc)
Round 10: 1 sc in each st (42 sc)
Round 11: 1 sc in each st (42 sc)
Round 12: 1 sc in each st (42 sc)
Round 13: 1 sc in each st (42 sc)
Round 14: 1 sc in each st (42 sc)
If you want to add safety eyes rather than embroidering you will want to do this now, place between rows 10 and 11, you want them to be on opposite sides of the whale so they are on the side of the head rather than the front (my embroidered eyes are about 16 stitches apart)
Switch to Clarity (light gray/blue)
Round 15: [sc2tog, sc in next 5 sts] repeat around (36 sc)
Round 16: [sc2tog, sc in next 4 sts] repeat around (30 sc)
Begin stuffing and continue stuffing as you work so that the body is fully stuffed by the time it is done
Round 17: [sc2tog, sc in next 3 sts] repeat around (24 sc)
Round 18: [sc2tog, sc in next 2 sts] repeat around (18 sc)
Round 19: [sc2tog, sc in next st] repeat around (12 sc)
Round 20: sc2tog around (6 sc)
Finish off and weave in ends
Tail
Make 1 with Dewdrop (light blue), begin with magic ring
Round 1: in mr, ch 1, 6 sc (6 sc)
Round 2: [2 sc in first st, 1 sc in next 2 sts] repeat (8 sc)
Round 3: 1 sc in each st (8 sc)
Round 4: [2 sc in first st, 1 sc in next 3 sts] repeat (10 sc)
Round 5: [2 sc in first st, 1 sc in next 4 sts] repeat (12 sc)
Round 6: [2 sc in first st, 1 sc in next st] repeat around (18 sc)
Finish off and cut yarn leaving long tail for sewing
Add stuffing to the tail and then sew to the back of the body, the light gray part is the belly of the whale so that should be on the bottom and the tail should be pretty much lined up with the bottom at the back side of the whale (if you have already added eyes they should be closer to the front, if you haven't added your eyes yet it won't really matter which side you sew the tail on, but I like to sew it on so that it covers my color change on the body)
Tail Fin
Make 1 with Dewdrop (light blue)
ch 7
turn, sl st in first ch from hook, sc, hdc, dc, hdc, sc, sl st
continuing on without cutting yarn repeat above to make the second fin
finish off, cut yarn, stitch fin to the end of the tail
Fins
Make 2 with Dewdrop (light blue), begin with magic ring but you will not join to make a circle, instead you will turn and work back around the opposite way
Round 1: in mr, ch 1, 5 sc (5 sc)
Round 2: ch 1, turn, 1 sc in first st, 2 sc in each of the next 3 sts, 1 sc in last st (8 sc)
Finish off and cut yarn leaving long tail for sewing
Sew fins to the side of the body toward the bottom
Embroider eyes and mouth on whale, stitch the eyes on the sides of the head a few rows up from the bottom, stitch the mouth as a straight line between the two colors on the body all the way across the front.
Sea Turtle
Finished Size: about 3.5" from head to back of shell
Sample Made with Jalapeño and Honeydew
Belly
Make 1 with Honeydew (light green), starting with a magic ring
Round 1: in mr, ch 1, 6 sc (6 sc)
Round 2: 2 sc in each st (12 sc)
Round 3: [2 sc in first st, 1 sc in next st] repeat around (18 sc)
Round 4: [2 sc in first st, 1 sc in next 2 sts] repeat around (24 sc)
Round 5: [2 sc in first st, 1 sc in next 3 sts] repeat around (30 sc)
Round 6: [2 sc in first st, 1 sc in next 4 sts] repeat around (36 sc)
Round 7: [2 sc in first st, 1 sc in next 5 sts] repeat around (42 sc)
Finish off, cut yarn and set aside
Shell
Make 1 with Jalapeño (dark green), starting with a magic ring
Round 1: in mr, ch 1, 6 sc (6 sc)
Round 2: 2 sc in each st (12 sc)
Round 3: [2 sc in first st, 1 sc in next st] repeat around (18 sc)
Round 4: [2 sc in first st, 1 sc in next 2 sts] repeat around (24 sc)
Round 5: [2 sc in first st, 1 sc in next 3 sts] repeat around (30 sc)
Round 6: [2 sc in first st, 1 sc in next 4 sts] repeat around (36 sc)
Round 7: [2 sc in first st, 1 sc in next 5 sts] repeat around (42 sc)
Round 8: 1 sc in each st (42 sc)
Round 9: 1 sc in each st (42 sc)
Place the belly piece in the opening of the shell and on the next round you will crochet around working through both the shell and the belly to attach them together, begin stuffing as you work and continue to add stuffing so that it is completely stuffed by the end of the round
Round 10: 1 sc in each st working through both layers, the shell and the belly (42 sc)
Finish off and weave in ends
Head
Make 1 with Honeydew (light green), starting with a magic ring
Round 1: in mr, ch 1, 6 sc (6 sc)
Round 2: 2 sc in each st (12 sc)
Round 3: [2 sc in first st, 1 sc in next st] repeat around (18 sc)
Round 4: 1 sc in each st (18 sc)
Round 5: 1 sc in each st (18 sc)
If you are using safety eyes you will want to add them at this time, between the 3rd and 4th rows on the sides of the head
Round 6: sc2tog around (9 sc)
Stuff the head
Round 7: 1 sc in each st (9 sc)
Round 8: 1 sc in each st (9 sc)
Finish off and cut yarn leaving long tail for sewing
Sew head to the turtle just under the edge of the shell on the belly
Flippers
Make 4 with Honeydew (light green), begin with magic ring
Round 1: in mr, ch 1, 6 sc (6 sc)
Round 2: [2 sc in first st, 1 sc in next 2 sts] repeat (8 sc)
Round 3: [2 sc in first st, 1 sc in next 3 sts] repeat (10 sc)
Round 4: 1 sc in each st (10 sc)
Round 5: 1 sc in each st (10 sc)
Round 6: 1 sc in each st (10 sc)
Round 7: sc2tog around (5 sc)
Finish off and cut yarn leaving long tail for sewing
Sew flippers to the sides of the belly just under the shell
Embroider face with embroidery floss, 2 small eyes on the sides of the head toward the front and a little smiley mouth on the front


No comments :
Post a Comment