
-This post may contain affiliate links-

I really enjoy embroidery and used to do it a lot more often. When I was in college I worked in a local consignment/quilt shop and I made and sold embroidery patterns. I'm not sure why I haven't done a lot of embroidery lately, but every once in a while I get the desire to pick it up again.
I love that, like crochet, embroidery is a project that I can take anywhere with me. When I used to do a lot of embroidery and sell patterns I rode the train to work and I would bring my embroidery projects with me to work on on the train.
When I am creating embroidery designs I have a tendency to stick with a couple of simple stitches. Backstitch is probably my go-to stitch for most things. But for a while now I have been wanting to make a stitch sampler. A project that uses lots of different stitches and gives you a chance to possibly learn some new stitches.

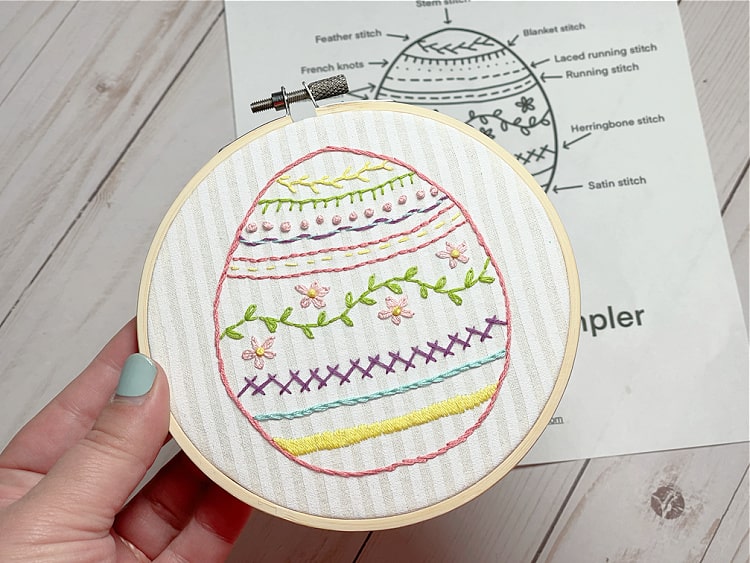
I thought an Easter egg was a perfect way to showcase several different stitches. This Easter Egg Sampler uses a total of 11 different stitches to create the outline of the egg and the designs on it. It uses the running stitch, backstitch, stem stitch, French knots, lazy daisy, herringbone, feather stitch, blanket stitch, laced running stitch, satin stitch, and chain stitch.

How to Stitch an Easter Egg Embroidery Sampler
You will need:
- 5" embroidery hoop
- cotton fabric (8" square)
- embroidery floss in desired colors
- embroidery needle
- washable fabric pen or heat erasable pen
- scissors
- PDF Pattern
Instructions:
Trace the design onto your fabric with a washable fabric marker or a heat erasable pen.
Put the fabric in your hoop, making sure it is tight.
Now you are ready to start stitching. Use 3 strands of embroidery floss throughout.
Follow the pattern to know which stitch to do for each line, or follow this list from top to bottom:
Outline- Stem Stitch
Line 1- Feather Stitch
Line 2- Blanket Stitch
Line 3- French Knots
Line 4- Laced Running Stitch
Line 5- Backstitch
Line 6- Running Stitch
Line 7- Backstitch
Line 8- Lazy Daisy Stitch for flowers and leaves, French Knots for flower centers, Backstitch for vine
Line 9- Herringbone Stitch
Line 10- Chain Stitch
Line 11- Satin Stitch (worked between the 2 bottom lines of the pattern)
Once all of the stitching is done wash out your pen lines if using a washable pen, or use an iron or blow dryer to remove heat erasable pen.
Put the embroidery back in the hoop if you took it out to wash it, making sure it is stretched taught.
Trim the fabric into a circle with about an inch of fabric hanging off around the hoop.
Stitch a running stitch all the way around the edge of the excess fabric and pull to cinch.
Secure in place and leave as is, or add a circle of felt to the back of the hoop to cover the back.
Stem Stitch-
- Bring your needle up through the fabric (point 1)
- Insert the needle one stitch length away, just below the line on the pattern (point 2)
- Bring the needle back up halfway between point 1 and 2, just above the line on the pattern (point 3)
- Insert the needle one stitch length away, just below the line (point 4)
- Repeat
Feather Stitch-
- Bring your needle up through the fabric (point 1)
- Insert the needle a little below the first point (point 2)
- Before you pull the thread tight bring the needle a stitch length over and in between the first two (point 3)
- Pull the thread to make a sideways u or v shape (point 1 and 2 making the arms and point 3 making the point or curve at the bottom)
- Bring the needle up a little above point 3 (point 4)
- Insert the needle 1 stitch length from point 1 (point 5)
- Before you pull the thread tight bring the needle a stitch length over and in between points 3 and 4 (point 6)
- Pull the thread
- repeat the pattern
Blanket Stitch-
- Bring the needle up at the edge of the line
- Insert the needle at the bottom of the first short line
- Before pulling your thread tight bring the needle up at the top of the first line with the working thread behind the needle, then pull tight creating an L shape
- Repeat
French Knot-
- Bring your needle up where you want your know
- Wrap the thread 2-3 times around your needle (less makes a smaller knot, more makes a bigger knot, just keep it consistent so all of your knots are the same size, I did 3 wraps on my knots)
- Insert the needle close to the place you came up, and keeping the knots snug against the needle pull it through
Backstitch-
- Bring your needle up 1 stitch length in front of the beginning of the line
- Insert your needle back at the beginning of the line
- Bring your needle up 1 stitch length in front of the last stitch
- Insert it back at the same place the previous stitch ended
- Repeat
Running Stitch-
- Bring the needle up at the start of your line
- Insert the needle 1 stitch length after
- Leave a space and bring the needle up
- Repeat creating a dashed line of stitches
Lazy Daisy Stitch-
- Bring the needle up at the starting point of your stitch (the part of the leaf touching the vine or the center of the flower)
- Make a loop with your thread and insert the needle back in the same place as you started
- Bring the needle up a short distance from where you started (this will be the top of your leaf or petal) and pull it through the loop
- Insert the needle on the other side of the thread loop to tack it in place
- Repeat along the backstitched line for the leaves, or repeat 5 times in a circle for the flowers
Herringbone Stitch-
- Bring the needle up at the beginning of the row (it starts at the bottom one of the diagonal legs in the pattern) (point 1)
- Insert the needle diagonally up from the beginning (point 2)
- Bring the needle up a small distance before point 2 (point 3)
- Insert the needle diagonally down from point 3 (point 4)
- Bring the needle up a small distance before point 4 (point 5)
- Repeat
Chain Stitch-
- Bring the needle up at the beginning of the line
- Make a loop with your thread and insert the needle back down in the same place
- Bring the needle up 1 stitch length from the beginning and pull it up through the loop
- Repeat to the end, tacking the last loop in place with a small stitch
Satin Stitch-
- Bring the needle up on the top of your shape (in this case the top line)
- Insert the needle directly below along the bottom of your shape (in this case the bottom line)
- Bring the needle up close to the first stitch along the top
- Insert close to the previous stitch along the bottom
- Repeat until your whole shape is filled

Thanks for your post. It's very helpful post for us. You can also visit aari work in blouse for more Victor Steel related information. I would like to thanks for sharing this article here.
ReplyDelete