
-This post may contain affiliate links-
With Easter just around the corner I have been wanting to make some Easter decorations, but since it is coming up quick I wanted something I could make up really fast. This little Bunny Tails Sign fit the bill perfectly.

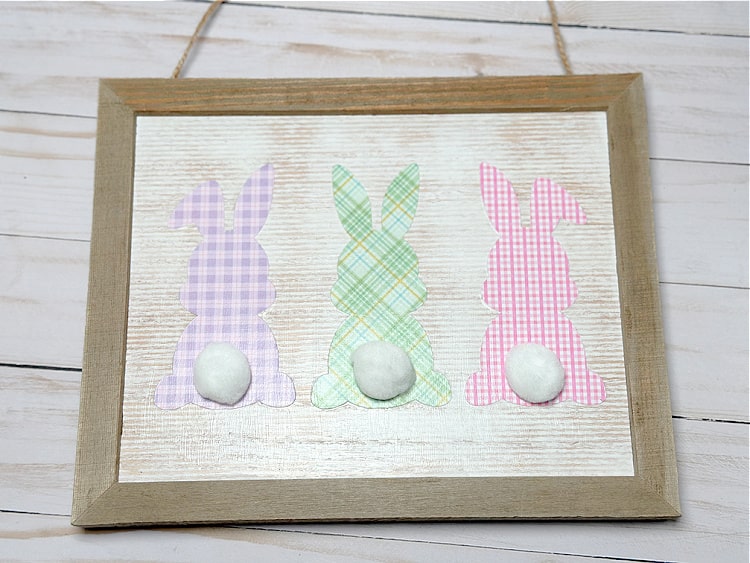
I cut out some little bunny silhouettes and then used pom poms to make their little puffy tails. I originally thought of using vinyl to cut out the bunny shapes, and you totally could, in fact it would probably be easier and cut out a few steps. But I decided I wanted to use some kind of spring or Easter prints and I really only had solids in the colors I wanted to use, so I decided to use paper instead.

I chose some plaid papers in pastel colors for my bunnies, Mod Podged them onto the sign that I used, and then when the Mod Podge was dry I glued on the little Pom Pom tails. It was super quick and easy to make, the longest part was the time it took to dry.

How to Make Bunny Tails Sign
You will need:
- Cricut
- paper in desired colors and prints (I used a 6x6 paper pad of plaid prints from Michaels)
- wood plaque
- 3 white pom poms, 1" diameter
- Mod Podge
- paintbrush
- glue gun
Instructions:
I used my Cricut Maker to cut the bunny shapes out of paper. There were several bunny shapes available in design space but I found one that I liked for this project and it happened to have the 3 bunnies that I needed. It also had little tails, but I just hid those since I didn't need them. I resized them to fit the sign I was using. You can find my Design Space Project here:
Once you have your bunnies sized to fit the sign you are using, cut them out of paper.
Use the Mod Podge to glue the paper bunnies to the wood board, let dry. Then add a layer of Mod Podge over the top of the bunnies and over the whole sign.
When the Mod Podge is dry use a glue gun to glue a Pom Pom to the bottom of each bunny.

No comments :
Post a Comment