
-This post may contain affiliate links-
About a week ago I shared on Instagram that I had a project that I was working on for later in the month, and this week is the week! This Thursday, March 2nd is Dr. Seuss's birthday, also known as Read Across America Day. This week a lot of schools have read-a-thons and other reading activities. I know my kids schools often have a spirit week with different dress up days themed around books and reading, sometimes parent and family reading activities, and usually a school wide read-a-thon.

Besides crafting, reading has always been one of my favorite pastimes, so I have always thought it would be fun to combine the two. Each year when this week comes around I wish I would have planned ahead to make some book themed crafts. I thought it would be fun to choose a few of my favorite books, books I liked as a kid, books that my kids enjoy, etc., and make a craft inspired by those books. This year I finally planned ahead enough to make it happen. I have chosen 5 books, one for each day this week Monday-Friday, that have some sort of significance to me, and I have made a craft inspired by each of those 5 books.

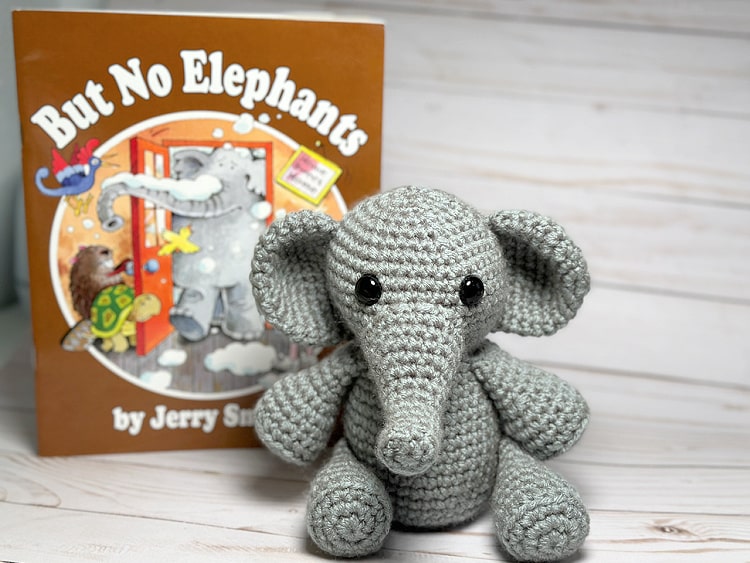
Today is Day 1, and I have decided to start in kind of a youngest to oldest order for the books, so the first book is a picture book that I loved as a little kid called But No Elephants. But, the story of why this book is one that I chose goes beyond liking it as a little kid. There are several books I enjoyed as a young child that I could have chosen but this one has kind of a fun story behind it for my family.

This was a book that I remember my mom reading when I was a kid, I remember reading it to my younger siblings, it was always a family favorite, but it was one of those books that I never saw or heard of outside of our family so I kind of assumed it was one that no one else read or knew about. Before my husband and I were married he was over at my house and somehow this book came up, I don't remember if one of my siblings pulled it out or if Jake just saw it on the bookshelf, but when he saw it he got really excited. He told me it was one of his favorite books as a little kid and that he had fond memories of his parents reading it to him. But, like me he had never seen it anywhere else or heard anyone else talk about it so he figured it was a book only his family knew and loved. It was fun to make that connection and talk about books we loved as kids. Needless to say, later when we were expecting our first baby and building a little library of books for our kids But No Elephants was one of the first ones that we bought.

For the project to go along with this book I chose the obvious thing, an elephant. I have lots of animals I would like to make crocheted versions of, and an elephant has been on that list for a long time. Figuring out the elephant's trunk and ears has always kind of intimidated me and caused the elephant to be pushed further and further down the list. But, I figured this was the perfect opportunity to make it happen and I finally made an elephant. This little guy is perfect for cuddling while reading But No Elephants!

How to Crochet an Amigurumi Elephant
You will need:
- worsted weight yarn in gray (sample made with Red Heart Super Saver Dusty Grey)
- G crochet hook
- Safety eyes, 14 mm
- Polyfil fiberfill
- yarn needle
- scissors
Instructions:
The body and head of the elephant are made in one piece, from the bottom up, the other pieces are made separately and sewn on at the end. All of the pieces are made starting with the magic ring.
Body and Head
Begin with magic ring, using gray yarnRound 1: in mr, ch 1, 6 sc (6 sc)
Round 2: 2 sc in each st (12 sc)
Round 3: [2 sc in first st, 1 sc in next st] repeat around (18 sc)
Round 4: [2 sc in first st, 1 sc in next 2 sts] repeat around (24 sc)
Round 5: [2 sc in first st, 1 sc in next 3 sts] repeat around (30 sc)
Round 6: [2 sc in first st, 1 sc in next 4 sts] repeat around (36 sc)
Round 7: 1 sc in each st (36 sc)
Round 8: 1 sc in each st (36 sc)
Round 9: 1 sc in each st (36 sc)
Round 10: 1 sc in each st (36 sc)
Round 11: 1 sc in each st (36 sc)
Round 12: 1 sc in each st (36 sc)
Round 13: 1 sc in each st (36 sc)
Round 14: 1 sc in each st (36 sc)
Round 15: 1 sc in each st (36 sc)
Insert the weighted base into the bottom of the body
Round 16: [sc2tog, 1 sc in next 4 sts] repeat around (30 sc)
Round 16: [sc2tog, 1 sc in next 4 sts] repeat around (30 sc)
Round 17: 1 sc in each st (30 sc)
Round 18: 1 sc in each st (30 sc)
Round 19: [sc2tog, 1 sc in next 3 sts] repeat around (24 sc)
Round 20: [sc2tog, 1 sc in next 2 sts] repeat around (18 sc)
This is the end of the body portion, begin stuffing and continue to stuff as you work
Round 21: 2 sc in each st (36 sc)
Round 22: [2 sc in first st, 1 sc in next 5 st] repeat around (42 sc)
Round 23: 1 sc in each st (42 sc)
Round 24: 1 sc in each st (42 sc)
Round 25: 1 sc in each st (42 sc)
Round 26: 1 sc in each st (42 sc)
Round 27: 1 sc in each st (42 sc)
Round 28: 1 sc in each st (42 sc)
Round 29: 1 sc in each st (42 sc)
Round 30: [sc2tog, 1 sc in next 5 sts] repeat around (36 sc)
Insert Safety Eyes between rows 27 and 28, about 5 or 6 stitches apart
Round 31: [sc2tog, 1 sc in next 4 sts] repeat around (30 sc)
Round 32: [sc2tog, 1 sc in next 3 sts] repeat around (24 sc)
Round 33: [sc2tog, 1 sc in next 2 sts] repeat around (18 sc)
Round 34: [sc2tog, 1 sc in next st] repeat around (12 sc)
Round 35: sc2tog around (6 sc)
Finish off, weave around opening to close, weave in end
Trunk (make 1)
Begin with magic ring, using gray yarn
Round 1: in mr, ch 1, 6 sc (6 sc)
Round 2: [2 sc in first st, 1 sc in next] repeat around (9 sc)
Round 3: 1 sc in blo of each st (9 sc)
Round 4:1 sc in each st (9 sc)
Round 5: 1 sc in each st (9 sc)
Round 6: 1 sc in each st (9 sc)
Round 1: in mr, ch 1, 6 sc (6 sc)
Round 2: 2 sc in each st (12 sc)
Round 3: [2 sc in first st, 1 sc in next st] repeat around (18 sc)
Round 5: 1 sc in each st (9 sc)
Round 6: 1 sc in each st (9 sc)
Round 7: 1 sc in each st (9 sc)
Round 8: [2 sc in first st, 1 sc in next 2 sts] repeat around (12 sc)
Round 9: 1 sc in each st (12 sc)
Round 10: 2 sc in first st, 1 sc in next st, 2 sc in next st, 1 sc in next 9 sts (14 sc)
Round 11: 2 sc in first st, 1 sc in next 3 sts, 2 sc in next st, 1 sc in next 9 sts (16 sc)
Round 12: 1 sc in first st, 2 sc in next st, 1 sc in next 3 sts, 2 sc in next st, 1 sc in next 10 sts (18 sc)
Round 13: 1 sc in each st (18 sc)
Round 14: [2 sc in first st, 1 sc in next 2 sts] repeat around (24 sc)
Finish off leaving long tail for sewing
Ears (make 2)
Begin with magic ring, using gray yarn
Round 1: in mr, ch 1, 6 sc (6 sc)
Round 2: 2 sc in each st (12 sc)
Round 3: [2 sc in first st, 1 sc in next st] repeat around (18 sc)
Round 4: [2 sc in first st, 1 sc in next 2 sts] repeat around (24 sc)
Round 5: [2 sc in first st, 1 sc in next 3 sts] repeat around (30 sc)
Round 6: 1 sc in each st (30 sc)
Round 2: 2 sc in each st (12 sc)
Round 3: [2 sc in first st, 1 sc in next st] repeat around (18 sc)
Round 4: [2 sc in first st, 1 sc in next 2 sts] repeat around (24 sc)
Round 5: [2 sc in first st, 1 sc in next 3 sts] repeat around (30 sc)
Round 6: 1 sc in each st (30 sc)
Round 7: 1 sc in each st (30 sc)
Round 8: 1 sc in each st (30 sc)
Round 9: [sc2tog, 1 sc in next 3 sts] repeat around (24 sc)
Finish off leaving long tail for sewing
Legs (make 4)
Begin with magic ring, using gray yarnRound 1: in mr, ch 1, 6 sc (6 sc)
Round 2: 2 sc in each st (12 sc)
Round 3: [2 sc in first st, 1 sc in next st] repeat around (18 sc)
Round 4: 1 sc in blo of each st (18 sc)
Round 5: 1 sc in each st (18 sc)
Round 6: 1 sc in each st (18 sc)
Round 5: 1 sc in each st (18 sc)
Round 6: 1 sc in each st (18 sc)
Round 7: 1 sc in each st (18 sc)
Round 8: [sc2tog, 1 sc in next st] repeat around (12 sc)
Round 9: 1 sc in each st (12 sc)
Round 10: 1 sc in each st (12 sc)
Round 11: 1 sc in each st (12 sc)
Round 12: 1 sc in each st (12 sc)
Finish off and cut yarn leaving a long tail for sewing
Round 8: [sc2tog, 1 sc in next st] repeat around (12 sc)
Round 9: 1 sc in each st (12 sc)
Round 10: 1 sc in each st (12 sc)
Round 11: 1 sc in each st (12 sc)
Round 12: 1 sc in each st (12 sc)
Finish off and cut yarn leaving a long tail for sewing
Assembly
Lightly stuff the top of the trunk (closest to the opening) leaving the end unstuffed. Sew the trunk to to the face just below the eyes.
Flatten the ears, then curve to fit to the side of the head. Sew one ear on each side of the head.
Stuff the ends of the legs and sew one to each side of the body at the top for "arms", then sew two to the bottom for the legs. You can sew in a sitting position like I did, or you can sew them in a standing position.

No comments :
Post a Comment