
-This post may contain affiliate links. As an Amazon affiliate, I earn from qualifying purchases. I receive a small commission at no cost to you when you make a purchase using my link.-
*Ebook with all 12 patterns included available for purchase on Etsy and Ravelry
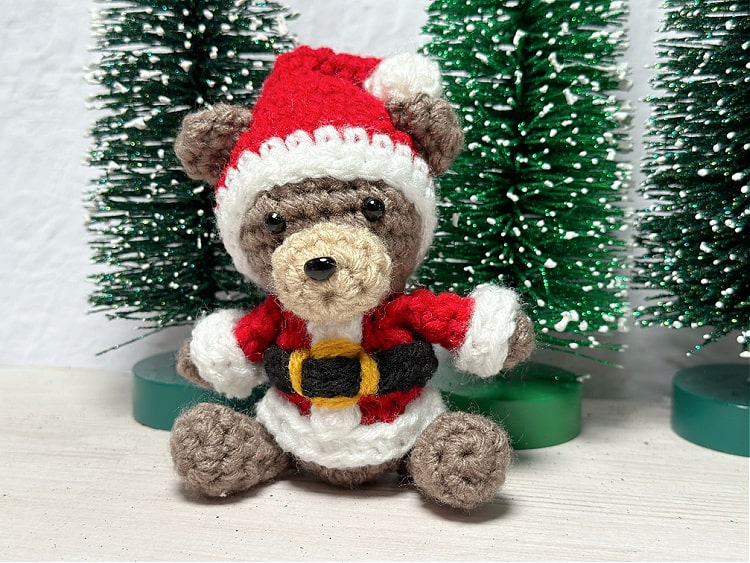
We have made it to the end of the Woodland Christmas Mini Amigurumi Crochet Along. It is Day 12 and we are finishing up the crochet along with a little Santa, but to stick with the woodland theme this little Santa comes in the form of a bear.

Last year's Mini Amigurumi Advent ended with a Santa on the last day, so I thought it would be fun to have a Santa show up on the last day again. As soon as I had the idea to include a Santa I quickly decided that a bear would be the perfect animal for the job.

The Santa Bear is the same size as the other animals in the set and made in the same way. He is dressed in a tiny Santa coat and hat. I'm not going to lie, this little Santa Bear might be might favorite of the whole set.

The suit is made by working part of the body in red, rather than the color of the bear. Then white strips are wrapped around to make the fur trim. And it is topped off with a little Santa hat on its head. There are a couple of pieces missing in the picture, one is the pompom for the hat because I just forgot to stick it in the picture. The other is the second ear, my original plan was to only have an ear showing on one side and to have the other side covered by the hat being folded down, but once I put it together I felt like it looked really off so I added the second ear.

I have had so much fun with this little crochet along, and I hope you have enjoyed it too. It took me a long time to decided on the theme for this time around. And even once I decided and started working on it I questioned whether or not it was the right choice. But as I continued to work on it I kind of fell in love with the theme. I am happy with the choice and the 12 little Woodland Christmas creatures that I made. Now to decide on the theme for the spring.

*Ebook with all 12 patterns included available for purchase on Etsy and Ravelry
How to Crochet a Santa Bear
Finished Size about 4" tall sitting
You will need:
- Worsted weight yarn in brown, tan, red, black, gold, and white (Sample made with Red Heart Super Saver in Buff, Cherry Red, Black, Gold, and White and Big Twist Value Worsted in Taupe)
- G crochet hook (4/4.25 mm)
- 2- 6mm safety eyes
- 8 or 9 mm safety nose
- stuffing
- yarn needle
- stitch markers
- scissors
Instructions:
The body, arms, legs, hat, and ears are made starting with a magic ring. The fur strips and belt are made starting with a chain that you will single crochet into. Because of the placement of some of the pieces, wrapping the fur strips around, the ears sticking out through the hat, etc., I would recommend making all of the pieces first, then assembling them all at the end. Safety eyes and nose attached where directed, if you choose two embroider the eyes and nose (better for small children) just embroider in the same spot.
Body/Head
Make 1 starting with brown yarn, changing to red where directed, beginning with magic ring
Round 1: in mr, ch 1, 6 sc (6 sc)
Round 2: 2 sc in each st (12 sc)
Round 3: [2 sc in first st, 1 sc in next st] repeat around (18 sc)
Round 4: 1 sc in each st (18 sc)
Change to red yarn
Rounds 5-8: 1 sc in each st (18 sc)
Begin stuffing and continue stuffing as you work
Round 9: sc2tog around (9 sc)
Change to brown yarn
Round 10: 2 sc in each st (18 sc)
Round 11: [2 sc in first st, 1 sc in next 2 sts] repeat around (24 sc)
Round 12: 1 sc in each st (24 sc)
Rounds 13-15: 1 sc in each st (24 sc)
Round 16: [sc2tog, sc in next 2 sts] repeat around (18 sc)
Insert safety eyes between rounds 13 and 14 about 3 stitches apart
Round 17: [sc2tog, sc in next st] repeat around (12 sc)
Round 18: sc2tog around (6 sc)
Finish off, weave in ends
Nose
Make 1 with white yarn, beginning with a magic ring
Round 1: in mr, ch 1, 6 sc (6 sc)
Round 2: 2 sc in each st (12 sc)
Round 3: 1 sc in each st (12 sc)
Finish off and cut yarn, leaving long tail for sewing
Insert safety nose, or embroider, to the nose
Ears
Make 2 with brown yarn, beginning with a magic ring
Round 1: in mr, ch 1, 6 sc (6 sc)
Round 2: [2 sc in first st, 1 sc in next st] repeat (9 sc)
Finish off and cut yarn, leaving long tail for sewing
Flatten the into a semicircle and set aside
Arms
Make 2 starting with brown yarn and changing to red where directed, beginning with a magic ring
Round 1: in mr, ch 1, 6 sc (6 sc)
Round 2: [2 sc in first st, 1 sc in next st] repeat around (9 sc)
change to red yarn
Round 3: [sc2tog, sc in next st] repeat around (6 sc)
Rounds 4-5: 1 sc in each st (6 sc)
Finish off and cut yarn leaving a long tail for sewing
Legs
Make 2 with brown yarn, beginning with a magic ring
Round 1: in mr, ch 1, 6 sc (6 sc)
Round 2: 2 sc in each st (12 sc)
Round 3: 1 sc in each st (12 sc)
Round 4: sc2tog around (6 sc)
Rounds 5-6: 1 sc in each st (6 sc)
Finish off and cut yarn leaving a long tail for sewing
Hat
Make 1 starting with red yarn and changing to white where directed, beginning with a magic ring
Round 1: in mr, ch 1, 4 sc (4 sc)
Round 2: [2 sc in first st, 1 sc in next] repeat (6 sc)
Round 3: [2 sc in first st, 1 sc in next 2 sts] repeat (8 sc)
Round 4: [2 sc in first st, 1 sc in next 3 sts] repeat (10 sc)
Round 5: [2 sc in first st, 1 sc in next 4 sts] repeat (12 sc)
Round 6: [2 sc in first st, 1 sc in next 5 sts] repeat (14 sc)
Round 7: [2 sc in first st, 1 sc in next 6 sts] repeat (16 sc)
Round 8: [2 sc in first st, 1 sc in next 7 sts] repeat (18 sc)
Round 9: [2 sc in first st, 1 sc in next 2 sts] repeat around (24 sc)
Rounds 10-12: 1 sc in each st (24 sc)
Change to white yarn
Rounds 13-14: 1 sc in each st (24 sc)
Finish off and cut yarn leaving a long tail for sewing
Pompom
Make 1with white yarn, beginning with a magic ring
Round 1: in mr, ch 1, 6 sc (6 sc)
Round 2: [2 sc in first st, 1 sc in next st] repeat around (9 sc)
Round 3: [sc2tog, sc in next st] repeat around (6 sc)
Finish off and cut yarn leaving a long tail for sewing
Fur Trim
You will make 4 total trim pieces- 2 sleeve trim, 1 coat front trim, 1 coat bottom trim
Sleeve Trim
make 2 with white yarn
ch 11
turn, sk first ch, sc in each ch to the end (10 sc)
Finish off and cut yarn leaving a long tail for sewing
Front Trim
make 1 with white yarn
ch 6
turn, sk first ch, sc in each ch to the end (5 sc)
Finish off and cut yarn leaving a long tail for sewing
Bottom Trim
make 1 with white yarn
ch 22
turn, sk first ch, sc in each ch to the end (21 sc)
Finish off and cut yarn leaving a long tail for sewing
Belt
make 1 with black yarn
ch 22
turn, sk first ch, sc in each ch to the end (21 sc)
Finish off and cut yarn leaving a long tail for sewing
Assembly
Sew the nose to the face below the eyes, add a tiny bit of stuffing as you stitch it on
Pull the hat over the head and stitch in place
Flatten the ears and curve them slightly, stitch them in place on top of the head/hat
Sew the pompom to the tip of the hat, bend the hat over and stitch the pompom to the side of the hat to keep it in the bent position
Sew the legs to the bottom of the bear in a sitting position
Wrap the bottom trim around the bottom of the body covering the transition from brown to red, stitch in place
Stitch the front trim to the front center of the body, from the top of the coat down to the bottom trim
Wrap the belt around the body and stitch in place
Use gold yarn to stitch a square around the belt where it crosses over the front trim to make a buckle
Wrap the sleeve trim around the arms covering the color transition, stitch in place
Stitch the arms to the side of the body

No comments :
Post a Comment