
-This post sponsored by Cricut, all ideas and opinions are my own. This post contains affiliate links.-

I use my Cricut all the time when I need to make a quick craft, and during the holiday season that is especially the case. I was thinking about all of the different materials that my Cricut Maker 3 can cut, and all of the different types of projects that I can make with it, and I thought it would be fun to do a Christmas project using a variety of different materials and project types to kind of showcase what you can do with a Cricut Maker.

I thought it would be fun to choose a theme and then use the Cricut Maker to make a variety of ornaments all based around that theme. The idea being that you could decorate a tree with this theme using the ornaments that you make with the Cricut. I chose to use the Cricut Maker because it has the widest variety of tools to use and materials it can cut.
I decided to go with a theme of "Mrs. Claus' Bakery". I was thinking Christmas cookies, candy, and gingerbread men and houses.

I chose 4 different ornaments to make using the different materials and tools.
The first ornament that I made was a little gingerbread man face. I had some little round wooden ornaments and thought I would use those as a blank and add some vinyl to make one of the ornaments in my set. Adding adhesive vinyl to a blank with a smooth, hard surface like this is a great, easy way to make ornaments with your Cricut. And any of the Cricut machines could be used to make this ornament.

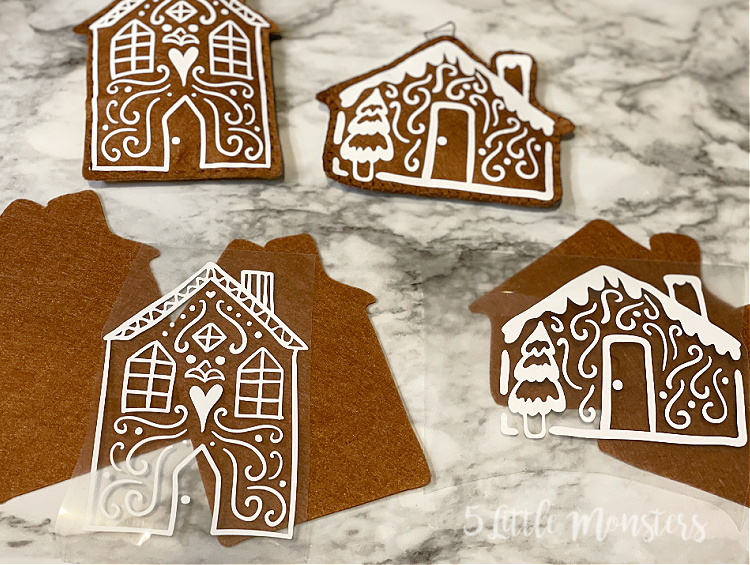
Next I wanted to use iron on. Another material that I use all the time, and that I felt like I had to use if I was showcasing different materials. Since you often use iron on with fabrics I thought I would combine it with felt that I also cut with the Maker. I like to use the rotary blade to cut felt. It cuts so smoothly and easily. I made brown felt gingerbread houses, then used white iron on to make the white icing designs.
I wanted to make a sign that looked like a bakery sign, so for this one I wanted to make a custom shape. I used basswood and the knife blade to cut out the sign shape. I also wanted to try wood veneer, so I cut out two basswood signs and glued wood veneer to one of them for a different look. Once I had the wood sign I added vinyl to it to finish.

Last, I wanted to make a paper ornament so I found a candy cane snowflake design in Design Space and I layered it with a solid shape using foam squares to give it a little dimension and I had a super easy paper ornament. This is another that could be made on any Cricut machine.

This just barely scratched the surface of the materials and tools that can be used with the Cricut Maker, there are so many more options. But it was fun to come up with a variety of ornaments and see a little bit of what one machine could do

How to Make Mrs. Claus' Bakery Ornaments with Cricut Materials
You will need:
For Gingerbread Man
- Wood Ornament Cutouts
- Vinyl in White, Black, Pink, Red
- Brown Paint
- Wet Wipes
Felt Gingerbread Houses
- Fabric Mat
- Rotary Blade
- Brown Felt
- White Iron On
- EasyPress (I used my Mini)
- EasyPress Mat
- Embroidery Floss
- Embroidery Needle
- Stuffing
Wooden Bakery Sign
- Strong Grip Mat
- Basswood
- Wood Veneer
- Knife Blade
- Deep Point Blade
- Vinyl in Black or White
- Transfer Tape
- Wood Glue (if using veneer)
- Masking Tape
Candy Cane Snowflake
- White Cardstock
- Red Cardstock
- 3d Foam Squares
Instructions:
Open the North Pole Bakery Design Space File to get all of the designs that I used. Resize each as needed to fit your needs. Assemble each following the directions below.
Gingerbread Man
Put a small amount of brown paint on the wooden ornament cutout, then use the wet wipe to wipe off so it leaves a thin faux stain layer of paint. Or if you prefer a more solid look just paint it like normal. Set aside to let dry.
Cut the face pieces out of vinyl:
Circle- white
Eyes & Mouth- black
Cheeks- pink
Bow - red
You can use transfer tape to put the vinyl on the ornament, or just place them on one at a time. Since they are all pretty small, individual pieces I just stuck them on like a sticker, peel them off the backing and stick in place.
Add a string for a hanger.
Gingerbread Houses
I made two different styles of these houses but there were several available in Design Space. If you click on the image set, or search for Gingerbread House Cookie, you will find like 8 different house designs.
Cut the house shapes out of brown felt. You can use the fine point blade for this but I prefer to use the rotary blade. I feel like it cuts the felt so much better. You will cut 2 houses for each ornament.
Cut the icing design out of white iron on. Weed iron on design.
Press icing design onto one of the felt houses.
Place the two houses together with the icing side up and stitch around the outside. I used a blanket stitch around the outside of one, and a simple running stitch on the other. When you have stitched a little over halfway around add a tiny bit of stuffing between the layers. You don't need a lot of stuffing at all, just a tiny bit to add a little puffiness to the ornament. Finish stitching around the outside.
Add some embroidery floss to the top to make a hanger.
Bakery Sign
Use the knife blade to cut out the basswood sign. Be sure to move the star wheels over to the side and tape your basswood down to your mat.
If you want to use the wood veneer cut out the same sign shape from wood veneer using the deep point blade.
Use wood glue to glue the veneer to the basswood. You may want to set it under something heavy while it dries so it dries flat and doesn't peel up.
Use transfer tape to add the vinyl decal onto the wood sign shape.
Add twine or string to make a hanging loop
Candy Cane Snowflake
Cut the candy cane snowflake layers out of red and white cardstock. You should have 2 red snowflake layers and 1 white solid layer.
Use foam squares to stick the layers together, sandwiching the white layer in between the 2 red layers. You may need to cut the squares down to fit them between the spaces on the snowflake. I cut mine in half, or even in quarters to make them fit.
Add a string loop for hanging.
These are adorable
ReplyDelete