
-This post may contain affiliate links-

My 9 year old daughter is one who feels things very deeply and is very sensitive to things going on around her. But even knowing that I don't think I really anticipated how much she would be affected by the war in Ukraine. Ever since she found out about what was happening she has been very concerned about the people there. She prays for them regularly and talks to us about it a lot. I know that she wishes there was more she could do to help.

On Easter Sunday we got together with my family and my sister put together an Easter egg hunt for the kids. Most of the eggs were filled with candy, but inside some eggs were tickets. The kids could use those tickets to "buy" items for a few different charities. She had 3 different organizations they could choose from and an area set up for each with items they could buy with their tickets. They could get toys or coloring books to donate to the Shriner's Hospital, drinks and snacks to donate to the Ronald McDonald House, or they could get things like baby items and first aid supplies to donate to help Ukrainian refugees.

As soon as my daughter found out that there was stuff they could buy to help Ukrainian refugees she was so excited. There was finally something she could do to help them. She got her little brother on board with her and they put all of their eggs together and found all of their tickets. Then they immediately ran over to the Ukraine area and used their tickets to buy pacifiers, diapers, wipes, onesies, and more. They were more excited about helping the kids from Ukraine who had to leave their homes than about the candy in their eggs. It made me really happy to see them get so excited about helping others. My son, who is 5, has mentioned several times since then how some kids in Ukraine had to leave there homes with nothing and he was so happy they could buy some things to help them. Having the opportunity to do that made a really big impact on the two of them.
The next day I was working in Cricut Design Space making a project, and I saw one of their Ukraine designs pop up. I knew that they had a bunch but I hadn't really looked that closely before. When I saw them this time though, I knew I needed to make a shirt for my daughter, it was something that she was so passionate about and cared about so much that I knew it would mean a lot to her to have a shirt that she could wear.

I chose a few designs and let her pick the one she wanted, and then bought a couple of shirts so that she could have a Ukraine shirt. She kept telling me that having a shirt would show people that she "stands with Ukraine". I don't know where she had heard that phrase before but she said it several times, so since I had the stuff to make 2 shirts I ended up making the one that she picked as well as another that said "Stand with Ukraine.

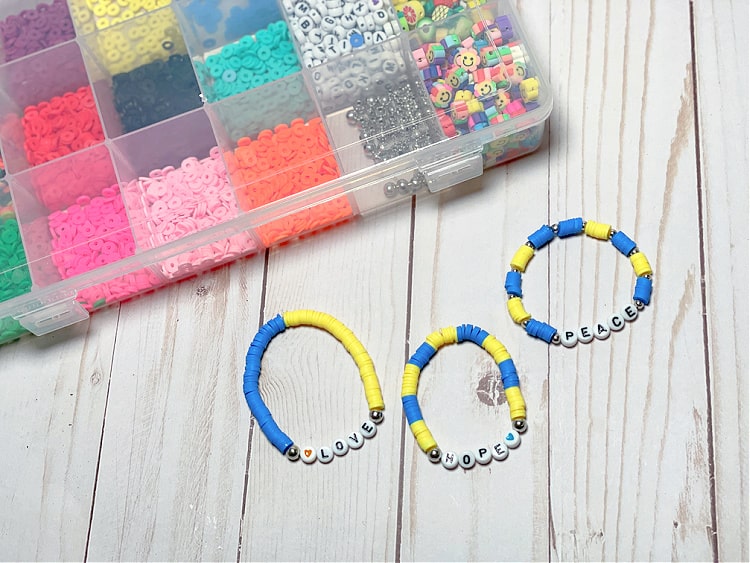
We also made some simple beaded bracelets that she could wear that were in yellow and blue and had words like hope, peace, and love.

She was so excited about all of it and couldn't wait to wear her new shirts and bracelets. One of the things that I love most about crafting is being able to make things like this. Wearing a shirt that says "Stand with Ukraine" doesn't really make a big difference to what is happening there, but for one little 9 year old girl in Utah it makes her feel like she is showing her support to the people there and it gives her an opportunity to express her feelings on events that are happening in her world, even if it is far away. And that it is 100% worth it in my mind. There may not be much she can do besides pray, donate to help refugees, and wear a special t-shirt, but she is doing all of those things and it means a lot to her to be able to.

How to Make Ukraine Shirts and Bracelets
You will need:
T-Shirts
- Cricut Maker or Explore (I used my Maker 3)
- t-shirts
- iron on in blue and yellow, and other colors needed for the designs
- EasyPress
- EasyPress Mat
Bracelets
- clear stretch cord (I used .8mm)
- clay disc beads in blue and yellow
- letter beads
- round silver beads
- super glue
Instructions:
T-Shirts
Begin by choosing the design you want to use. I just searched Ukraine in Design Space and a lot of options came up.
We ended up using Peace Love Ukraine- image #M37BD1BBF and Stand With Ukraine- image #M37DD0F65
Resize your design to fit the shirt (or other item) you are putting it on. For my daughter's kids size 10/12 shirts I made the images 8 inches wide, for a smaller child size you would want to make it smaller, and for adults I usually do around 9 inches, maybe larger depending on the shirt size.
Cut your designs out of iron on. Don't forget to mirror your designs and place the iron on shiny side down.
Weed the designs.
Iron onto the shirt using the recommended heat settings for the vinyl and EasyPress/Heat press/Iron that you are using.
Bracelets
Cut a length of cord about twice as long as the size that you want your finished bracelet to be, this will give you extra length to work and tie your bracelet at the end.
For these bracelets I started in the middle with the word that I wanted. Add the letters to spell the word to the center of the string.
Next add a bead to each side of the word as a spacer bead. I used small round silver beads. This step isn't absolutely necessary but I liked the look of adding that bead between the letters and clay disc beads.
Then add colored beads on either side of the word in the pattern that you want until you have the length that you need. I did different patterns on each bracelet. One had all yellow beads on one side and all blue on the other. Another had alternating sections of 10 yellow and 10 blue all the way around. And the last had alternating sections of 8 blue and 8 yellow with a silver ball in between each color. But this is your bracelet, you can make it any way you want.
Tie the ends of the bracelet together, knotting securely, then put a drop of super glue on the knot. I like to squeeze it between the last two beads, and hold it in place until the glue is starting to set.
Let the glue dry completely before using the bracelet. Cut the excess string from the end.

No comments :
Post a Comment