
-This post may contain affiliate links-
I rarely buy a new skein of yarn just because I like it. I usually only buy new yarn when I have a specific project in mind and I typically go to the store looking for exactly what I need. I'm not a very impulsive buyer, but every once in a while I see some yarn that I wasn't planning on buying but I immediately picture in my mind the perfect project and decide I have to get it. Then sometimes I bring that yarn home and start working on that perfect project only to find that I kind of hate it, the project not the yarn, like maybe that wasn't the perfect project for that yarn after all.
That happened to me earlier this year. I went to Micheals, not really to buy anything, but because my husband was getting a haircut next door so rather than wait there I decided to wander around Micheals while I waited. I saw some O'Go yarn that I thought the colors were fun and I decided to get a couple. I knew exactly what I was going to make. I was going to make some multicolor hats, I knew what stitch I was going to use and everything. I even made some TikTok videos about it.

Then I started making them. I didn't love the different colors on the hat, it was too busy. I felt like the stitch I used made the sizing and shape of the hat weird. It just wasn't turning out the way I wanted. I liked the feel and the colors of the yarn, but I hated the hats. So I pushed it aside on my desk not quite sure what to do with it and there it stayed for a couple of months.
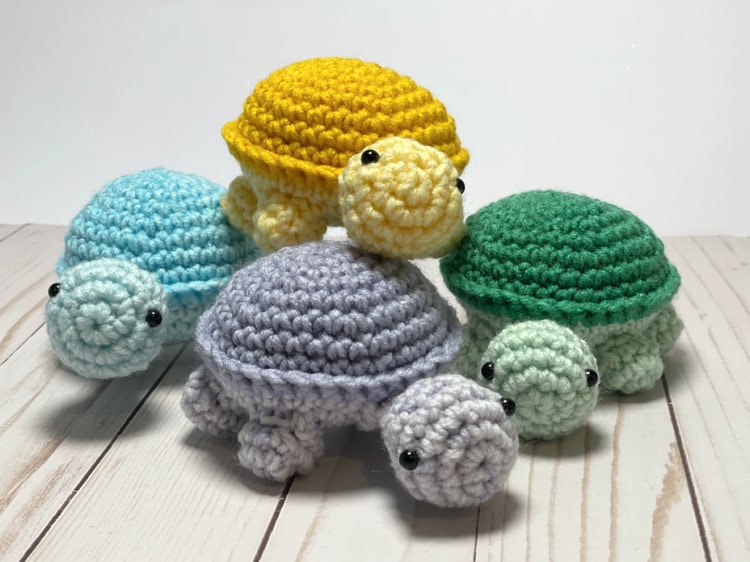
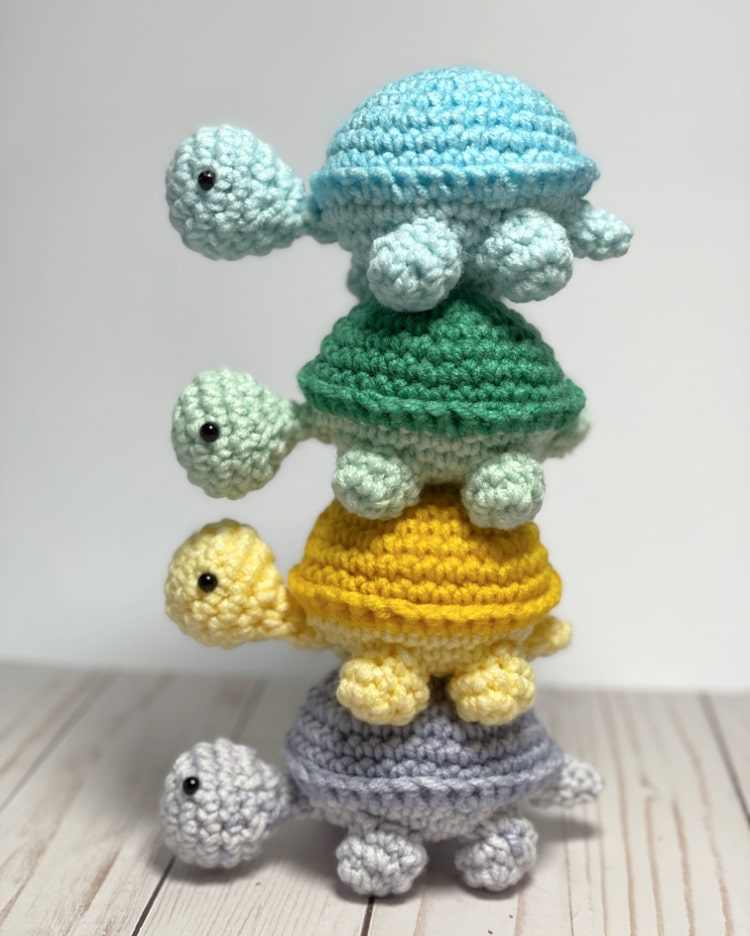
Then an idea popped into my head of what I could make with that yarn, and this time I didn't hate it, in fact I kind of love it. The colors in the skein (if that is what you call a thing of O'Go yarn) had various shades of each color. I paired two of the shades of each of the colors, a lighter and a darker shade of each color, to make a tiny little turtles.

They are only about 2.5" tall and 5" long so they are pretty small, just the right size to fit in my hand.

I think the colors turned out pretty cute, the yarn that I used had a slightly tonal variation that I really liked. You could obviously pair any two colors together, but I really like the way the two shades of one color turned out, and in the end I had a cute little rainbow of turtles.

*Purchase an ad-free version of this pattern on Ravelry or Etsy
How to Crochet Tiny Turtles
You will need:
- worsted weight yarn in 2 colors (samples made with Caron Big Donut in Blue Moon and Mint Julep)
- G crochet hook
- small safety eyes (6mm)
- fiberfill
- yarn needle
Instructions:
Belly
Round 1: in mr, ch 1, 6 sc (6 sc)
Round 2: 2 sc in each st (12 sc)
Round 3: [2 sc in first st, 1 sc in next st] repeat around (18 sc)
Round 4: [2 sc in first st, 1 sc in next 2 sts] repeat around (24 sc)
Round 5: [2 sc in first sc, 1 sc in next 3 sts] repeat around (30 sc)
Round 6: [2 sc in first sc, 1 sc in next 4 sts] repeat around (36 sc)
Round 7: 1 sc in each st (36 sc)
Finish off and cut yarn
Shell
Round 1: in mr, ch 1, 6 sc (6 sc)
Round 2: 2 sc in each st (12 sc)
Round 3: [2 sc in first st, 1 sc in next st] repeat around (18 sc)
Round 4: [2 sc in first st, 1 sc in next 2 sts] repeat around (24 sc)
Round 5: [2 sc in first sc, 1 sc in next 3 sts] repeat around (30 sc)
Round 6: [2 sc in first sc, 1 sc in next 4 sts] repeat around (36 sc)
Round 7: 1 sc in each st (36 sc)
Round 8: 1 sc in each st (36 sc)
Do not finish off or cut yarn
Take the belly piece and place it wrong sides together with the shell, matching up the stitches
Round 9: sc in each st working through both layers- the shell and the belly, begin stuffing when you are a little more than halfway around and continue stuffing as you go so that it is fully stuffed by the time you get all the way around, sl st to the first sc to join (36 sc)
Finish off, cut yarn, weave in end
Head
Round 1: in mr, ch 1, 6 sc (6 sc)
Round 2: 2 sc in each st (12 sc)
Round 3: [2 sc in first st, 1 sc in next st] repeat around (18 sc)
Round 4: 1 sc in each st (18 sc)
Round 5: 1 sc in each st (18 sc)
Insert safety eyes between rounds 3 and 4 with about 6 stitches in between
Round 6: [sc2tog, sc in next st] repeat around (12 sc)
Stuff the head
Round 7: sc2tog around (6 sc)
Round 8: sc in each st (6 sc)
Round 9: sc in each st (6 sc)
Finish off and cut yarn, leaving a long tail for sewing
Legs
Make 4 with Color A
Round 1: in mr, ch 1, 6 sc (6 sc)
Round 2: 2 sc in each st (12 sc)
Round 3: [sc2tog, 1 sc in next 2 st] repeat around (9 sc)
Finish off and cut yarn, leaving a long tail for sewing
Add a tiny bit of stuffing to each leg
Tail
Make 1 with Color A
Round 1: in mr, ch 1, 4 sc (4 sc)
Round 2: [2 sc in first st, 1 sc in next] repeat (6 sc)
Round 3: 1 sc in each st (6 sc)
Finish off and cut yarn, leaving a long tail for sewing
Assembly
Stitch the head to the belly, just under one side of the shell. Adding a stitch on each side of the neck helps keep it from being too floppy.
Stitch the legs onto the belly, 2 on each side.
Stitch the tail to the belly just under the shell on the opposite side of the head.
No comments :
Post a Comment