
-Product for this post provided by Fairfield World. This post may contain affiliate links.-
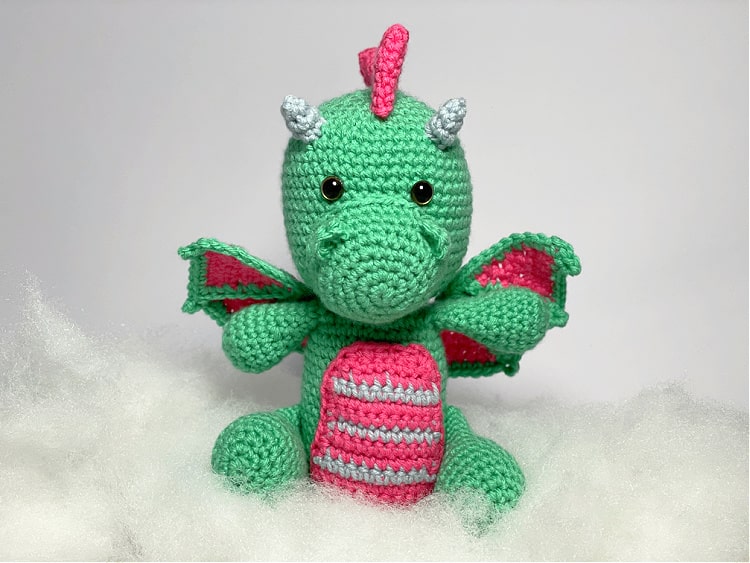
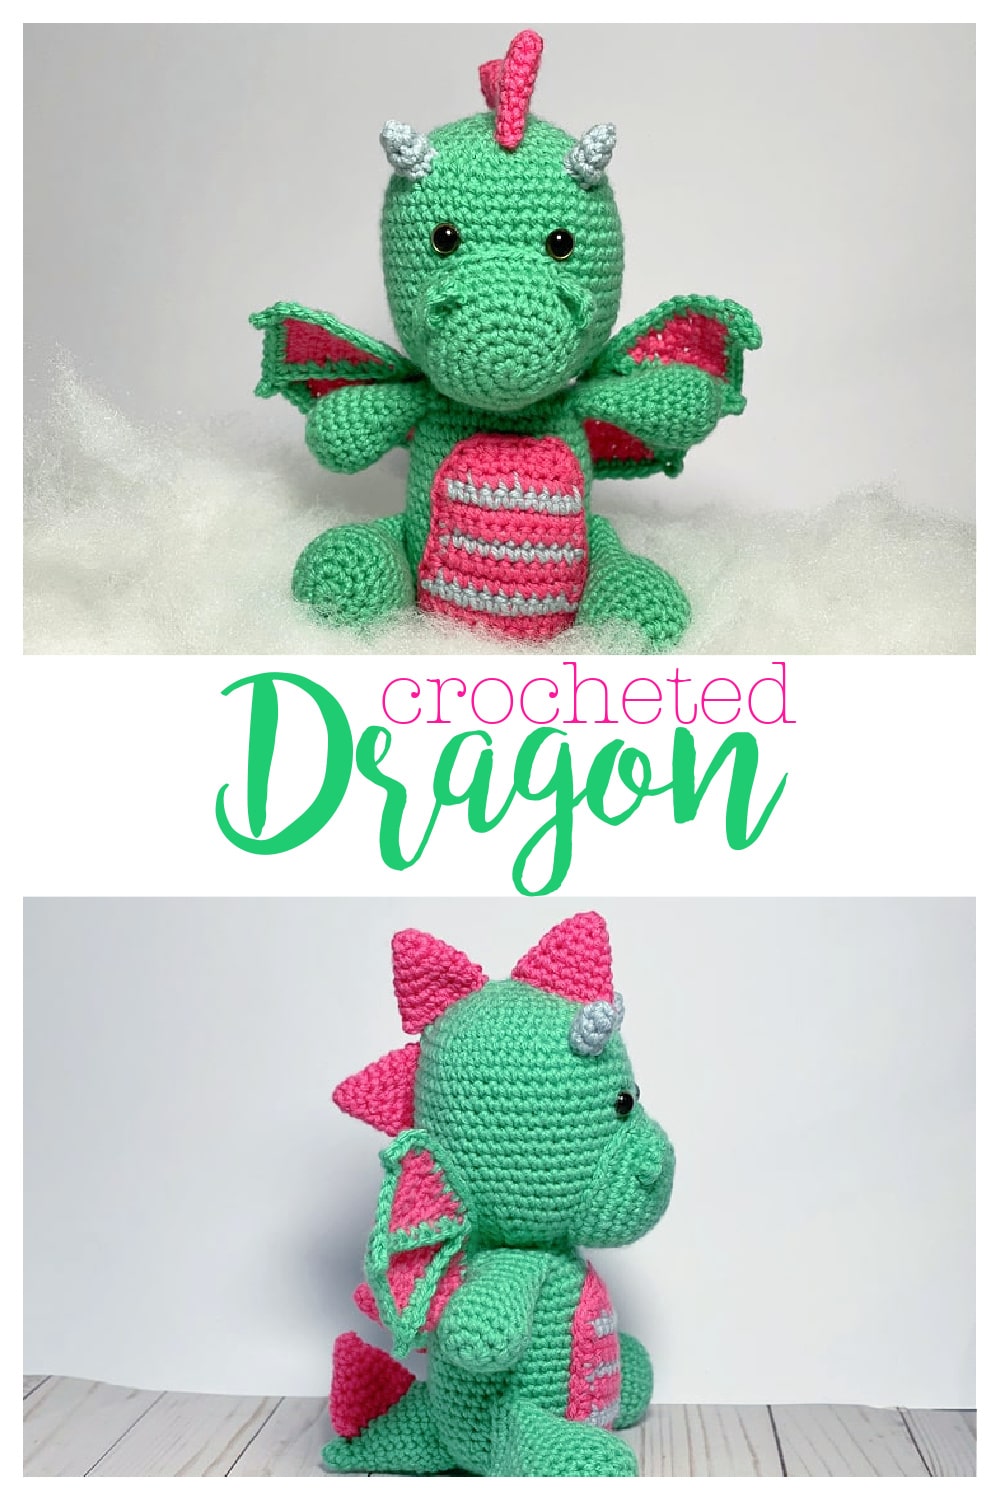
Today I am excited to be joining CAL Central for the Softie Crochet Along with a new crocheted softie pattern, a cute little crocheted dragon.
The 2022 Softie CAL started in April and runs through June 20, so we are getting close to the end now. Each week a different designer with share a free crochet softie pattern. By the end of the CAL you will have 12 new softie patterns to make, as well as the opportunity to share your projects in a Facebook group or on Ravelry, chat with other crocheters, and enter to win some fun giveaway prizes! Head over to Underground Crafter to enter the giveaway by June 26, 2022 to enter.

This is the third out of the last four years I have participated in the Softie CAL, and it is one of my favorite crochet alongs to do. Mostly because stuffed animals/dolls/softies are some of my favorite things to crochet. The very first one I made my Dinosaur Softie, which is one of my favorite stuffed animals that I have ever made. I also made a Robot Softie, and a Flamingo.
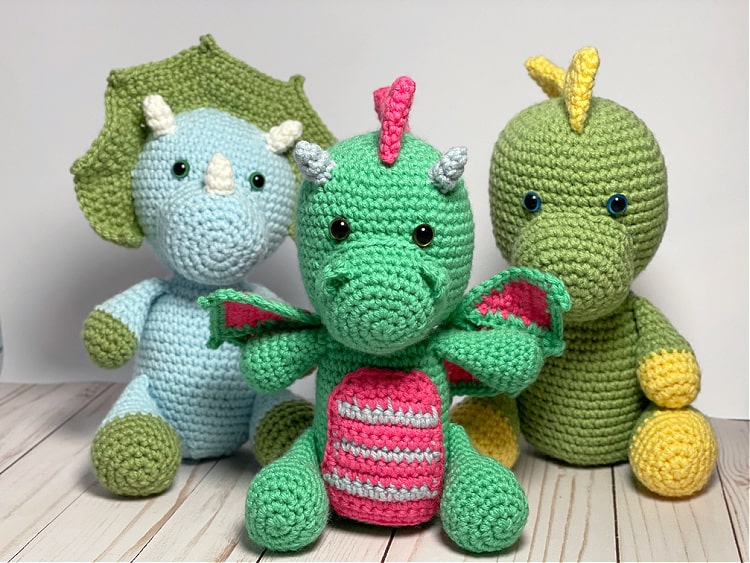
When I made my dinosaur pattern a few years ago I immediately started thinking about the other things I could turn it into. A couple of years later I took that pattern, changed up a few things, and turned it into a Triceratops, which I might love even more than the original. Another thing that I wanted to make using the dinosaur pattern as a base was a dragon, and 4 years later I finally did it!

To make this dragon I used the dinosaur pattern for the body and the spikes, I changed up the coloration a little, not adding the contrasting color to the arms and legs. Then I added some little nostrils, a patch on the belly, horns on the head, and of course wings.

I love the way it turned out and I hope you do too! Be sure to share your finished projects on social media with #CALCentralCrochet, and enter to win the awesome prizes.

How to Crochet a Dragon
Sits about 10" tall including spikes
You will need:
- worsted weight yarn in 3 colors
- color A- green (Loops & Threads Impeccable, Jade)
- color B- pink (Loops & Threads Impeccable, Lippy)
- color C- blue/gray (Loops & Threads Impeccable, Smoke)
- G crochet hook
- 2- 12 mm safety eyes
- Poly-Fil fiberfill
- stitch markers
- yarn needle
Instructions:
Head and Body
Make 1 with Color A, begin with magic ring
Round 1: in mr, ch 1, 6 sc (6 sc)
Round 2: 2 sc in each stitch (12 sc)
Round 3:[2 sc in first stitch, 1 sc in next] 6 times (18 sc)
Round 4: [2 sc in first stitch, 1 sc in next 2] 6 times (24 sc)
Round 5: [2 sc in first stitch, 1 sc in next 3] 6 times (30 sc)
Round 6: [2 sc in first stitch, 1 sc in next 4] 6 times (36 sc)
Round 7: [2 sc in first stitch, 1 sc in next 5] 6 times (42 sc)
Round 8: [2 sc in first stitch, 1 sc in next 6] 6 times (48 sc)
Rounds 9-19: 1 sc in each stitch (48 sc)
Place eyes between rounds 12 and 13, about 6 stitches apart
Begin stuffing the head and continue to stuff as you go
Round 20: [sc2tog, 1 sc in next 6 stitches] 6 times (42 sc)
Round 21: [sc2tog, 1 sc in next 5 stitches] 6 times (36 sc)
Round 22: [sc2tog, 1 sc in next 4 stitches] 6 times (30 sc)
Round 23: [sc2tog, 1 sc in next 3 stitches] 6 times (24 sc)
Round 24: sc2tog all the way around (12 sc)
Round 25: 2 sc in each stitch (24 sc)
Round 26: [2 sc in first stitch, 1 sc in next 3] 6 times (30 sc)
Round 27: [2 sc in first stitch, 1 sc in next 4] 6 times (36 sc)
Rounds 28-42: 1 sc in each stitch (36 sc)
Round 43: [sc2tog, 1 sc in next 4 stitches] 6 times (30 sc)
Round 44: [sc2tog, 1 sc in next 3 stitches] 6 times (24 sc)
Round 45: [sc2tog, 1 sc in next 2 stitches] 6 times (18 sc)
Round 46: [sc2tog, 1 sc in next stitch] 6 times (12 sc)
Round 47: sc2tog around (6 sc)
Finish off, weave in ends
Muzzle
Make 1 with Color A, begin with magic ring
Round 1: in mr, ch 1, 6 sc (6 sc)
Round 2: 2 sc in each stitch (12 sc)
Round 3:[2 sc in first stitch, 1 sc in next] 6 times (18 sc)
Round 4: [2 sc in first stitch, 1 sc in next 2] 6 times (24 sc)
Round 5: [2 sc in first stitch, 1 sc in next 3] 6 times (30 sc)
Round 6: 1 sc in each stitch (30 sc)
Round 7: [2 sc in first stitch, 1 sc in next 4] 6 times (36 sc)
Round 8: 1 sc in each stitch (36 sc)
Nostrils
Make 2 with Color A
ch 3
Row 1: 2 sc in 2nd ch from hook, 2 sc in last ch (4 sc)
Finish off, leave long tail for sewing
Arms
Make 2 with Color A
Round 1: in mr, ch 1, 6 sc (6 sc)
Round 2: 2 sc in each stitch (12 sc)
Round 3:[2 sc in first stitch, 1 sc in next] 6 times (18 sc)
Rounds 4-6: 1 sc in each stitch (18 sc)
Round 7: [sc2tog, 1 sc in next stitch] 6 times (12 sc)
Rounds 8-12: 1 sc in each stitch (12 sc)
Finish off, leave long tail for sewing
Legs
Make 2 with Color A
Round 1: in mr, ch 1, 6 sc (6 sc)
Round 2: 2 sc in each stitch (12 sc)
Round 3:[2 sc in first stitch, 1 sc in next] 6 times (18 sc)
Round 4: [2 sc in first stitch, 1 sc in next 2] 6 times (24 sc)
Rounds 5-8: 1 sc in each stitch (24 sc)
Round 9: [sc2tog, 1 sc in next 2 stitches] 6 times (18 sc)
Rounds 10-15: 1 sc in each stitch (18 sc)
Finish off, leaving long tail for sewing
Tail
Make 1 with Color A
Round 1: in mr, ch 1, 4 sc (4 sc)
Round 2: [2 sc in first stitch, 1 sc in next] twice (6 sc)
Round 3: 1 sc in each stitch (6 sc)
Round 4: [2 sc in first stitch, 1 sc in next 2] twice (8 sc)
Round 5: [2 sc in first stitch, 1 sc in next 3] twice (10 sc)
Round 6: [2 sc in first stitch, 1 sc in next 4] twice (12 sc)
Round 7: [2 sc in first stitch, 1 sc in next 5] twice (14 sc)
Round 8: [2 sc in first stitch, 1 sc in next 6] twice (16 sc)
Round 9: [2 sc in first stitch, 1 sc in next 7] twice (18 sc)
Round 10: [2 sc in first stitch, 1 sc in next 8] twice (20 sc)
Round 11: 1 sc in each stitch (20 sc)
Finish off, leaving long tail for sewing
Belly
Make 1, start with Color B
ch 11
Row 1: sc in 2nd ch from hook and each sc to the end (10 sc)
Row 2: ch 1, turn, sc in each st to the end (10 sc)
change to Color C
Row 3: ch 1, turn, sc in each st to the end (10 sc)
Change to Color B
Row 4: ch 1, turn, sc in each st to the end (10 sc)
Row 5: ch 1, turn, sc in each st to the end (10 sc)
Change to Color A
Row 6: ch 1, turn, sc in each st to the end (10 sc)
Change to Color B
Row 7: ch 1, turn, sc in each st to the end (10 sc)
Row 8: ch 1, turn, sc in each st to the end (10 sc)
Change to Color A
Row 9: ch 1, turn, sc in each st to the end (10 sc)
Change to Color B
Row 10: sc dec in first 2 sts, sc in next 6 sts, sc dec in last 2 (8 sc)
Row 11: sc dec in first 2 sts, sc in next 4 sts, sc dec in last 2 (6 sc)
ch 1, sc evenly all the way around the outside of the belly piece
Finish off, leave long tail for sewing
Spikes
Make 6 with Color B
Round 1: in mr, ch 1, 4 sc (4 sc)
Round 2: [2 sc in first stitch, 1 sc in next] twice (6 sc)
Round 3: [2 sc in first stitch, 1 sc in next 2] twice (8 sc )
Round 4: [2 sc in first stitch, 1 sc in next 3] twice (10 sc)
Round 5: [2 sc in first stitch, 1 sc in next 4] twice (12 sc)
Round 6: [2 sc in first stitch, 1 sc in next 5] twice (14 sc)
Round 7: [2 sc in first stitch, 1 sc in next 6] twice (16 sc)
Finish off, leave long tail for sewing
Horns
Make 2 with Color C
Round 2: [2 sc in first stitch, 1 sc in next] twice (6 sc)
Round 3: 1 sc in each stitch (6 sc)
Finish off, cut yarn leaving long tail for sewing
Wings
Make 2, Begin with Color B
Triangles (make 3 per wing)
ch 7
Row 1: sc in 2nd ch from hook and each ch to end (6 sc)
Row 2: ch 1, turn, sc in each st (6 sc)
Row 3: ch 1, turn, sc dec in first 2 sts, sc in next 2 sts, sc dec in last 2 sts (4 sc)
Row 4: ch 1, turn, sc in each st (4 sc)
Row 5: ch 1, turn, sc dec twice (2 sc)
Row 6: ch 1, turn, sc in each st (2 sc)
Row 7: ch 1, turn, sc dec (1 sc)
Finish off and cut yarn, weave in ends
Edging/Wing Assembly
with color A
Place 2 triangle wrong sides together (there isn't really a right and wrong side to each triangle, but the sides facing out will become the right side)
sc the two triangles together along 1 long edge working from the bottom (short edge) to the top (point), then place the other triangle wrong side together with one of the 2 triangles you just stitched together and sc down the long edge joining the 3 triangles together (at this point you should have a half hexagon type shape), cut yarn
Still using Color A- begin at the bottom right corner and sc evenly all the way around, working up the side of the triangle to the center, and back down the side of the third triangle, at the corner sc in the corner, picot (ch 3, sl st in first ch) and continue across the bottom of that triangle, when you reach the sc join of Color A, work another picot, repeat across the bottom working another picot at the next join and in the last corner
Finish off and cut yarn leaving long tail for sewing, make sure other tails are woven in

Assembly
Stitch the muzzle on the front of the dragon just under the eyes, stuffing as you go. You want it to be well stuffed as it will be on the face.
Stitch the nostril pieces onto the muzzle slightly cupped to make the nostrils.
Stitch the nostril pieces onto the muzzle slightly cupped to make the nostrils.
Stitch the belly patch to the front of the body with the bottom edge lined up along the bottom of the body.
Stitch the arms to the side of the body near the top.
Stitch the legs to the side of the body in a sitting position.
Stitch the tail to the bottom back of the dragon.
Flatten the spikes so that they are a flat triangle shape and stitch on the back, one on the tail, one on the body back, and 4 on the head.
Stitch the horns to the top of the head, one on each side.
Stitch the wings to the back with the right side facing out.
i have just seen your sitting dragon pattern with wing membrane and spites worked in same colour the dragon look fab. i also looked at your patterns in post you speak lighting problems in workroom, had same problem bought a work place light bulb it looks like ceiling fan the blade shape light parts can be lifted up it cost less than £15.00 (UK) from Amazon it may worth looking into the shadow problem gone with the light
ReplyDelete