
-This post may contain affiliate links-

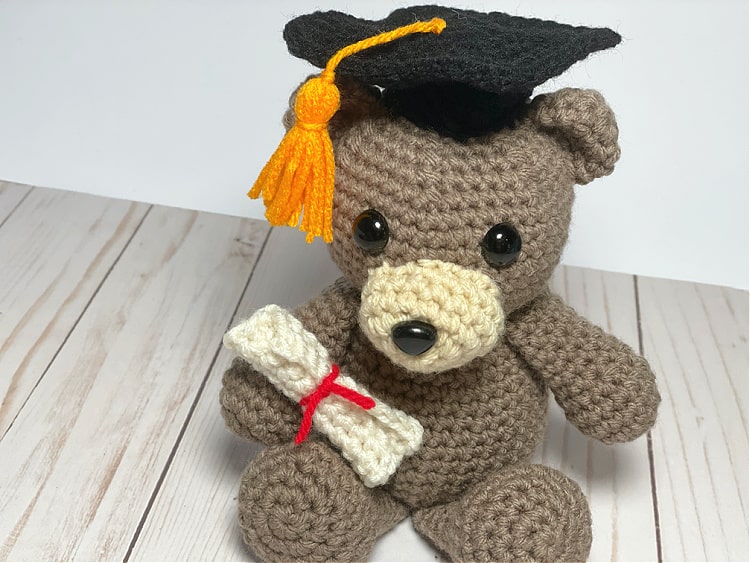
It is graduation season, whether it is high school or college, or even just kindergarten or preschool, I think all of us know someone who is celebrating a graduation in the next few weeks (or already did). I thought it would be fun to make a little graduation teddy bear.

I got the idea to make this bear a little too late to get it made and published as early as I would have liked since I know some of this year's graduations have already happened. But, I figured it was still worth putting out for those with upcoming graduations this year, or in the future.

Last year I made a pumpkin bear in the fall, and at the time I thought it would be fun to make a series of seasonal/holiday bears throughout the year to go along with different times of the year. I made a Santa bear at Christmas time, but then I didn't get any others made. Sometimes I have more ideas in my head than I have time to actually make.

Then as I was starting to see social media posts about upcoming graduations, getting invitations, etc. I had the idea for this bear. I made this one mostly the same size as the other two, although this bear is a little skinnier. The others, being a pumpkin and Santa, I wanted to have very round bellies, but this one I was going for a little more normal teddy bear look. Other than the size of the body the other parts are the same.

I added a little graduation hat and diploma to the teddy bear to turn him from plain teddy bear to graduate. You could change up the colors of the tassel and the ribbon on the diploma to match the colors of the graduate you are making it for.
How to Crochet a Graduation Bear
Finished Size 7" tall
You will need:
- worsted weight yarn in brown, tan, black, white/cream, and the colors you want for the tassel and ribbon, Sample made with:
- Big Twist Value, Taupe
- Red Heart Super Saver, Buff
- Red Heart Super Saver, Aran
- Red Heart Super Saver, Black
- Scraps for the tassel and ribbon
- G crochet hook
- Safety nose, 15 mm
- Safety eyes, I used 16 mm but I felt like they were a little too big and wish I would have gone slightly smaller
- Polyfil fiberfill
- Poly Pellets, weighted stuffing beads
- nylon knee-high, or scrap of fabric
- yarn needle
- scissors
Instructions:
Weighted Base
First make your Poly Pellet insert by either taking a nylon and filling the toe with Poly Pellets, then tie a knot and cut off the excess (this is my favorite way) or cut a circle out of a scrap of fabric, stitch a running stitch around the outside, pull to cinch, fill, and stitch closed. (How to Make a Weighted Base)The body and head are made in one piece, from the bottom up, the other pieces are made separately and sewn on at the end. All parts except the hat base and diploma are made starting with the magic ring.
Body and Head
Begin with magic ring, using brown yarn
Round 1: in mr, ch 1, 6 sc (6 sc)
Round 2: 2 sc in each st (12 sc)
Round 3: [2 sc in first st, 1 sc in next st] repeat around (18 sc)
Round 4: [2 sc in first st, 1 sc in next 2 sts] repeat around (24 sc)
Round 5: [2 sc in first st, 1 sc in next 3 sts] repeat around (30 sc)
Round 6: [2 sc in first st, 1 sc in next 4 sts] repeat around (36 sc)
Round 7: 1 sc in each st (36 sc)
Round 8: 1 sc in each st (36 sc)
Round 10: 1 sc in each st (36 sc)
Round 11: 1 sc in each st (36 sc)
Round 12: 1 sc in each st (36 sc)
Round 13: 1 sc in each st (36 sc)
Round 14: 1 sc in each st (36 sc)
Round 15: 1 sc in each st (36 sc)
Round 16: 1 sc in each st (36 sc)
Insert the weighted base into the bottom of the body
Round 17: [sc2tog, 1 sc in next 4 sts] repeat around (30 sc)
Round 17: [sc2tog, 1 sc in next 4 sts] repeat around (30 sc)
Round 18: 1 sc in each st (30 sc)
Round 19: 1 sc in each st (30 sc)
Round 20: [sc2tog, 1 sc in next 3 sts] repeat around (24 sc)
Round 21: [sc2tog, 1 sc in next 2 sts] repeat around (18 sc)
This is the end of the body portion, begin stuffing and continue to stuff as you work
Round 22: 2 sc in each st (36 sc)
Round 23: [2 sc in first st, 1 sc in next 5 st] repeat around (42 sc)
Round 24: 1 sc in each st (42 sc)
Round 25: 1 sc in each st (42 sc)
Round 26: 1 sc in each st (42 sc)
Round 27: 1 sc in each st (42 sc)
Round 28: 1 sc in each st (42 sc)
Round 29: 1 sc in each st (42 sc)
Round 30: 1 sc in each st (42 sc)
Round 31: [sc2tog, 1 sc in next 5 sts] repeat around (36 sc)
Insert Safety Eyes between rows 28 and 29, about 5 or 6 stitches apart
Round 32: [sc2tog, 1 sc in next 4 sts] repeat around (30 sc)
Round 33: [sc2tog, 1 sc in next 3 sts] repeat around (24 sc)
Round 34: [sc2tog, 1 sc in next 2 sts] repeat around (18 sc)
Round 35: [sc2tog, 1 sc in next st] repeat around (12 sc)
Round 36: sc2tog around (6 sc)
Finish off, weave around opening to close, weave in end
Arms (make 2)
Begin with magic ring, using brown yarn
Round 1: in mr, ch 1, 6 sc (6 sc)
Round 2: 2 sc in each st (12 sc)
Round 3: [2 sc in first st, 1 sc in next st] repeat around (18 sc)
Round 4: 1 sc in each st (18 sc)
Round 5: 1 sc in each st (18 sc)
Round 6: [sc2tog, 1 sc in next st] repeat around (12 sc)Round 7: 1 sc in each st (12 sc)
Round 8: 1 sc in each st (12 sc)
Round 9: 1 sc in each st (12 sc)
Round 10: 1 sc in each st (12 sc)
Round 11: 1 sc in each st (12 sc)
Round 12: 1 sc in each st (12 sc)
Finish off and cut yarn leaving a long tail for sewing
Legs (make 2)
Begin with magic ring, using brown yarn
Round 1: in mr, ch 1, 6 sc (6 sc)
Round 2: 2 sc in each st (12 sc)
Round 3: [2 sc in first st, 1 sc in next st] repeat around (18 sc)
Round 4: [2 sc in first st, 1 sc in next 2 sts] repeat around (24 sc)
Round 5: 1 sc in each st (24 sc)
Round 6: 1 sc in each st (24 sc)
Round 7: [sc2tog, 1 sc in next 2 sts] repeat around (18 sc)
Round 8: 1 sc in each st (18 sc)
Round 9: 1 sc in each st (18 sc)
Round 10: 1 sc in each st (18 sc)
Round 11: 1 sc in each st (18 sc)
Round 12: 1 sc in each st (18 sc)
Round 13: 1 sc in each st (18 sc)
Finish off and cut yarn leaving a long tail for sewing
Ears (make 2)
Begin with magic ring, using brown yarn
Round 1: in mr, ch 1, 6 sc (6 sc)
Round 2: 2 sc in each st (12 sc)
Round 3: [2 sc in first st, 1 sc in next 3] repeat around (15 sc)
Round 4: 1 sc in each st (15 sc)
Finish off and cut yarn leaving long tail for sewing
Muzzle
Begin with magic ring, using tan yarn
Round 1: in mr, ch 1, 6 sc (6 sc)
Round 2: [3 sc in first st, 1 sc in next 2 sts] repeat (10 sc)
Round 3: [2 sc in each of the next 3 sts, 1 sc in next 2 sts] repeat (16 sc)
Round 4: 1 sc in first 2 sts, 2 sc in each of next 2 sts, 1 sc in next 6 sts, 2 sc in each of next 2 sts, 1 sc in next 4 sts (20 sc)
Round 5: 1 sc in each st (20 sc)
Finish off and cut yarn leaving long tail for sewing, add safety nose just above the center of the muzzle
Round 4: 1 sc in first 2 sts, 2 sc in each of next 2 sts, 1 sc in next 6 sts, 2 sc in each of next 2 sts, 1 sc in next 4 sts (20 sc)
Round 5: 1 sc in each st (20 sc)
Finish off and cut yarn leaving long tail for sewing, add safety nose just above the center of the muzzle
Graduation Hat
Base
with black yarn
ch 20, join with sl st to make a circle
Round 1: ch 1, sc in each st around, join with sl st to first sc (20 sc)
Round 2: ch 1, sc in 9 st, hdc in next st, (dc, ch 1, dc) in next st, hdc in next, sc in next 8 st, sl st to first sc to join (17 sc, 2 hdc, 2 dc)
Finish off and cut yarn leaving long tail for sewing
Top
Begin with magic ring, using black yarn
Round 1: in mr, ch 1, 8 sc, sl st to first sc to join (8 sc)
Round 2: ch 1, [3 sc in first st, 1 sc in next st] repeat around, sl st to first sc to join (16 sc)
Round 1: in mr, ch 1, 8 sc, sl st to first sc to join (8 sc)
Round 2: ch 1, [3 sc in first st, 1 sc in next st] repeat around, sl st to first sc to join (16 sc)
Round 3: ch 1, 1 sc in first st, 3 sc in next st, [1 sc in next 3 sts, 3 sc in next st] 3 times, 1 sc in last 2 sts, sl st to first sc to join (24 sc)
Round 4: ch 1, 1 sc in first 2 sts, 3 sc in next st, [1 sc in next 5 sts, 3 sc in next st] 3 times, 1 sc in last 3 sts, sl st to first sc to join (32 sc)
Round 5: ch 1, 1 sc in first 3 sts, 3 sc in next st, [1 sc in next 7 sts, 3 sc in next st] 3 times, 1 sc in last 4 sts, sl st to first sc to join (40 sc)
Round 6: ch 1, 1 sc in first 4 sts, 3 sc in next st, [1 sc in next 9 sts, 3 sc in next st] 3 times, 1 sc in last 5 sts, sl st to first sc to join (48 sc)
Finish off and cut yarn leaving long tail for sewing
Tassel
Wrap yarn 4-5 times around a book or piece of cardboard 5 or more inches wide.
Slide off and tie a piece of yarn around the middle leaving a long end to attach the tassel to the hat.
Fold in half (with the tied piece at the center) and tie a piece of yarn a little below the top, and trim the tassel to the length you want. Mine is about 2" tall
Diploma
with white or cream yarn
ch 11
Row 1: 1 sc in second ch from hook and each ch to the end (10 sc)
Row 2-10: ch 1, turn, sc in each st to the end (10 sc)
Finish off and cut yarn leaving long tail for sewing, weave in beginning tail
Bear Assembly
Sew the muzzle onto the front of the head below the eyes, lightly stuffing it as you sew it on.
Sew the ears to the top side of the head, curving them to fit along the head.
Lightly stuff the ends of the arms and sew to the side of the body as close as possible to the indent between body and head.
Stuff the ends of the legs and sew to the bottom of the body in a sitting position
Stitch hat together by stitching the base to the underside of the top in the center, the pointed section of the base is in the front.
Stitch the hat to the center of the top of the hat, hanging down at the length that you want.
Stitch the hat to the top of the head, between the ears, add a little stuffing under the hat as you stitch.
Roll up the diploma and tie a scrap of yarn around it, trim as desired.
Stitch the diploma to the hand, and if you want you can stitch the bottom part of the diploma to belly to hold it in place better if you want.

No comments :
Post a Comment