
-This post may contain affiliate links. As an Amazon affiliate, I earn from qualifying purchases. I receive a small commission at no cost to you when you make a purchase using my link.-

Today is the day! The first day of the last Mini Amigurumi Crochet Along of the year. The theme of this final crochet along of the year is Woodland Christmas. When I thought of this theme I mostly pictured little forest animals dressed in hats and scarves and other winter clothes, along with some other nature and Christmas elements. So to start off the crochet along we have a little Lop-Eared Bunny wearing a tiny beanie with a pom-pom on top.
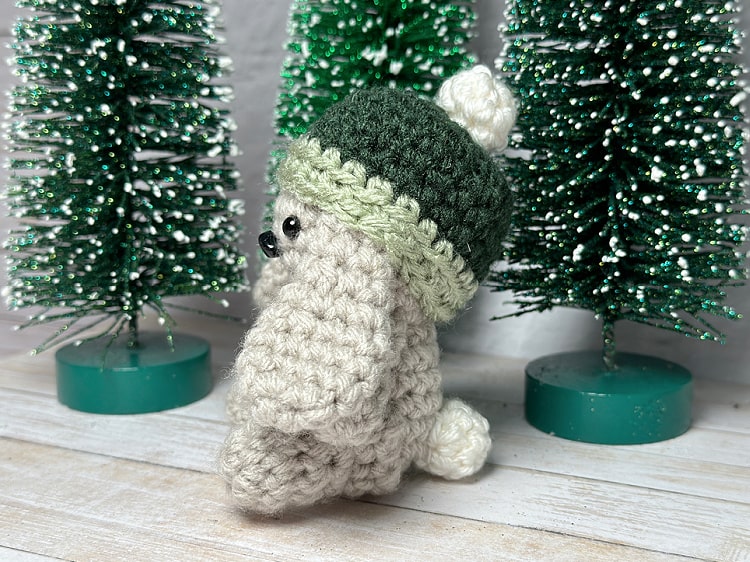
I have made a bunny for one of my Mini Amigurumi Crochet Alongs before, there was a little bunny in the Spring Farm Animal Crochet Along, but this one is a little different. Obviously a major difference is the fact that this one is wearing a hat. But I also chose to make this one with big floppy ears hanging down, instead of having long ears that stick straight up.

I have a daughter who loves bunnies and lop eared bunnies with their floppy ears are her favorite, so I guess this one was kind of inspired by her and her love of lop eared bunnies. Plus I just thought it would be cute to have the little bunnies ears hanging down from its hat.

If you have done any of my previous crochet alongs you will know that I kind of have a standard body that I use for a lot of my animals and this little bunny is no different. The head and body are made in one piece from the bottom up. Then the arms, legs, and ears are made separately and sewn on. There is also a little puffball tail sewn on the back (I forgot to include that in the picture of all the pieces, but it is made exactly like the pompom for the hat so just picture 2 of those). Then to finish it off there is a little hat, I made mine all one color except for the last couple of rows to give kind of a contrast trim, with a little pompom on top.

Going forward you will notice that a lot of the pieces are little animals with hats and scarves. You could make these with any colors you want, obviously with the animals there are going to be a few colors that make sense (though the bunny is one that could be a few different colors) but the accessories could be any colors you want. You could make them all different or stick to a specific palette. I wanted to add to the Christmasy Vibe so I chose a palette of 5 colors that I thought would feel like Christmas- 2 shades of green, 2 shades of red/pink, and a golden yellow. I will mix and match them throughout the crochet along so you will see these colors pop up almost every day. I still chose colors from my stash so they are a couple different brands but to give you an idea here are the colors I chose:
Dark Green- Red Heart Super Saver in Hunter Green
Light Green- Red Heart Super Saver in Frosty Green
Red- Loops & Threads Impeccable in Claret
Pink- Loops & Threads Impeccable in Soft Rose
Gold- Red Heart Super Saver in Gold

*Ebook with all 12 patterns included available for purchase on Etsy and Ravelry
How to Crochet a Little Lop Ear
Finished Size about 4" tall sitting
You will need:
- Worsted weight yarn in desired colors, bunny, hat, hat contrast, pompom (Sample made with Loops & Threads Impeccable in Putty, Red Heart Super Saver in Hunter Green and Frosty Green, and Lion Brand Basic Stitch in White)
- G crochet hook (4/4.25 mm)
- 2- 6mm safety eyes
- 8 or 9 mm safety nose
- stuffing
- yarn needle
- stitch markers
- scissors
Instructions:
All of the pieces are made in the round beginning with a magic ring, the head and body made in one piece, the arms, legs, tail, and ears made separately and sewn on. Safety eyes and nose attached where directed, if you choose two embroider the eyes and nose (better for small children) just embroider in the same spot. The hat and pompom are also made separately and sewn on at the end.
Body/Head
Make 1 with yarn in desired color (sample made with Loops & Threads Impeccable in Putty), beginning with magic ring
Round 1: in mr, ch 1, 6 sc (6 sc)
Round 2: 2 sc in each st (12 sc)
Round 3: [2 sc in first st, 1 sc in next st] repeat around (18 sc)
Rounds 4-8: 1 sc in each st (18 sc)
Begin stuffing and continue stuffing as you work
Round 9: sc2tog around (9 sc)
Round 10: 2 sc in each st (18 sc)
Round 11: [2 sc in first st, 1 sc in next 2 sts] repeat around (24 sc)
Round 12-15: 1 sc in each st (24 sc)
Round 16: [sc2tog, sc in next 2 sts] repeat around (18 sc)
Insert safety eyes between rounds 13 and 14 about 3 stitches apart, insert safety nose just below eyes (or stitch a nose)
Round 17: [sc2tog, sc in next st] repeat around (12 sc)
Round 18: sc2tog around (6 sc)
Finish off, weave in ends
Ears
Make 2 with same color yarn as body, beginning with a magic ring
Round 1: in mr, ch 1, 6 sc (6 sc)
Round 2: 2 sc in each st (12 sc)
Round 3: 1 sc in each st (12 sc)
Round 4: 1 sc in each st (12 sc)
Round 5: [sc2tog, sc in next 2 sts] repeat around (9 sc)
Round 6: 1 sc in each st (9 sc)
Round 7: [sc2tog, sc in next st] repeat around (6 sc)
Round 8: 1 sc in each st (6 sc)
Round 9: 1 sc in each st (6 sc)
Finish off and cut yarn, leaving long tail for sewing
Flatten the ears and sew ears to the sides of the head hanging down
Arms
Make 2 with same color yarn as body, beginning with a magic ring
Round 1: in mr, ch 1, 6 sc (6 sc)
Round 2: [2 sc in first st, 1 sc in next st] repeat around (9 sc)
Round 3: [sc2tog, sc in next st] repeat around (6 sc)
Rounds 4-5: 1 sc in each st (6 sc)
Finish off and cut yarn leaving a long tail for sewing
Sew the 2 arms to the side of the body between the body and head
Legs
Make 2 with same color yarn as body, beginning with a magic ring
Round 1: in mr, ch 1, 6 sc (6 sc)
Round 2: 2 sc in each st (12 sc)
Round 3: 1 sc in each st (12 sc)
Add a tiny bit of stuffing to the bottom of the legs at this point if desired
Round 4: sc2tog around (6 sc)
Rounds 5-6: 1 sc in each st (6 sc)
Finish off and cut yarn leaving a long tail for sewing
Sew the 2 legs to the bottom side of the body in a sitting position
Tail
Make 1 with white yarn or same color yarn as body, beginning with a magic ring
Round 1: in mr, ch 1, 6 sc (6 sc)
Round 2: [2 sc in first st, 1 sc in next st] repeat around (9 sc)
Round 3: [sc2tog, sc in next st] repeat around (6 sc)
Finish off and cut yarn leaving a long tail for sewing
Sew the tail to back of body
Hat
Make 1 with yarn in desired color (sample made with main color Red Heart Super Saver in Hunter Green, contrasting color Red Hear Super Saver in Frosty Green), beginning with magic ring, start with main color
Round 1: in mr, ch 1, 6 sc (6 sc)
Round 2: 2 sc in each st (12 sc)
Round 3: [2 sc in first st, 1 sc in next st] repeat around (18 sc)
Round 4: [2 sc in first st, 1 sc in next 2 sts] repeat around (24 sc)
Rounds 5-7: 1 sc in each st (24 sc)
Change to contrasting color
Round 8: 1 sc in each st (24 sc)
Round 9: 1 sc in blo of each st (24 sc)
Finish off and cut yarn leaving a long tail for sewing
Pompom
Make 1 with white yarn, beginning with a magic ring
Round 1: in mr, ch 1, 6 sc (6 sc)
Round 2: [2 sc in first st, 1 sc in next st] repeat around (9 sc)
Round 3: [sc2tog, sc in next st] repeat around (6 sc)
Finish off and cut yarn leaving a long tail for sewing
Sew the pompom to the top of the hat, then pull the hat over the head, covering the top sewn edge of the ears, sew the hat in place

So cute. Just started. Great pattern. Thank you. I'll purchase pdf when released to make it again.
ReplyDeleteAm very excited about this. Thank you so much!! I have 15 grandchildren who would love these.
ReplyDeleteSo adorable! Love it ❤️💚!
ReplyDeleteJust started, working on ears!!
ReplyDeleteThis bunny is so adorable!! I can't wait to start on one tonight!!
ReplyDelete