
-This post may contain affiliate links, fabric used in this project provided by Missouri Star Quilt Co.-
I have always enjoyed making quilts even though I don't make them that often, but when I do baby quilts are my favorite to make. I think it is the smaller size that makes them less intimidating to me. Plus they are small enough that I can quilt them on my sewing machine, much bigger and they get hard to maneuver.

This year we had a couple new baby cousins coming, one is already born and another coming next month, so I figured it was the perfect time to make a couple of baby quilts. So a couple months ago I ordered a couple of fat quarter bundles from Missouri Star Quilt Co. that I thought would be cute for baby boy quilts, as well as some super soft cuddle dimple for the back.

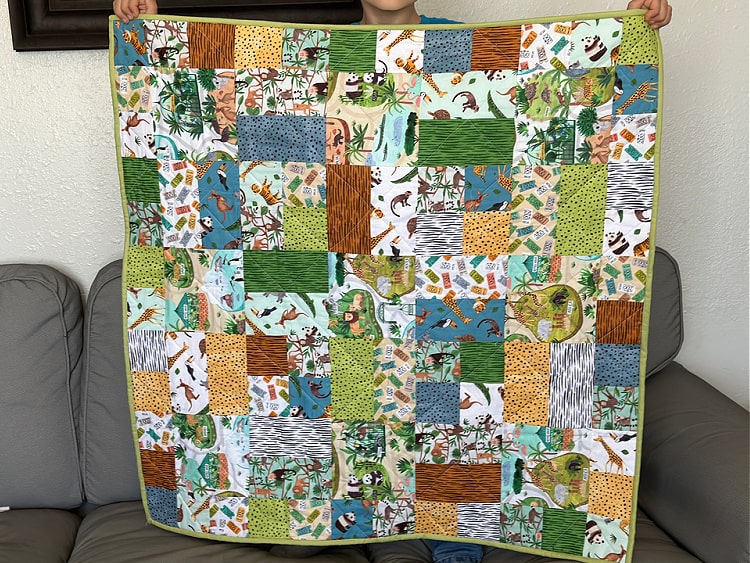
For this quilt I used the fabric from the line "Ticket to the Zoo" by Rebecca Jones for Clothworks. I really like the colors and thought the zoo prints were really fun for a baby boy.

The largest print in the line was a zoo map print and it came in two colors so I knew I wanted those fabrics to be in larger squares so you could see a bigger section of the fabric. I came up with a design that used a combination of large squares, small squares, and rectangles. I also finished it off with a border of small squares. The whole quilt (minus the backing and binding) was made with one 15 fat quarter bundle, with some left over for another project.

Get 15% off you purchase from Missouri Star Quilt Company this month to celebrate their birthday (through 9/30/2023)
How to Make a Zoo Trip Baby Quilt
Finished Size: 36" square
You will need:
- 15 fat quarters (Ticket to the Zoo bundle)
- 1/3 yard fabric for binding (Kona Cotton- Green Tea)
- 1 1/4 yards Cuddle fabric for backing (Cuddle Embossed Dimple- Dusty Blue)
- crib quilt size batting
- rotary cutter, mat, ruler
- sewing machine
- coordinating thread
- optional: basting adhesive spray
Instructions:
Cut the following:
8- 6.5" squares (4 each out of the large print zoo map fat quarters if using the same bundle)
24- 3.5" x 6.5" rectangles (out of a variety of other prints, about 2 of each print)
60- 3.5" squares (out of a variety of prints) - 16 for blocks, 44 for border
Lay out the blocks following the diagram below (colors don't matter, just the shapes and directions of the shapes)-

Row 1: large square, 2 horizontal rectangles, 1 large square, 2 horizontal rectangles, 1 large square
Row 2: 2 vertical rectangles, 4 small squares, 2 vertical rectangles, 4 small squares, 2 vertical rectangles
Row 3: large square, 2 horizontal rectangles, 1 large square, 2 horizontal rectangles, 1 large square
Row 4: 2 vertical rectangles, 4 small squares, 2 vertical rectangles, 4 small squares, 2 vertical rectangles
Row 5: large square, 2 horizontal rectangles, 1 large square, 2 horizontal rectangles, 1 large square
10 small squares across top
10 small squares across bottom
12 small squares on each side

Sew rectangles together to make squares
Sew small squares together to make squares
Sew rows together according to layout
Sew the border squares together (10 for top and bottom, 12 for sides)
Sew the top and bottom borders to the quilt
Sew the side borders to the quilt
Layer the backing, batting, and pieced top, use adhesive spray to baste, or use desired basting method
Quilt the top as desired. I quilted diagonal grid lines across the whole quilt.
Trim the extra backing and batting to be even with the quilt top
Cut 4- 2.5" strips x length of fabric for binding
Sew the binding strips together, fold in half and press well
Sew raw edge of folded binding around the edge of front of quilt, fold over to back, stitch in place

No comments :
Post a Comment